Optical User Calibration
The following steps for an optical user calibration were performed on Channel A of an N1093B DCA-M. But, the steps are the same for calibrating any DCA-M or N1000A plug-in module that has an optical input channel.
If the module requires a Module or Vertical calibration, FlexDCA automatically starts the calibration before performing the optical user calibration. A module or vertical calibration is recommended whenever any of the following conditions are true:
- A DCA-X or DCA-M power has been cycled.
- A DCA-X module has been removed and then reinserted since the last calibration.
- The temperature change of a DCA-X or DCA-M exceeds 5°C compared to the temperature of the last module calibration ( ΔT > 5°C).
- Time since the last calibration has exceeded 10 hours.
To perform an optical user calibration:
- Install the module so that it shows in FlexDCA.
- On FlexDCA's menu, click Setup > Modules and select the module. In this case, an N1093B.
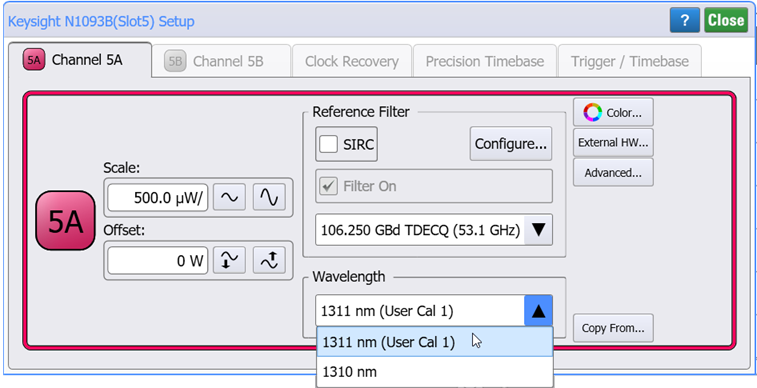
- In the Setup dialog, select the tab that represents the channel that you want to calibrate. For example, Channel 5A.
- Locate the Wavelength field in the dialog. This drop-down list is where your user calibration will appear once you have completed this procedure.
- Configure an external continuous wave (unmodulated) optical source to the wavelength and power that is compatible with the module as shown in the following table. For the N1093B, a 1311 nm wavelength at 1 mW was configured.
- Disconnect all signals from the module's input channels.
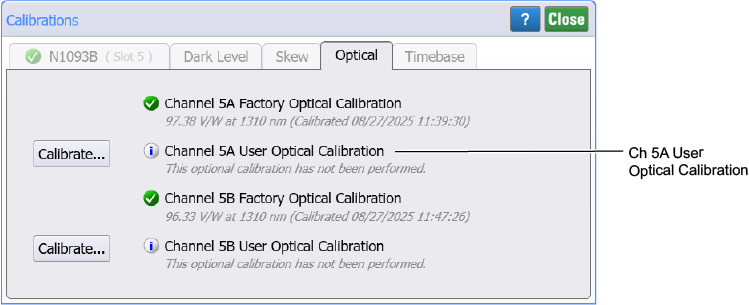
- On FlexDCA's menu, click Tools > Calibrations to open the Calibrations dialog.
- Select the dialog's Optical tab.
- Locate the User Optical Calibration listing in the dialog. For example, Channel 5A User Optical Calibration.
- In the dialog, click the Calibrate button that is next to your calibration.
- If FlexDCA determines that the module requires a Module Calibration, click Next to start the calibration. During the Module Calibration, no signals can be connected to the input channel.
- If needed, after the Module Calibration completes a channel Vertical Calibration automatically starts.
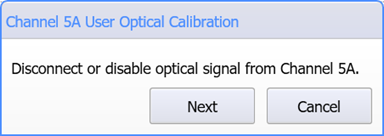
- When the following dialog appears, disconnect the optical signal from the input channel and click Next. A dark calibration is performed.
- The following dialog starts the actual user optical calibration. For example, Channel 5A User Optical Calibration.
- Reconnect the optical signal to the input channel. In the dialog, make the following selections:
- In the Selected Calibration field, select a user calibration. For example, User Cal 1, User Cal 2, or User Cal 3. If the user cal is marked as Unused, you will create a new calibration. If the selected user cal has already been performed, a new calibration can be performed to overwrite the existing user cal.
- In the Wavelength field, enter the wavelength of your optical source.
- In the Average Power field, enter the average power of your optical source.
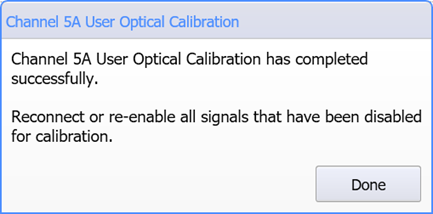
- Click Next to complete the user wavelength calibration. When the following dialog appears, click Done.
- Confirm that the user calibration can be selected in the Channel dialog:
- On FlexDCA's menu, click Setup > Modules and select the module that you just calibrated.
- In the Setup dialog, select the tab that represents the channel that you just calibrated.
- Confirm that your calibration is listed in the Wavelength field.

Do not connect the source waveform to the module at this time.
| Module | Option | User Calibration Wavelength Range | Factory Calibrated Wavelength(s) |
Source Optical Power Level | |
|---|---|---|---|---|---|
| Allowable | To Meet Specifications | ||||
| N1093A/B | — | 830 nm to 1600 nm | 1310 nm | 250 μW to 2.5 mW |
500 μW to 1 mW |
| N1092A/B/C/D/E | 30A | 830 nm to 1600 nm | 850 nm 1310 nm 1550 nm |
500 μW to 2.5 mW 500 μW to 2.5 mW 500 μW to 2.5 mW |
500 μW to 1 mW 500 μW to 1 mW 500 μW to 1 mW |
| N1092A/B/C/D/E | 40A | 1250 nm to 1600 nm | 1310 nm 1550 nm |
500 μW to 2.5 mW 500 μW to 2.5 mW |
500 μW to 1 mW 500 μW to 1 mW |
| N1092A | N28 | 830 nm to 1600 nm | 850 nm 1310 nm 1550 nm |
500 μW to 2.5 mW 500 μW to 2.5 mW 500 μW to 2.5 mW |
500 μW to 1 mW 500 μW to 1 mW 500 μW to 1 mW |
| N1090A | — | 750 nm to 1650 nm | 850 nm 1310 nm 1550 nm |
375 μW to 425 μW 175 μW to 225 μW 175 μW to 225 μW |
375 μW to 425 μW 175 μW to 225 μW 175 μW to 225 μW |
| N1032A/B | — | 1250 nm to 1625 nm | 1310 nm 1550 nm |
175 μW to 225 μW 175 μW to 225 μW |
175 μW to 225 μW 175 μW to 225 μW |
| N1030A/B | — | 1250 nm to 1600 nm | 1310 nm 1550 nm |
175 μW to 225 μW 175 μW to 225 μW |
175 μW to 225 μW 175 μW to 225 μW |
FlexDCA will prompt you to connect your calibration signal before the optical user calibration is started.

To enter the wavelength either use the up and down arrows or click on the field and enter the wavelength value.
Avoid expensive damage to the module's input channel. The power of the optical calibration signal must not exceed the Max Optical value indicated next to the module's front-panel input channel.
Confirm that the power of the optical calibration signal meets the requirements listed in the table provided in this topic.