|
|
BenchVue AC Source Application Help |
Welcome
This help system contains information on the PathWave BenchVue AC Source Application. This application provides easy access to instrument control, data collection, and data analysis for the AC power sources on your workbench.
The specific features and functionality available in this application will vary depending on the instrument and model number. Some of the parameters and functionality described here might not be available for a particular instrument. The application will show only those parameters and parameter ranges available for your specific instrument.
Software Licensing
Keysight's flexible licensing options allow you to select the license type and license terms that best fit your software needs. To use the AC Source application, you will be required to purchase a software license. For more information on purchasing and installing a software license, see Software Licensing Options.
AC Source Application Features
The AC Source application requires either of the following licenses:
- BV0026B – PathWave BenchVue AC Source Control Software
- BV0028B – PathWave BenchVue AC Source Avionics Standard Test Software
- BV0030B – PathWave BenchVue AC Source Pre-Compliance Test Software
BV0028B and BV0030B are required for full access to AC Source application features, including the Avionics Standard tests and Immunity tests respectively. Without the above mentioned licenses, you will only be able to try out the Avionics and Immunity features in Demo Mode.
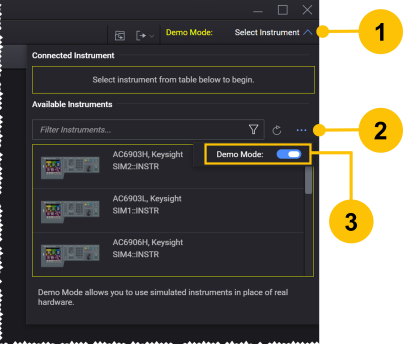
Demo Mode
You can use the AC Source application without a software license in the Demo Mode, which enables you to preview the application's features without being connected to an actual instrument. Some functionality shown in the Demo Mode may not be available on your particular instruments.
To enable the Demo Mode, perform the following steps.
- Click the Select Instrument drop-down.
- Click the
 button under Available Instruments.
 - Click the Demo Mode switch.
Graphical Overview of AC Source Application
To introduce you to the user interface elements of the AC Source application, we have created a graphical overview below. Although the specific configuration properties vary by the instrument model number, the primary elements of the application will be the same.
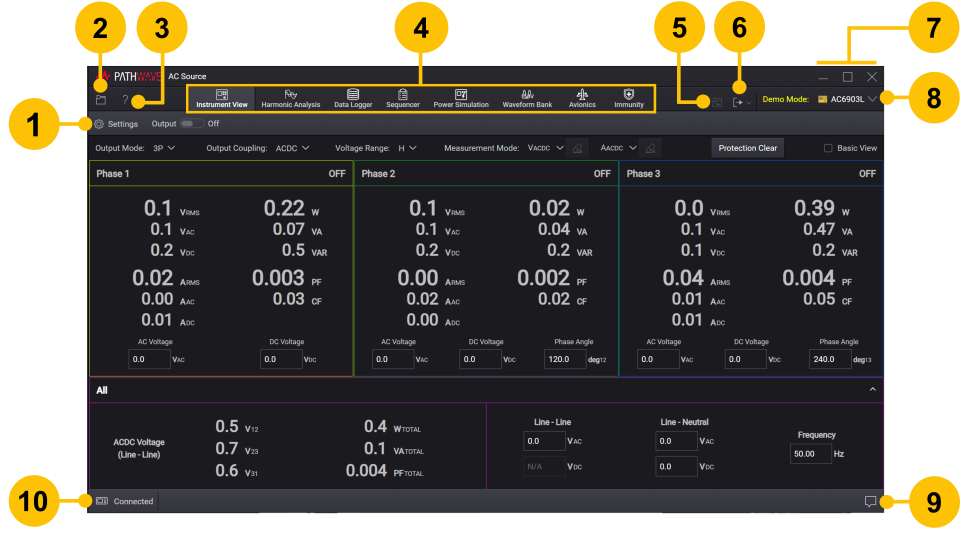
| 1 | Configure advanced settings for instruments and data logging.
|
|
| 2 | From the following functionality view, save a file, or import and open a previously-stored file.
|
|
| 3 | Open the Information and Technical Support Menu to view the Help system and technical support information. | |
| 4 | Available features on this AC Source application.
|
|
| 5 | While not connected to an instrument, load a previously-stored Data Log file from your computer. See Load Offline Data Log. | |
| 6 | From the following functionality view, export a file.
|
|
| 7 | Minimize, maximize, or close AC Source application window. | |
| 8 | Show the instrument model currently connected to AC Source application. From the Select Instrument drop-down, you can also enable or disable Demo Mode with simulated instruments and measurement data. For more information on connecting instruments, see Connect to Instruments. | |
| 9 | View information, warnings, and errors messages for the application. See Notifications. | |
| 10 | Pause instrument IO communication between AC Source application and instrument. See Pause Instrument Connection. |
See Also
Supported Instruments and Interfaces
System and Installation Requirements
Troubleshoot Instrument Connections
Help Version 2024.2 | 12 August 2024