Battery Emulation Process Overview
Description
Process flowchart
If you have a battery available
If you do not have a battery available
This topic describes the basic process of setting up and using the PathWave Advanced Battery Test and Emulation application. Click Getting Started for a description of how to quickly get started using the Battery Test and Emulation application.
Description
The Battery Test and Emulation application has three primary functions: battery charge/discharge, battery profiling, and battery emulation. The emulation operation is bi-directional, which lets you emulate a battery when in normal use. In a normal use case a battery is discharged and charged repeatedly - as when a cell phone is either discharging the battery or charging it when connected to the charger. The discharge or charge operation is determined by the direction of the current flow of the device that is connected to the battery.
The application also lets you run different operations for each channel. This is because the application maintains an independent set of configurations for each channel on each instrument. For example, you can run an emulation operation in channel 1 and a discharge profiling operation in channel 3. The application also provides flexible start and stop control for single and multiple channels. There is also a Status panel to quickly view the running progress of each test. The Status panel also provides a quick start/stop control for each channel.
You can control the start/stop of each channel easily from the Status panel. The Status panel not only provide better visualization, it also provides a quick way of start/stop control for each channel. This design provides convenience when running battery tests.
Process flowchart
As shown in the following flowchart, there are two ways that you can use the Battery Test and Emulation application to emulate a battery.
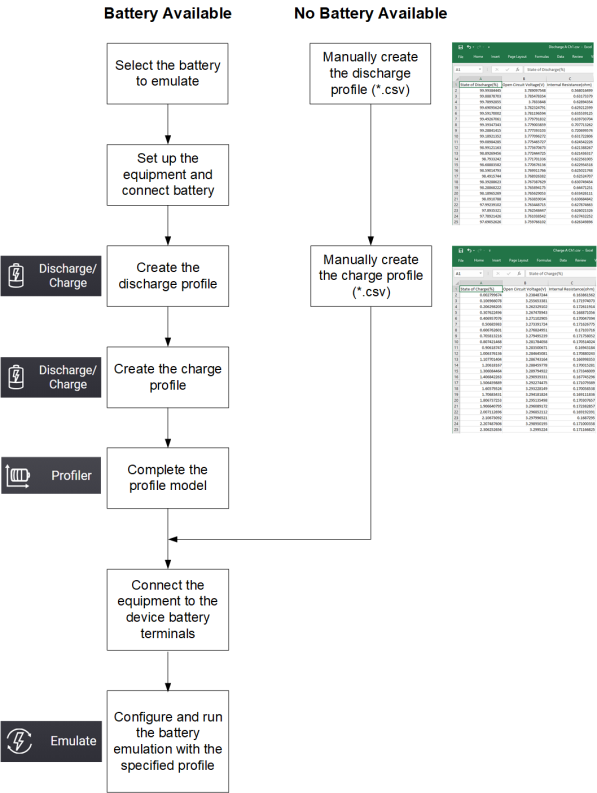
If you have a battery available from which you can create an Emulation profile
The easiest way to use the Battery Test and Emulation application is if you have an actual battery that you want to emulate. You can use the Battery Test and Emulation application to create a profile that accurately represents the actual battery. Both discharging and charging profiles can be created. The battery that you want to emulate must be new or fully charged.
As shown in the flowchart, you must connect the battery to the source/measurement equipment that you are using. Refer to Step 1 for a figure describing the instrument connections.
The first step in emulating the battery is to create the discharge profile. This is important because the battery must first be fully discharged before you can create the charging profile. Follow the directions under “Discharge Settings” to set up the Battery Test and Emulation application to discharge the battery. Note that the completed discharge information is stored inside the Battery Test and Emulation application and is automatically loaded into the Profiler function.
Once the battery has been discharged, you can create a charge profile. The equipment connections are the same as for the discharge profile. Follow the directions under “Charge Settings” to set up the Battery Test and Emulation application to charge the battery. Note that during the charging profile the application also calculates the internal resistance of the battery by briefly shorting the battery terminals throughout the charging cycle and taking a current measurement. The completed charge information is stored inside the application and is automatically loaded into the Profiler function.
The next step is to complete the profile model. Follow the direction under “Discharge Profile Settings” and “Charge Profile Settings”. This includes information such as Capacity Rating, Current Pulse Width, Ri Pulse Width, and additional cut-off condition settings. When complete, save the completed charge/discharge profile under a file name for future use.
As shown in the flowchart, you must connect the source/measurement equipment to the device in which you are emulating the battery. Remove the battery and connect the source/measurement equipment to the same terminal to which the battery was connected. You do not need to use remote sensing when you are emulating a battery.
Follow the direction under Emulation Settings. Then start the battery emulation using the completed and saved profile.
If you do not have a battery available from which you can create an Emulation profile
You can also create a battery emulation profile, by manually entering the battery charge and discharge information into an Microsoft Excel file and then save the file with *.csv file extension. The CSV file must have a minimum of 100 data rows.
The following column heading information is required for each of the 100 data rows or steps. The heading row is row 1. The remaining 100 data rows of three columns follow row 1. The charge battery model is illustrated.
| 1 | State of Charge (%) | Open Circuit Voltage (V) | Internal Resistance (ohms) |
| 2 | 0.002799671 | 3.238487244 | 0.163861562 |
| 3 | 1.00591243 | 3.325080872 | 0.168751235 |
| 100 | 89.50665811 | 3.421974182 | 0.177837212 |
| 101 | 99.50079915 | 4.170227051 | 0.105745764 |