To
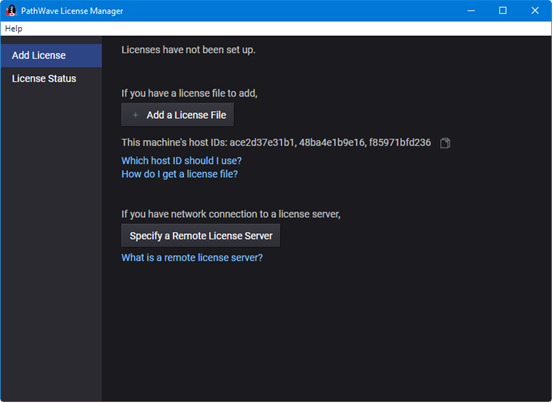
add a license to the PC, click on the Add a License File button,
choose the license file to add, then click on the Add Now button.

Start the PLTS software by doing either of the following:
Double-click the Launch Physical Layer Test System icon on the PC desktop
Select Start, Programs, Keysight Technologies, Physical Layer Test System, PLTS
Every time you start PLTS, the Keysight PLTS Connection Manager Server verifies that essential components of the PLTS installation are working.
Do NOT close the Connection Manager window. If necessary, click the Minimize button to hide Connection Manager.
If Connection manager contains unchecked items, please see the Troubleshooting chapter of the PLTS Installation Manual.
Note: Beginning with PLTS release 3.12, a floating license can now be installed on Solaris and HP-UX servers. For a complete description of the licensing process, refer to Chapter 3 of the PLTS Installation Manual. |
From July 1, 2020, PLTS2020 update 1 release (PLTS2020U1), we implemented Keysight Advanced License (KAL). For PLTS orders after July 1, 2020, PLTS uses the KAL license.
For the KAL license, users need to use Keysight PathWave License Manager to add and manage the licenses.
PLTS software will automatically install "Keysight PathWave License Manager" to your PC.
Before the first start of the PLTS software, we recommend you add KAL license in "Keysight PathWave License Manager."
NOTE: PathWave License Manager has been renamed to Keysight Software Manager Utility (KSM-U). KSM-U is the preferred method for installing and managing licenses for PLTS software. Learn more and download KSM-U at keysight.com/find/KSMU.
To
add a license to the PC, click on the Add a License File button,
choose the license file to add, then click on the Add Now button.
If you didn’t add the license before the first start of PLTS, when PLTS starts and can’t find a qualified license, PLTS will display a dialog with instructions. Follow the steps in the dialog to add the licenses or run in free viewer mode without a license:

Note: Make a back-up copy of the license file if you have not already done so.
It would be very time-consuming for PLTS to look for hardware at every GPIB interface and address each time PLTS is started. This is especially true considering that most people use the same hardware every time. The following is the process that PLTS uses to establish and communicate with your PLTS hardware:
When PLTS is started, it looks for the same system at the same addresses that were used that last time PLTS was run.
If that system IS found, the Calibration and Measurement Wizard is launched.
If that system is NOT found, or when PLTS is first run, then PLTS Rescans.
PLTS Rescan looks for instruments using the Keysight IO Library's list of instruments / addresses.
If only ONE system is found, it is assumed that this is the hardware you want to use, and the Calibration and Measurement Wizard is launched.
If more than one system is found, the Build Logical Measurement System dialog is launched.
If NO system is found, the Manual Configuration dialog is launched.
If you click Cancel, then the Select (Virtual) Measurement System dialog is launched.
Note: Problems finding instruments when using Keysight IO Libraries Version Suite 14. If there were instruments on the bus and then removed or turned off, they stay in the Keysight IO Libraries list of instruments. When PLTS rescans for instruments, they are not found and timeout messages are displayed for the missing instruments. It is necessary to manually delete the instruments from the configuration in the Keysight IO Library Connection Expert.
|
If PLTS finds more than one system on the GPIB, it displays the Build Logical Measurement System dialog box. This dialog box allows you to identify your PLTS system hardware for the PLTS software. To identify your system:
In the Instruments Found list, click the model number of your VNA or TDR instrument. Then click Primary Inst >> which moves the model number to the text box at the right of the button.
If using a VNA test set, in the Instruments Found list, click the model number of your test set. Then click Secondary Inst >> which moves the model number to the text box at the right of that button.
Click Create System which moves the combination of the devices to the Logical Measurement System box.
Click OK to save the system so the software identifies the PLTS system.

If your system does not identify hardware automatically, you can manually configure your system by selecting the Manual Configuration button to display the Hardware Configuration dialog box. This procedure was necessary with older PLTS test sets.
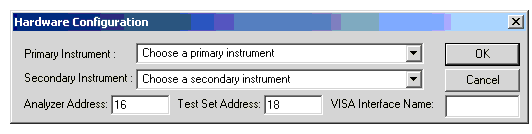
Select the primary instrument (typically at VNA or a TDR) from the Primary Instrument list. If necessary, select a secondary instrument (typically at test set) from the Secondary Instrument list.
Enter the address for the primary instrument in the Analyzer Address text box and the secondary instrument in the Test Set Address text box. Also, enter the VISA Interface Name.
If PLTS does NOT recognize a PLTS system, it notifies you: “No instruments were detected. PLTS will operate in analysis-only mode.” Select the virtual instrument that best matches your PLTS system or if known, the system that was used to measure data that you will be loading for analysis.

Note: The selection highlighted above is a PNA-L with a 12-port test set.
For more information about making measurements see either:
Click Tools, then Acquisition Hardware, then either Choose Data Acquisition Device or Scan (or Re-scan) for New Hardware.