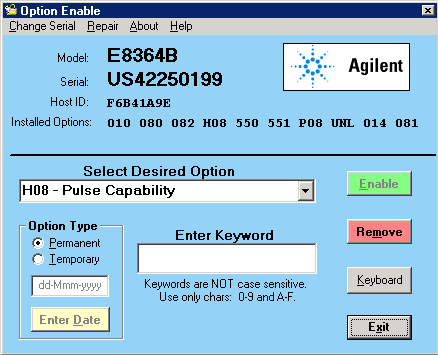
The Option Enable utility allows you to perform the following activities on your analyzer.
Enable or remove software options and some hardware options.
Recover option data if the hard drive or other data-containing assembly is replaced.
Input or change a serial number.
The following items are discussed in this topic:
Tip: Use Move App to Back to cause the PNA application to move behind this application on the screen.
To add certain options, you need a keyword that is provided by Keysight. There are two types of keywords:
Option Keywords add a software option.
Model Keywords may be required if you replace multiple assemblies.
Keywords are linked to the PNA Host ID, which is displayed on the Option Enable dialog box (below).
Temporary and Permanent Options
Any software option can also be installed on a temporary basis for a specified amount of time. This allows you to evaluate a specific feature or capability at no cost.
If the license key provided by Keysight has an expiration date, you must select the "temporary" option and enter the expiration date exactly as stated in the license statement. If you decide to make this option permanent, Keysight will provide a new keyword that converts the option to permanent status.
For either permanent or temporary software options, a provided keyword must be entered.
On the PNA, press System, then Service, then Option Enable.

To enable or remove an option, select it from the drop-down list of available options. If the desired option is not listed, select the last choice in the list, labeled Enter Unlisted Option.
Enter the 3-character option name and click Enter
If a software option was chosen, the following occurs.
The Remove button will be enabled.
The keyword entry area becomes visible.
The permanent/temporary selection is enabled.
If a hardware option is selected, the following occurs.
With the hardware option already installed, the Remove button is enabled.
With the hardware option not installed, the Enable button is enabled.
To remove an option, click Remove.
After the option is removed, restart the network analyzer application for the changes to take effect.
Note: Removal of a licensed option (such as Option 010, Time Domain) will permanently remove the license keyword. If this option may be needed in the future, then record the license keyword before removing the option. Do this by copying the file “gen.lic” to another location (such as a floppy disk), or print it using notepad. The file, located at "c:\users\public\network analyzer\” contains all the information needed to recreate the license.
If the keyword entry area is visible, enter a keyword. (The keyword is not case sensitive.)
Click Enable.
After the option is installed, restart the network analyzer application for the changes to take effect.
Note: If a desired option is not visible, it may be because a prerequisite option has not yet been installed. For example, Option 083 will not be visible if Option 080 is not already present. See Configurations and options.
Repairing and Recovering Option Data
Use this part of the Option Enable Utility in the following situations:
If the hard drive is replaced
If the frequency reference assembly is replaced
This routine rebuilds the option information contained on the hard drive and frequency reference assembly (primary and backup).
Select Repair from the Option Enable menu bar.
Note: If you are unsure if this routine needs to be done, run it; no harm will result.
The model and serial number are displayed, along with four check boxes.
Select the boxes that apply.
Click Begin Repair. The routine checks all data files and performs any needed repairs. You may be asked to verify certain information and processes.
If the routine finds that the model number is incorrect or invalid, you will be asked to select the correct model number.
Along with this model number, a model keyword will be required. If this is not labeled on the analyzer, or is not otherwise known, contact Keysight
When done, click Exit Repair.
If you do not need to install any other options, click Exit.
Installing or Changing the Serial Number
It may be necessary to install or change a serial number if certain assemblies are replaced.
To change the serial number, select Change Serial from the Option Enable menu bar. The current serial number will be displayed. If no serial number has previously been entered, the word "NONE" will be displayed.
Type the new serial number into the space provided, and click Change Serial. (The serial number is not case sensitive.)
Note: Use extreme care when entering the serial number; only one entry chance is allowed!
To change an incorrect serial number, a clear-code password is required. Contact Keysight to obtain this clear code and have the existing serial number available. Enter the clear code in the space provided, along with the new serial number, then click Change Serial.