There are three ways to access the Pattern Library:
Click the Pattern Library tab at the bottom of the main form.
Click View on the main window menu bar and select the Pattern Library menu item from the menu.
Click View on the main window menu bar and select the Both Libraries menu item.
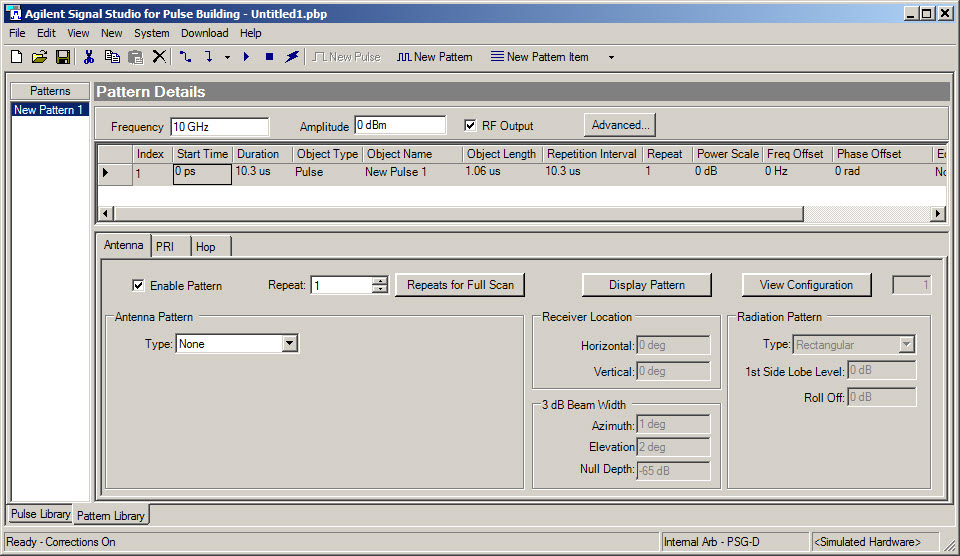
The Pattern Details section of the Pattern Library form, shown above, has inputs for signal generator frequency, amplitude, and RF output; an Advanced button; a table with column names labeled as parameters with corresponding cells, and panels for antenna scan and PRI pattern properties. The table cells are used to enter parameters associated with the items of a pattern, including the parameters located on the Antenna and PRI panels. These item parameters include: repetition rate, number of repeats, frequency offset, antenna scan patterns, PRI patterns and wobbulation, and so forth. The Pattern Library section has detailed descriptions on each of the column parameters. The Advanced button allows you to configure pattern-specific parameters including markers and triggers, as well as hardware-specific parameters.
A new pattern can be created using three different methods:
Select the New Pattern button  from the toolbar.
Select the New menu, then select the Pattern menu item.
Place the mouse pointer in the Patterns section of the form, click the right mouse button and select New.
A new pattern is given a default name and automatically saved in the Pattern Library. The figure above uses the default pattern name New Pattern 1. You can change the default name:
Place the mouse pointer on the pattern name you want to change.
Click the right mouse button.
Select Rename and enter a name for the pattern.
Once a new pattern is created, items can be inserted into the pattern. A pattern can be exported to, and imported from a CSV pattern file. The Pattern Library form with a default pattern name, New Pattern 1, and a single pulse item is shown in the figure above.