A CalPod module can be used as 1-port ECal module to calibrate channels for all measurement classes. In addition, the CalPod module can be left in place during measurements in order to refresh calibrations.
In this topic:
Characterizing the CalPod module
To use a CalPod module as a calibration device:
The CalPod module must be configured using the CalPod software. Learn how.
Unlike an ECal module, a CalPod module has no internal memory and therefore, no internal characterization data. Before a CalPod can be used as an ECal module, its internal standards must first be characterized using the ECal User Characterization wizard. In addition, the characterization data can ONLY be stored in VNA disk memory.
After these steps have been performed, connect the CalPod modules to the controller to perform a VNA calibration. The CalPod modules will appear in Cal Wizard dialogs just like an ECal module.
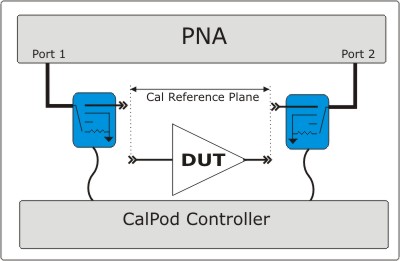
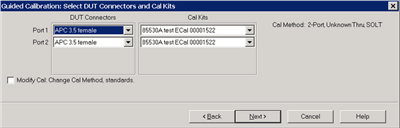
This image shows TWO CalPod modules after both have been characterized. An additional thru connection is required to complete a 2-port calibration. Subsequent ‘refresh’ calibrations can occur without making additional connections.
When performing a User Characterization for a CalPod module, you can establish the Calibration reference plane at the input connector, or at the output connector, depending on how you plan to use CalPod.
Initially calibrate the VNA.
After the calibration, the internal CalPod OPEN, SHORT, and LOAD standards are measured.
The measurements are saved to VNA disk memory. They are used when performing calibrations using the CalPod module.
Detailed steps to Perform a User CharacterizationNote: If you have more than one CalPod module, each module must be characterized separately.
|
|
Using Hardkey/SoftTab/Softkey |
|
|
|
|
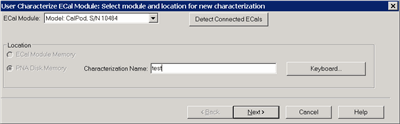
ECal Module Select a CalPod from list of connected modules and registered CalPods. Detect Connected ECals Click to rescan CalPod/ECal modules. Location
Keyboard Launches a keypad that can be used to type a characterization name from the VNA front panel. Next Click to continue to the Select Connectors for the Characterization dialog box. |
|
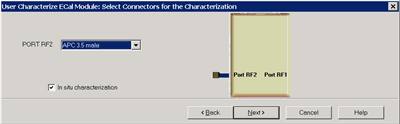
In situ characterizationWhen Checked:
When Cleared:
Next Click to continue to the Calibrations to perform or recall dialog box. |
|
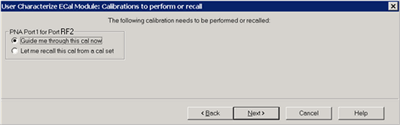
Perform or load a 1-port cal. Guide me through this cal now Click to perform a Guided calibration. A calibration kit is required for each connector type. Note: Some PNA-L models cannot perform TRL calibration during the calibration portion of a User Characterization. However, this type of Cal can be performed using the Cal Wizard, saved to a Cal Set, then recalled at this point in the User Characterization. Let me recall this cal from a cal set Click to select an existing Cal Set. You cannot select a Cal Set that is currently in use. Learn more about Using Cal Sets. Next Click to continue to either the Select Cal Kits (Perform Cal) or Select Cal Set (Recall Calset).
|
|
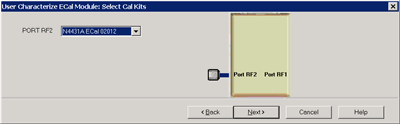
When 'In situ' is selected, a cal kit is selected for port "RF2", as this will be the calibration reference plane (where standards are connected). Provides a list of calibration kits to perform the calibration. Select the Cal Kit you will use for the port. Next Click to continue to the Select Cal Set dialog box. |
|
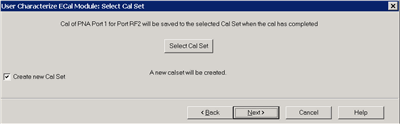
The calibration that you perform will be written to a Cal Set. This dialog box allows you to select a Cal Set to overwrite, or to write to a new Cal Set. The current choice is visible below the Select Cal Set button. Select Cal Set Click to open the Select A Cal Set dialog box. Create new Cal Set Check to create a new Cal Set to store the calibration. Clear to select and overwrite a stored Cal Set. Next Click to continue to the Guided Calibration Steps dialog box. Note: Remember the Cal Set name for future reference. |
|
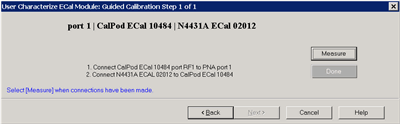
The first Measure page. Connect each calibration standard to the location in the prompt. Measure Click to measure the standard. Back Click to repeat one or more calibration steps. Done Click after a standard is re-measured and all measurements for the calibration are complete. Next Click to continue to the next calibration step. (Does not measure the standard.) Cancel Exits Calibration Wizard. |
|
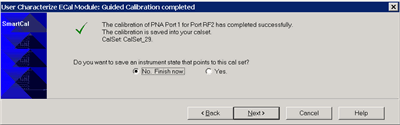
Allows you to finish the calibration and continue to the next characterization steps. No. Finish now Select to save Cal Set data. Yes Allows selection of Save options. Next Click to continue to the Exit to Inspect Quality of Calibration dialog box. |
|
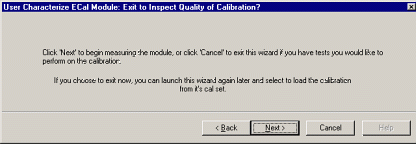
Allows you to exit User Characterization to validate the calibration before proceeding with the characterization. Back Allows you to repeat calibration. Next Click to continue to the Characterization Steps dialog box. Cancel Exits the Calibration. To return to the current step:
|
|
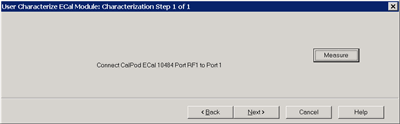
After the initial VNA calibration, the CalPod internal states are measured. Connect the CalPod if not already connected. Measure Measures the CalPod module. Next Click to continue to the Information for the New Characterization dialog box when measurements are complete. |
|
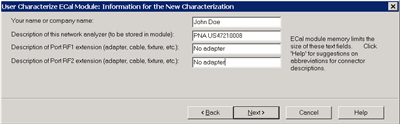
Enter descriptive information that will be stored in the characterization file. This description will be viewable in the several VNA dialogs when the CalPod is selected. Next Click to continue to the Write Characterized Data dialog box. |
|
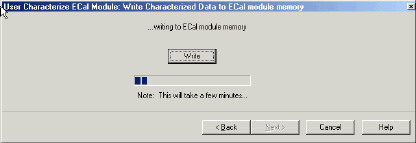
The VNA writes User Characterization data to the VNA disk memory. Write Click to write data. |
|
Summary page of characterization wizard after characterization is complete. Cancel Click to exit (characterization complete). Finish Click to exit (characterization complete). |
The CalPod module is now characterized and ready to be used in a VNA calibration.
When CalPod modules are selected for ALL ports of an N-port cal, Unknown Thru is the only selectable Thru method for all paths. Learn more about Unknown Thru.
The above image is the Connectors and Cal Kits page as seen during a SmartCal on a standard channel. A similar version of this page is shown in the Calibration Wizard for all Application channels (FCA, GCA, NFA and so forth).