How to start a GCA Calibration
Using Hardkey/SoftTab/Softkey
Using a mouse with VNA Menus
-
Press CAL > Main > Smart Cal....
-
Click Response > Start Cal > Cal Wizard.
The GCA Calibration Wizard guides you through a calibration of GCA . The procedure is the same regardless of the Gain Compression Settings.
A Source Power Calibration is performed first.
Then, your choice of a Full 2-port Cal or an Enhanced Response Cal.
Calibration Programming commands
How to start a GCA Calibration |
|
|
Using Hardkey/SoftTab/Softkey |
Using a mouse with VNA Menus |
|
|
The GCA Calibration Wizard first performs a Source Power Cal. The GCA Source Power Cal is a little different from a standard Source Power Cal. Although GCA measurements are performed at many power levels, the GCA source power cal is performed at a single power level over the specified frequency span of your GCA measurement. The required source correction from that single power level is applied to ALL power levels. This method ensures that the 'absolute' power level being applied to the DUT is within the VNA source power linearity specification.
Although it is important for GCA to be able to set the absolute power level to the DUT, it is MOST important to be able to exactly measure the actual incident power. Therefore, during the GCA Source Power Cal, a receiver calibration is applied to the port 1 reference receiver, and indirectly to both test port receivers during the S-parameter calibration, correcting for impedance mismatch between the power meter and the VNA source, and the DUT and the VNA source.
Although the cal process is also at a single power level, the dynamic accuracy of the VNA receivers is typically about +/- .05 dB, which is comparable to the accuracy of Keysight's best power sensors. This allows GCA to very accurately measure and report ALL power levels that are actually applied to the DUT.
By default, a full 2-port calibration is performed as part of a GCA calibration. However, you can change to an Enhanced Response Cal. The following issues may help you decide between these two Cal types:
Accuracy A full 2-port correction is more accurate than ER when GCA measures linear gain. However, for non-linear measurements, ER yields identical compression values as a full 2-port cal, so this may not be a significant factor.
Measurement speed An ER correction only requires measurements in the forward direction. The reverse parameters (usually S22 and S12) are not measured unless requested. With a full 2-port cal applied, all four S-parameters are measured, which requires an additional reverse sweep. Learn more.
Ease A full 2-port cal is easiest with an ECal module. An ER Cal requires a Defined Thru or a Flush Thru Cal method. If these are possible, then an ER cal is easiest when using a mechanical Cal Kit.
High power The test port damage level of a standard VNA is +30 dBm. Therefore, external attenuation may be required on the output of high power amplifiers, which degrades calibration accuracy for reverse (full 2-port) measurements. In addition, the external attenuation improves the DUT output / load match error, which allows a better uncorrected response and makes an Enhanced Response Cal the better choice.
DUT limitations With an ER Cal applied, reverse measurements on the DUT are not performed unless requested.
How to select Enhanced Response Cal
At the Select DUT Connectors page of the GCA Cal Wizard:
Check Modify Cal, then click Next.
A Defined Thru or a Flush Thru Cal method must be selected.
Click Cal Type/Stds
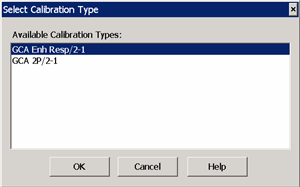
Under Calibration type, select EnhResp (2 <= 1 refers to the receive port 2 and source port 1).
Downgrade a Full 2-port Cal to Enhanced Response Cal if you prefer to perform a Full 2-port cal, but not perform reverse sweeps on the DUT.
To change the correction on the channel from Full 2-port to Enhanced Response:
Press CAL > Main > Correction Methods.
Select GCA EnhResp, then OK


|
Select DUT Connectors and Cal Kits - GCA Cal dialog box help |
|
This is a standard Cal Wizard page except for the following: Power Sensor Specify the connector type and gender of the power sensor. When the power sensor connector is not the same type and gender as the DUT Port 1 connector, then an adapter is required to connect the power sensor to the port 1 reference plane during the Source Power Cal. An extra 1-port cal is performed to measure and correct for the adapter. No characterization S2P files are required.
Modify Cal Check, then click Next, to Modify Cal (Standards AND Thru Method). Source Cal Settings Click to launch the Source Cal Settings dialog. |

|
Power Level at which to perform the Source Power Cal. It is usually best to perform the Source Power Cal at 0 dBm because the power sensor is calibrated at that level. However, if the Gain Compression measurement is performed entirely below or above 0 dBm, then perform the Source Power Cal at the Stop power which probably has the lowest level of measurement noise. |
The remaining Gain Compression Cal dialogs are the same as the standard SmartCal dialogs.
Return to Gain Compression Application.
Last Modified:
|
6-Feb-2012 |
Slight edit to first paragraph |
|
17-Oct-2011 |
Clarified adapter selection |
|
27-Sep-2010 |
Updated for GCX |
|
26-Nov-2007 |
MX New topic |