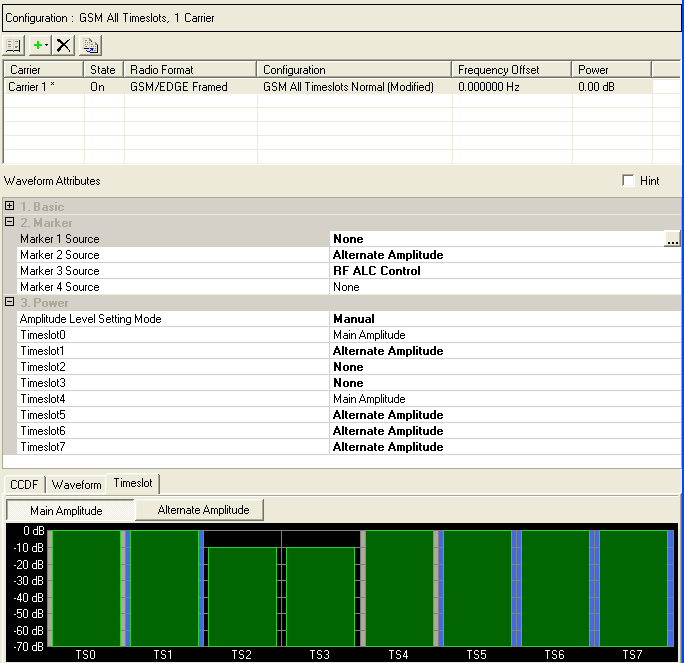
The Timeslot's Main Amplitude, Alternate Amplitude buttons, and timeslot graph are available in the WFMn node. The timeslot graph indicates the timeslot's 3. Power function table status (Main Amplitude, Alternate Amplitude, or None (i.e. amplitude unleveled) for each of the corresponding Timeslots, Timeslot0 to Timeslot7. The timeslot buttons can be used along with the drop down arrows in the 2. Marker and 3. Power function tables, to set the Alternate Amplitude settings.
When using the Alternate Amplitude function, avoid using the timeslot's Power parameter, in the Timeslot node, to adjust the timeslot's power. The Alternate Amplitude feature has priority over the Timeslot node's Power parameter.
It is not recommended that the Alternate Amplitude function be used with waveform sequences. If the Alternate Amplitude function is used with waveform sequences, the last waveform in the sequence's result is used to calculate the Alternate Amplitude settings and is then applied to all of the other waveforms in the sequence. This behavior may or may not be desired for all the other waveform segments in the sequence.
The alternate amplitude function is unique to the ESG E4438C with standard electronic attenuator (not compatible with Option UNB mechanical attenuator or Option 506). Refer to the ESG E4438C's Data Sheet and the User's Guide.
For Signal Studio, Marker 2 is always used for the Alternate Amplitude function.
When Single bit output mode is turned on for DigRF, a message is displayed in the area below the graph warning that the Preview graph is incorrect. Related settings are not available in this mode.
 Click this button to have standard amplitude
behavior for all of the timeslots.
Click this button to have standard amplitude
behavior for all of the timeslots.
Use the drop down arrows to select Main Amplitude (default), then the Main Amplitude button can be selected (by clicking) along with clicking in the timeslots to turn on and off the Main Amplitude function.
 Alternate Amplitude generates a waveform
with the proper marker file and works through the ESG --pre-configured
for alternate amplitude-- with the proper marker routings to activate
the alternate amplitude function for the specified time slot. The alternate
amplitude state, delta, and trigger are located in the 2. Basic function
table in the Instrument tree view (i.e. the 2. Basic Alternate Amplitude
settings are automatically updated when the waveform is generated
Alternate Amplitude generates a waveform
with the proper marker file and works through the ESG --pre-configured
for alternate amplitude-- with the proper marker routings to activate
the alternate amplitude function for the specified time slot. The alternate
amplitude state, delta, and trigger are located in the 2. Basic function
table in the Instrument tree view (i.e. the 2. Basic Alternate Amplitude
settings are automatically updated when the waveform is generated 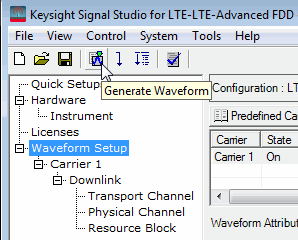 ).
For more information on Alternate Amplitude, refer to the instrument's
Data Sheet and User's
Guide for more information.
).
For more information on Alternate Amplitude, refer to the instrument's
Data Sheet and User's
Guide for more information.
In the n node's function table, use the drop down arrows to select . Then the Alternate Amplitude button can be selected (by clicking) along with clicking in the timeslots to turn on and off the Alternate Amplitude function.
- When
is clicked in the node's function table Timeslot's drop down, there is no power leveling from the
ALC for these timeslots. The result is lower power levels from reducing
the IQ data values generated in the None-enabled timeslot(s). For this
 example, TS2 and TS3 are set to None.
If the Amplitude Delta is too high in the None-enabled timeslots (as a result of the reduced IQ data values) the result is poor EVM, due to insufficient DAC dynamic range in these timeslots.
To avoid this EVM degradation, the None-enabled timeslots could be re-assigned to an Alternate Amplitude-enabled marker, the power leveling is activated by the Alternate Amplitude's ALC loop. When Alternate Amplitude is used, the IQ data in that timeslot(s) is generated as if it's at its highest power, while being controlled by the Alternate Amplitude's ALC loop. The result is that the EVM and level accuracy are not degraded, because the IQ value has not been reduced or negatively effected by the DAC's dynamic range.
But, as there are only two ALC loops in the instrument --one for Main power levels and one for Alternate Amplitude power levels-- if there is a third power level required, it needs to be set to None (unleveled).
See also the instrument's Data Sheet and the User's Guide.
When connected to a Alternate Amplitude-configured ESG E4438C:
Click n in the Tree View.
In the function table, click and use the dropdown arrows to change to .
Repeat step 2, for the .
In the function table, click and use the dropdown arrows to change to .
For this example,
the Alternate Amplitude marker is applied to TS1 and TS5 through TS7 (i.e.
indicated by the blue outlines).
The marker numbers selected for Alternate Amplitude in the N7602B software, should match the markers indicated for Alternate Amplitude in the instrument.
Click and use the dropdown arrows to change to . (This sets the marker 3 source to ALC Hold.)
For this example,
the RF ALC Control marker is applied to TS0 and TS4 (i.e. indicated above
by the green outlines, but may be shown as pink outline in your software).
For this example
TS2 and TS3 are set to -10 dB. When there are multiple power levels the
RF
ALC Control marker ignores the multiple power levels and only sets
the ALC control marker for the 0 dB levels of power (i.e. other power
levels are left unleveled). See also Timeslot
Power Assignments.
In the function table, click the to set to .
Using the dropdown arrow next to each timeslot, click or to setup the timeslots.
In the function table, click ALC Hold and in the dropdown arrow select .
On the Toolbar, click the Generate Waveform button .
Verify 's drop down boxhas changed to read . (This parameter is set by the software and is not editable.)
In Instrument node's function table, verify set to .
Verify the values.
Verify the is set to .
When the Waveform Generated button is clicked, the Instrument node's Alternate Amplitude settings are automatically set by the software.