In parameter view windows, you can check
 and then click the desired parameter for a brief description.
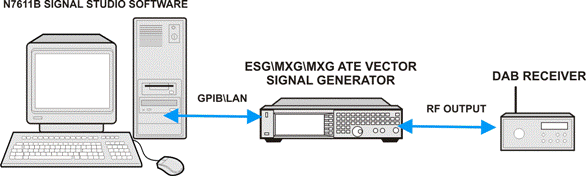
The following example procedure shows you how to configure the equipment and Signal Studio software for a DAB signal receiver test.
In parameter view windows, you can check
and then click the desired parameter for a brief description.
Set up the equipment as shown below.
Open the software and select in the , shown as follows.

Click from the tree view and set the parameters on the carrier setup window as needed. Here, use the default settings.
By clicking  , you can add more carriers to the DAB signals
under test. Signals on each carrier can be configured independently. For
example, one carrier can send DAB signal and another one can send DAB+
signal. For more details, refer to Carrier
Configuration Summary Table.
, you can add more carriers to the DAB signals
under test. Signals on each carrier can be configured independently. For
example, one carrier can send DAB signal and another one can send DAB+
signal. For more details, refer to Carrier
Configuration Summary Table.
Select from the tree view. There are two methods to configure the ensemble.
Select or as the Input Pattern, and use an ETI file as payload. Using this method, the parameters for services and service components will be set automatically. Then you can skip step 5, step 6 and go to step 7 directly.
Select as the Input Pattern, then configure each service and service component.
Set as an .
Select as . Actually if you select , a dialog will pop up for Fast Information Group Configuration.
Configure the Service Component 0.
Select from the tree view, and then click on .
Set as an .
Select as .
Select as the .
To generate DAB+ waveforms, select as, and as
To generate T-DMB waveforms, select as , and as .
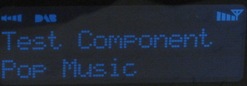
Select "10.Pop Music / Country" as the Programme Type.
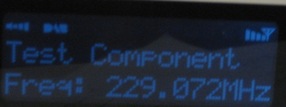
Configure the signal generator settings.
Click the Signal Generator in the tree view and set the frequency and amplitude to the values below.
Frequency: 229.072MHz
Amplitude: -30.00 dBm
Generate and download the waveform to the signal generator.
From the tool bar, Click
 to generate the waveform .
Observe the message area of the status bar to track waveform generation progress.
If you want to generate and
download the waveform at the same time, click  to complete the generating and downloading.
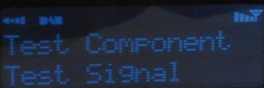
Evaluate the DAB messages on the receiver.
|
Display Mode |
From |
Parameters |
What displayed on the DAB receiver |
Description |
|---|---|---|---|---|
|
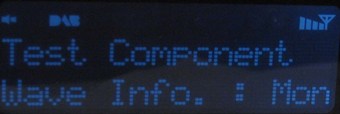
Multiplex name |
Ensemble label (FIG type 0/10) |
Ensemble Label |
|
Displaying the Service component label and Ensemble label. |
|
Other Info. |
Service label (FIG 1/1) or service component label (Fig 1/4) |
Service Label or Service Component Label |
|
Displaying the Service Label or Service Component Label |
|
Audio type and bit rate |
MP2 file header |
In Audio file |
|
Displaying the data rate of test component. |
|
Frequency |
Signal generator settings |
Frequency |
|
Displaying the frequency. |
|
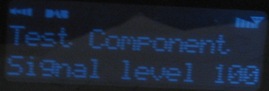
Level |
Signal Level |
Signal Level |
|
Displaying the signal Level. |
|
Programme Type |
Programme Type (FIG type 0/17) |
Programme Type |
|
Displaying the programme type. |
|
Scrolling text |
MP2 file PADs |
In Demo file |
|
Displaying the scrolling text contained in the demo file. |
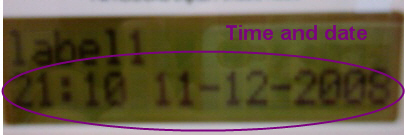
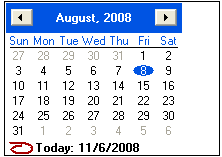
Some parameters might not be revealable on certain receivers, such as "Time and date". Therefore a new configuration is initiated as follows, and this time a new receiver is used:
In the above Step 5, change "Service Component Label" to "Label1".
Click on the Ensemble, and
select "December 11, 2008" in the ![]() drop-down
menu
as
drop-down
menu
as
The message is shown as follows: