The FieldFox can save any of the following types of files:
—Current settings and calibration
—Trace data (*.csv, *.S1P, *.S2P)
—Picture of the FieldFox screen
In addition, files can be saved to the internal memory, a USB Flash drive, or a standard SD card.
In this Chapter
See Also: |
FieldFox State files are intended to be recalled on the same instrument model on which they were saved. Sometimes you may able to recall them within model families. An error will result when trying to recall a state file that was saved on a different model family. |
The FieldFox model families are:
—N991x & N995x (VNA/SA) model family
—N993x & N996x (SA) model family
1.Press Save/Recall 9
2.Then Save
3.At the top of the current ‘labeler’ screen (see following image) check the File Type to save and Device (Internal, USB, Storage Card) to which the file is saved. Learn how to change these settings in “Set File Type and Select Device” on page 919.
4.Then use the labeler to specify a filename.
| If you are having difficulty saving to a USB flash drive, it may be a timing issue. The turn-around time for “file open, write data, file close” to a USB drive is much longer than to FieldFox’s internal memory. Alternative methods are: – Save your content to the FieldFox’s internal memory; and then move your files off to a USB flash drive using FTP SCPI programming. Refer to “Move (Copy) Files” on page 918 and to the :MMEM SCPI commands in the FieldFox Programming Guide (via FieldFox Manuals, Firmware, Software and Product Support). – Save your data to the FieldFox’s internal memory, then move the data to a PC using a binary block transfer, and delete the data from the FieldFox’s internal memory. An example for transferring an image in the FieldFox Programming Guide (via FieldFox Manuals, Firmware, Software and Product Support). Please note that the receiving computer program needs to be able to handle the binary block transfer. See also What Should I Do If My USB Flash Drive Could Not Be Recognized by FieldFox? - Technical Support Knowledge Center Open (keysight.com). |

| Insert only ONE USB flash drive in the FieldFox when saving or copying files. |

Saving MATLAB files
| If you have Option 351 I/Q Analyzer option, you can directly save your data as MATLAB files (*.mat). Refer to Chapter 11, “IQ Analyzer (IQA) – Option 351”, on page 309. If you have the FieldFox’s Remote Server mode (89600 VSA software connectivity), you can use the VSA software to capture and record your data as MATLAB files (*.mat). Learn more about FieldFox and 89600 VSA software, refer to Chapter 18, “Remote Server Mode (Requires SA Option 233)” and to http://helpfiles.keysight.com/csg/89600B/WebHelp/89600.htm. |
Figure 33-1 I/Q Analyzer Mode (IQA) MATLAB File Save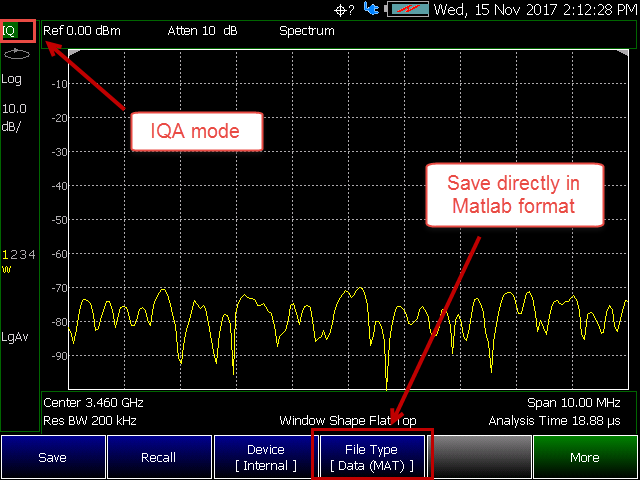
Figure 33-2 VSA Software MATLAB File Save
The FieldFox labeler is used to edit or change the current filename. It is also used for many other labeling functions, such as creating a title, prefix, and keyword to display on the FieldFox screen. Learn about Titles in “How to Manage files” on page 922.
—Move the cursor (see section below, How to move the cursor), then press Select to add the cursor character to the end of the existing filename.
—Back Space to erase the last character(s) from the end of a filename.
—Press Shift to toggle keyboard between lower case and upper case characters.
—Press Alt Keyboards to display the different keyword choices.
| You can select either an ABC or Qwerty style keyboard. Refer to “Alpha Numeric Editing” on page 879. |
The preselected keywords (File, Site, and so forth) can be selected just like a single character. These keywords can also be edited. Learn more in “Edit Keywords” on page 939.
Figure 33-3 The FieldFox labeler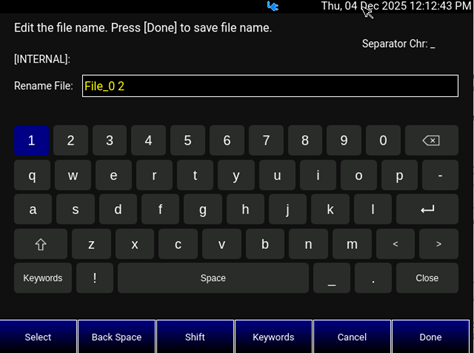
In the graphic above, the current filename is File_0 2. The file will be saved to INTERNAL.
How to move the cursor
—Use the rotary knob to move cursor on the same row. The cursor will change rows when it comes to a row end.
—Use the arrows  to move the cursor up and down the rows.
When the current filename is complete
—Press Done to save the file to the specified filename.
—Press Cancel to close the labeler without saving a file.
—If the filename already exists, you are prompted to choose from the following:
—Press Yes to overwrite the existing file.
—Press Cancel to return to edit the filename.
The FieldFox can recall State files, Trace + State files, and image files.
ALL FieldFox instrument settings for ALL Modes are saved and recalled in a *.sta file. If error correction is ON in CAT or NA Mode, then calibration data is also saved and recalled.
If error correction is OFF (CalRdy is active), calibration data is NOT saved in the *.sta file. When a Trace + State file is recalled on a FieldFox other than the one it was saved on, differences in the CalRdy calibration data may result in differences between the displayed traces.
Image Files
The FieldFox can open and display *.png, *.jpg, and *.jpeg images.
| Before recalling a file, first Select the Device and Location from which the file will be recalled. See the following section for more information. |
1.Press Save/Recall 9
2.Then Recall File or Enter
3.Navigate to the file to be recalled using the Up/Down arrow keys .
—Optional: Sort by Name to list the current files by name.
—Optional: Sort by Date to list the current files by date.
—Optional: Next Page if available, to go to the next page of filenames.
—Optional: Previous Page if available, to go to the previous page of filenames.
4.Then Recall File or Enter.
5. Cancel to cancel recall file and return to the previous menu.
The FieldFox can Move files (i.e., including Trace + State files, and image files).
How to move a file
1.Press Save/Recall 9
2.Then Device to be copied from (i.e., Internal, SD, or USB). Refer to “Set File Type and Select Device” on page 919.
3.Then More > Manage Files > Select Files
4.Navigate to the file(s) to be copied using the Up/Down arrow keys or the knob.
5.Then Copy
—Select the destination device using the softkeys:
—Copy to Internal Copies to FieldFox’s internal memory.
—Copy to USB Copies to a USB memory device.
—Copy to SD Card Copies to a SD/SDHC memory card.
—Cancel to cancel copy file and return to the previous menu
6.Use the close folder icon or the open folder icon to locate the target folder for your files.
7.Then Do Copy copies files to selected location and FieldFox displays a confirmation message of a successful file copy.
8.Cancel to cancel copy file and return to the previous menu.
Set File Type and Select Device
The following File TYPE and DEVICE settings are used to determine the type of file to save, and the location to be used for all file operations.
These two settings remain through an instrument preset, but are reset to the default values when the FieldFox power is shutdown.
Select Device (location of File Save/Recall)
—Then Device to set the LOCATION where the file is to be saved, recalled, or moved. Choose from the following:
— Internal Saves/Recalls/Moves (Copies) files to/from the FieldFox internal memory. To specify a folder, first select Manage Folders (learn how in “Manage Folders” on page 932). The Data Link software will read data ONLY from the \UserData folder.
—SD Card Saves/Recalls/Moves (Copies) files to/from the SD card (not included), inserted in the card slot. See “Take the FieldFox Tour” on page 44. Only the root folder is available.
—USB Saves/Recalls/Moves (Copies) files to or from a USB Flash drive (not included) that is inserted in one of the USB connectors. Only the root folder is available.
| Insert only ONE USB Flash Drive in the FieldFox when saving or copying files. |
—Then File Type. Choose one of the following:
— State Saves ALL FieldFox instrument settings for ALL Modes to a *.sta file. If a calibration is ON in CAT or NA Mode, calibration data is also saved. This file can be opened ONLY by a FieldFox. State files can be saved between compatible FieldFox models. See note in.“Saving and Recalling Files” on page 914.
—Trace+State Saves the current trace and instrument settings to a *.sta file. In SA Mode, all traces are saved. This file can be opened ONLY by a FieldFox. When recalled, the FieldFox sweep is set to Hold.
| When using RTSA, the Density Spectrum information is not saved using Trace+State. Only the last displayed trace settings is saved. |
—Picture (PNG) Saves a 640 x 453 pixel image of the FieldFox screen to a *.png file. The picture does NOT include the softkeys.
—Data (csv) Saves trace data from the current Mode to a *.csv file. This format can be imported into spreadsheet software such as Microsoft Excel. Column A is always the frequency at which the data is measured.
——In SA Mode, all visible data traces are saved. Each trace is saved to a separate column that is labeled with the Trace State.
——In CAT and NA Modes, only the data trace is saved – not the memory trace.
——In Power Meter (with Option 208 Frequency Offset Power Sensor (FOPS)), all visible traces are saved. Each trace is saved to a separate column labeled Output Power or Memory.
——In VVM Mode, NO data is saved.
—Group Saves a group of file types that have been selected in the Preferences menu. Learn more, see “Group Save File Types Editing” on page 880.
—Data (S1P) / (S2P) Saves CAT and NA Mode trace data to an *.S1P or *.S2P file, depending on the active measurement. This file format is used by CAE programs such as Keysight's Microwave Design System (MDS) and Advanced Design System (ADS). It can also be imported into spreadsheet software such as Microsoft Excel.
About SNP Files
The SNP file includes header information, and the following data:
—S1P - saves 1-port (receiver) data for the active data trace. *.s1p Files contain 1 stimulus value and 1 S-parameter (total of 3 scalar values) Stim Real(Sxx) Imag(Sxx)
—S2P (NA Mode ONLY) - saves 2-port data for the active trace. *.s2p Files contain 1 stimulus value and 4 S-parameters (total of 9 scalar values) Stim Real(S11) Imag(S11) Real(S21) Imag(S21) Real(S12) Imag(S12) Real(S22) Imag(S22)
—Only data traces are saved – not memory traces.
Corrections
—When parameters are corrected, data is returned even when not displayed. Data is returned with the correction type that is applied for each S-parameter. The correction type for each S-parameter is annotated in the header.
—When parameters are NOT corrected or displayed:
—With Smith chart and Polar formats, Real/Imag zero-filled data appears as (1.0, 0.0).
—With all other formats, LogMag/Phase zero-filled data appears as (0.0, 0.0).
> Display formats
In CAT Mode, S1P files are always Magnitude (dB) / Phase (angle) format.
In NA Mode:
—Smith chart and Polar display formats are ALWAYS saved in Real/Imag data pairs.
—All other display formats are saved in LogMag/Phase (dbAngle).
> What Data Processing functions are included in saved SNP Data:
In NA Mode, the data processing functions (such as trace math) that are included in the SNP data depends on a Preference setting. Click System, then Preferences, then Preferences, then scroll to NA, SNP File Save, then select from the following:
—Default – SNP data does NOT include smoothing. SNP data saves are taken AFTER data processing (location 2) on the processing chain.
—Advanced – SNP data includes the following:
—With Smith or Polar display format, SNP data saves are taken BEFORE most processing (location 1 on the data processing chain).
—With any other display format, SNP data saves are taken just AFTER Formatting and Smoothing is applied (location 3 on the data processing chain). For each non-active trace, SNP trace data is reprocessed using the data processing chain of the active trace.
See the FieldFox data processing chain at the Supplemental Online Help: https://rfmw.em.keysight.com/wireless/helpfiles/FieldFoxOnlineSupplementalHelp/Home.htm. Learn more about System Preferences in “Preferences” on page 870.
Files that are stored in the FieldFox internal memory, standard SD card, and USB Flash drive, can be copied to another device or deleted.
IQ Recording files are stored in the IQRecording folder and use the VITA49A file format (.vita49). Recording folders may also contain a SessionInfo.txt file with recording metadata. IQ Recording files and folders can be copied, moved, renamed, or deleted using the standard File Management functions.
1.Press Save/Recall 9
2.Then Device to select the location (Internal, USB, standard SD Card, or CD Drive) of the file to copy or delete.
| When selecting Internal, it may also be necessary to first select Manage Folders to specify an active folder which contains the files to copy or delete. Refer to “Manage Folders” on page 932 |
3.Then More > Manage Files
4.Highlight a file to manage. Then choose from the following:
—File ... Navigate to file menu.
—New Folder A new folder is created in the current folder. Refer to “How to use the FieldFox labeler ” on page 916 for folder/filename edit.
——Cancel To close the labeler without saving a folder.
——Done To save the new folder in the current folder.
—Sort
——Sort by Name Sorts the displayed list of files by name in alphabetical (A-Z) and numerically (0-9) order. Pressing again reverses the oder Z-A and 9-0.
——Sort by Date Sorts the displayed list of files by date, from oldest to newest. Pressing again reverses the oder, switching to newest to oldest.
| Must press Select for the highlighted files (with check boxes) before pressing File ... > Copy. If a file is highlighted but not selected, the system will prompt Select file (check boxes) the file(s) that want to copy. Refer to Figure 33-4 on page 926 for more details. |
—Copy To copy selected file(s) to a selected device.
——Copy to Internal Copy the selected file to Internal device.
——Copy to USB (must be inserted) Copy the selected file to USB device.
——Copy to SD Card (must be inserted) Copy the selected file to SD Card.
——Then select a destination folder from the screen that displays the folder tree of the selected device.
——Do Copy To complete the file copy to the selected media/folder.
| When press Do Copy, if the file Copy Operation encounters files with identical names at the destination, the system prompts a message “There is already a file with the same name in this location. Proceed to Copy and Replace?”. If the file doesn’t already exist in the destination, it will be copied to the destination without any prompt. |
—— Yes Complete the file copy.
—— No Skip the file copy.
—— Cancel Skip and cancel entire Copy operation if more than 1 file is being copied.
——Collapse To minimize or hide highlighted sections of content to keep workspace organized and reduce clutter.
| Copy can be done to any FieldFox internal folder, standard SD folder, or USB storage device. |
| Must press Select for the highlighted files (with check boxes) before pressing File ... > Delete. If a file is highlighted but not selected, the system will prompt “Please select files or highlight a folder before deleting.” Refer to Figure 33-5 on page 927 for more details. |
—Delete To delete the selected file(s).
| System will prompt “This operation is permanent. Do you want to continue?” to alert this is non-reversible action and require explicit confirmation before proceeding. Refer to Figure 33-6 on page 928 for more details. |
| One or more files can be deleted at a time. |
—— Yes Complete deleting the selected file.
—— No Skip deleting the selected file.
—— Cancel To cancel Delete operation and return to previous menu.
—More
——Show Files as List or Show Files as Tiles (depending on the currently show files viewing mode) This toggle button switches between List view and Tiles view, allowing to display files either as a list with their names and dates or as visual tiles with their names. Refer to Figure 33-7 on page 929 and Figure 33-8 on page 930 for more details.
——Rename Displays a keyboard and text entry field. Enter the filename string to be replaced. Refer to Figure 33-9 on page 931 and Figure 33-10 on page 932 for more details.
| Must highlight the file before pressing File ... > More > Rename. If no folder is highlighted and no file(s) is selected, the system will prompt “Please select files or highlight a folder before renaming.” Refer to Figure 33-5 on page 927 for more details. |
| “How to use the FieldFox labeler ” on page 916 and “Prefixes and Suffixes for Filenames” on page 940 |
| Only one file can be renamed at a time. |
—— Select Select.
—— Back Space Backspace.
—— Shift Shift.
—— Keywords Keywords.
—— Cancel Skip and cancel file rename operation.
—— Done Complete the file rename operation.
—Set As User Folder Using the folder where the current selected file is located to set it as the user folder.
| The User Folder setting is visible in the Preferences menu, it only persists if User Folder Persist is ON in the Preferences menu. |
—Select or Deselect (depending on the highlighted file’s selected stage) Button only visible when a file is highlighted. A toggle button that will select or deselect the current highlighted file. Refer to
—Select All | Deselect All A toggle button that will select (check) or deselect (uncheck) all files in the current folder.
—Expand All | Collapse All A toggle button that will expand or collapse all folders recursively.
—Clear Selections To clear (uncheck) all selected (checked) files anywhere in the all directory, recursively.
| Insert only ONE USB Flash Drive in the FieldFox when saving or copying files to USB. |
| Press ESC key on the front panel to exit the Manage Files window. |
Figure 33-4 Manage Files - Select File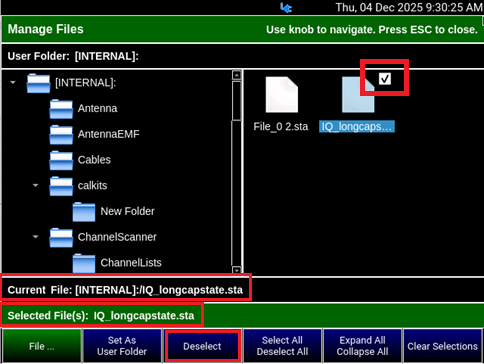
Figure 33-5 Manage Files - Delete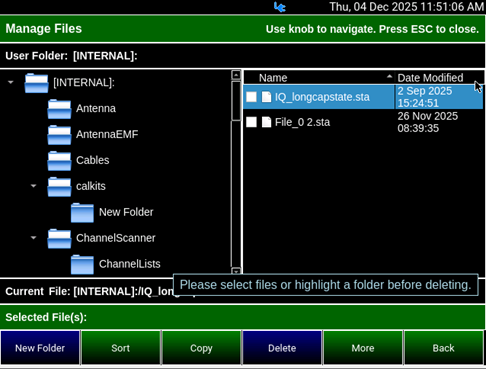
Figure 33-6 Manage Files - Delete File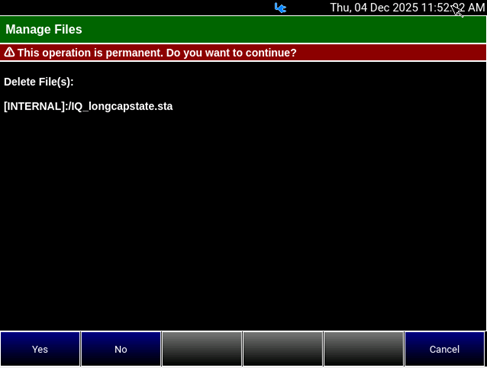
Figure 33-7 Manage Files - File as List Mode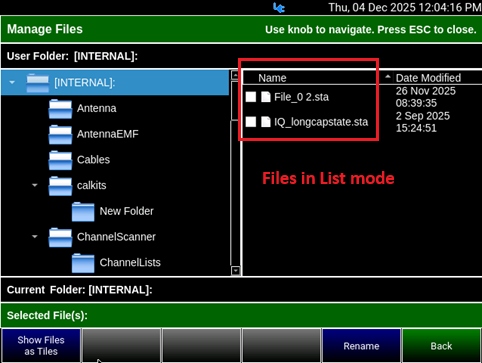
Figure 33-8 Manage Files - File as Tiles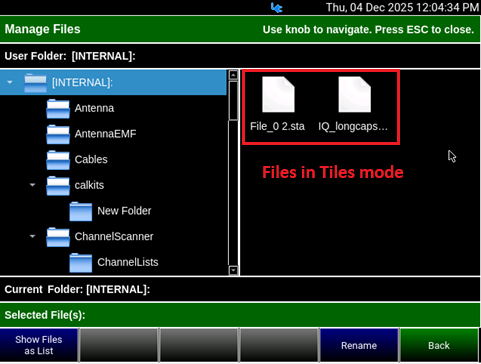
Figure 33-9 Manage Files - Rename
Figure 33-10 Manage Files - Filename Rename Entry
You can create new folders, delete old folders, and select the active folder to which files can be saved. The Parent folder [..] is listed when not in the root directory.
Creating and Managing Folders
1.Press Save/Recall 9
2.Then Device to select the location (Internal, USB, standard SD Card, or CD Drive) of the folder to copy or delete.
3.Then More > Manage Files
4.Highlight a folder to manage. Then choose from the following:
—File ... Navigate to file menu
—New Folder A new folder is created in the current folder. Refer to “How to use the FieldFox labeler ” on page 916 for folder/filename edit.
——Cancel To close the labeler without saving a new folder.
——Done To save the new folder in the current folder.
—Sort
——Sort by Name Sorts the files in the selected folder by name in alphabetical (A-Z) and numerically (0-9) order. Pressing again reverses the oder Z-A and 9-0.
——Sort by Date Sorts the files in the selected folder by date, from oldest to newest. Pressing again reverses the oder, switching to newest to oldest.
| Copy operations support only ONE folder at a time. Select ONE folder before pressing File ... > Copy. |
—Copy To copy selected folder to a selected device. Select a device to copy the file to from the following:
——Copy to Internal Copy the highlighted folder to Internal device.
——Copy to USB (must be inserted) Copy the highlighted folder to USB device.
——Copy to SD Card (must be inserted) Copy the highlighted folder to SD Card.
——A new screen will appear displaying the folder tree of the selected device. Select the destination folder where the target folder will be copied.
——Do Copy To complete the folder copy to the selected media/folder.
| When press Do Copy, if the folder copy operation encounters folder with identical names at the destination, the system prompts a message “There is already a folder with the same name in this location. Proceed to Copy and Replace?”. If the folder doesn’t already exist in the destination, it will be copied to the destination without any prompt. |
—— Yes Complete the folder copy.
—— No Skip the folder copy.
—— Cancel Skip and cancel copy operation.
——Collapse or Expand (depending on the selected folder stage) A toggle button that will collapse or expand the current selected folder (non-recursive).
| Copy can be done to any FieldFox internal folder, standard SD folder, or USB storage device. |
| Delete operations support only ONE folder at a time. Select ONE folder before pressing File ... > Delete. If no folder is highlighted, the system will prompt “Please select files or highlight a folder before renaming.” Refer to Figure 33-5 on page 927 for more details. |
—Delete To delete the selected folder.
| System will prompt “This operation is permanent. Do you want to continue?” to alert this is non-reversible action and require explicit confirmation before proceeding. Refer to Figure 33-6 on page 928 for more details. |
—— Yes Complete deleting the selected folder.
—— No Skip deleting the selected folder.
—— Cancel To cancel delete operation and return to previous menu.
—More
——Show Files as List or Show Files as Tiles (depending on the currently show files viewing mode) This toggle button switches between List view and Tiles view, allowing to display files either as a list with their names and dates or as visual tiles with their names. Refer to Figure 33-7 on page 929 and Figure 33-8 on page 930 for more details.
| Rename operation support only ONE folder at a time. Select ONE folder before pressing File ... > More > Rename. If [INTERNAL] folder is highlighted, the system will prompt “This folder name is managed by the system and cannot be edited.” Refer to Figure 33-13 on page 938 for more details. |
——Rename Displays a keyboard and text entry field. Enter the folder name string to be replaced. Refer to Figure 33-11 on page 936 and Figure 33-12 on page 937 for more details.
| “How to use the FieldFox labeler ” on page 916 and “Prefixes and Suffixes for Filenames” on page 940 |
| Only one folder can be renamed at a time. |
—— Select Select.
—— Back Space Backspace.
—— Shift Shift.
—— Keywords Keywords.
—— Cancel Skip and cancel folder rename operation.
—— Done Complete the folder rename operation.
—Set As User Folder Using the folder where the current selected file is located to set it as the user folder.
| The User Folder setting is visible in the Preferences menu, it only persists if User Folder Persist is ON in the Preferences menu. |
—Expand or Collapse (depending on the highlighted folder’s expanded stage) Button only visible when a folder is highlighted. A toggle button that will expand or collapse the current highlighted folder. Refer to Figure 33-14 on page 939 for more details.
—Select All | Deselect All A toggle button that will select (check) or deselect (uncheck) all files in the current folder.
—Expand All | Collapse All A toggle button that will expand or collapse all folders recursively.
—Clear Selections To clear (uncheck) highlighted folder and all selected (checked) files and anywhere in the all directory, recursively.
| Insert only ONE USB Flash Drive in the FieldFox when saving or copying folders to USB. |
| Press ESC key on the front panel to exit the Manage Files window. |
Figure 33-11 Manage Folder - Rename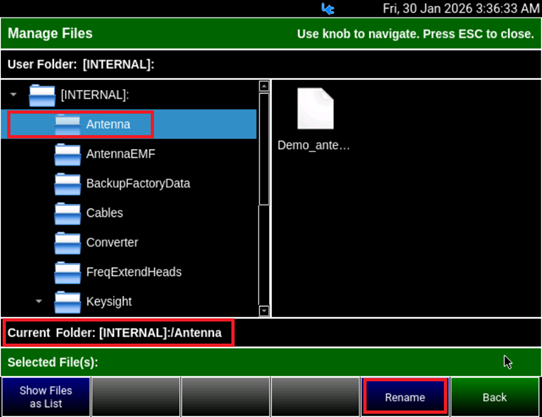
Figure 33-12 Manage Folder - Rename Folder Entry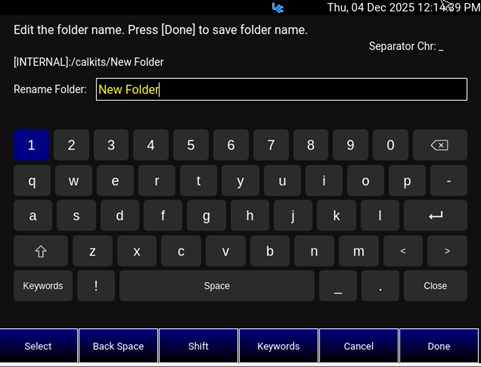
Figure 33-13 Manage Folder - Rename [INTERNAL]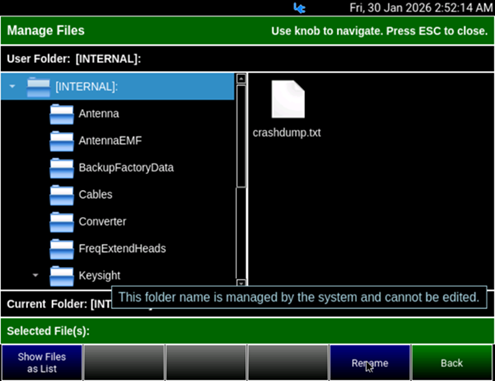
Figure 33-14 Manage Folder - Expand or Collapse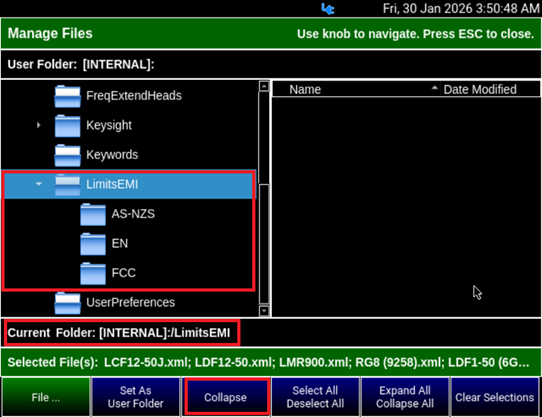
The preselected keywords (FILE, SITE, and so forth) can be edited to meet your specific needs. Your keywords will remain in the FieldFox until you change them. Keywords are limited to 30 characters.
How to edit keywords
1.Press Save/Recall 9 > More > Edit Keywords
2.Then Next Page and Previous Page to view all keywords.
—Use the arrows to select a keyword to edit.
—When a keyword is selected, then press Edit.
—Then choose from the following:
—Press Select to add the cursor character to the end of the selected keyword.
—Press Backspace to erase the last character from the end of the selected keyword.
—Press Shift to change from upper-case to lower-case and vice versa.
—Press Alt Keywords to toggle through different keyword choices.
—Use the rotary knob to move the cursor along the same row. The cursor will change rows when it comes to a row end.
—Use the arrows to move the cursor up and down between rows.
When the selected keyword is complete:
—Press Done to save all keywords and close the Edit Keywords labeler. These keywords will exist on the FieldFox until changed.
—Press Cancel to close the labeler without saving changes.
Prefixes and Suffixes for Filenames
The prefix and suffix (Auto Append) can be used together to organize files. Once set and enabled, they are automatically entered as the beginning (Prefix) and end (Suffix - using Auto Append) of a filename when performing a Save operation. These settings are persistent, until disabled. Refer to “How to edit the Prefix and Suffix (Auto Append)” on page 940 and “How to enable/disable Auto Append (Number and Date)” on page 942.
| If you are only interested in adding a prefix or a suffix to a new file or files one time, refer to “Manage Files” on page 922. File–Save Naming Options are settings are persistent through Preset and power cycling (e.g., Prefix, Auto Append). |
This section contains the following sections:
—“How to edit the Prefix and Suffix (Auto Append)” on page 940.
—“How to move the cursor” on page 917.
—“When the Prefix is complete” on page 942.
—“How to enable/disable Auto Append (Number and Date)” on page 942.
How to edit the Prefix and Suffix (Auto Append)
If you want to edit a prefix on a finite set of files one time, refer to “Manage Files” on page 922.
—Press Save/Recall 9 > More > Prefix Suffix
—Auto Append (Suffix)
—OFF (default) to disable Auto Append.
—Number to auto-append a number using format “nnnn” sequentially to all saved files (default).
—Date to auto-append a date and time using format “YYYY-MM-DD.HH.MM.SS” sequentially to all saved files.
—Prefix/Suffix
— OFF (default) to disable the prefix/suffix. The Edit Prefix, Edit Number, and Edit Suffix softkeys are grayed out (inactive). Refer to “How to enable/disable the Prefix/Suffix (persistent)” on page 942.
—Last File to use the last filename saved, as your filename for subsequent saved filenames. The Edit Prefix, Auto Append, Edit Number, and Edit Suffix softkeys are grayed out (inactive).
—User to use the user-selected prefix. All softkeys are active, unless Auto Append is disabled, then Edit Number Suffix is grayed out (inactive). Learn more, see “How to enable/disable the Prefix/Suffix (persistent)” on page 942 and “How to enable/disable Auto Append (Number and Date)” on page 942.
—Edit Prefix – the last Prefix used in saving a file is displayed (default == CustomPre).
Couplings: For the softkey to be active, Prefix/Suffix == MyFilePrefix.
—Then choose from the following:
——Select to add the cursor character to the end of the Prefix.
——Back Space to delete the last character(s) from the end of the prefix.
——Shift to toggle between capital letters and lower case letters.
——Alt Keywords to display the different preselected keywords (File, Site, and so forth) can be selected just like a single character. These keywords can also be edited. See Edit Keywords.
——Cancel to cancel edits and return to the previous menu.
—— Done to save changes and return to previous softkey menu.
—Edit Number Suffix – Sets the Auto Append number suffix formatting (e.g., “0001”).
Couplings: Auto Append must be set to “Number”. This softkey is inactive (grayed out) when Auto Append == Date.
—Edit Suffix to edit the suffix using the labeler. For more information on the Edit Suffix softkey menu refer to the Edit Prefix softkey menu descriptions above. (Default == UserSuffix).
Couplings: For this softkey to be active, the Prefix/Suffix softkey must be set to “User”. Learn more, see “Preferences” on page 870 and to “File Saving Naming Options” on page 879.
— Back to return to the previous menu.
| When Last File is selected, the Edit Prefix, Auto Append, Edit Number Suffix, and Edit Suffix softkeys are grayed out (inactive). Refer to “Prefixes and Suffixes for Filenames” on page 940. |
—Use the rotary knob to move cursor on the same row.
—Use the arrows to move the cursor up and down the rows.
—Press Done to save the Prefix and close the labeler. This Prefix will exist on the FieldFox until it is changed.
—Press Cancel to close the labeler without saving changes.
When the Suffix is complete
—Press Done Edit to save the Suffix and close the labeler. This Suffix will exist on the FieldFox until it is changed (i.e., with subsequent increments).
—Press Cancel to close the labeler without saving changes.
How to enable/disable the Prefix/Suffix (persistent)
1.Press Save/Recall 9 > More > Prefix Suffix
2.Then Prefix/Suffix
—OFF (default) to disable the prefix and suffix on subsequently saved files. Edit Prefix and Edit Suffix softkeys are grayed out (inactive).
How to enable/disable Auto Append (Number and Date)
1.Press Save/Recall 9 > More > Prefix Suffix
2.Then Auto Append
—OFF (default) to disable the Auto Append (number suffix) on subsequently saved files. The Edit Number Suffix softkey is grayed out (inactive).
The current screen or selected files can be printed using a PCL-compatible printer (like older HP Deskjet printer) connected to one of the FieldFox USB ports. Newer PCL3GUI photo and all-in-one printers are NOT supported.
Measurements can also be printed using the FieldFox Data Link software.
How to print the current screen or a saved file
To save ink, first select an outdoor (white background) display color. Learn how in “Display Colors” on page 860.
1.Connect the printer to a FieldFox USB port. The print softkey will appear ONLY when a compatible printer is connected.
2.Then press Save/Recall 9
3.Then Print and choose from the following:
—Printer & Page\nSetup - Confirm that the printer is connected and configured properly. The Status line should read “Ready’.
4.Make other print settings as desired.
a.Select Files\nfor Printing - Print up to 16 *.PNG images on one page that are stored on the Internal drive. Images can NOT be printed from the USB and SD card.
b.Edit the Quick Settings table to select up to FOUR Rows and FOUR Columns for up to 16 total images to be printed on a single page.
c.If necessary, edit the filenames to be printed.
d.Select Done. Then Print Selected\nFiles to begin printing.
—Print Current Screen – Immediately prints the FieldFox screen using the selected Printer and Page Setup settings.