Click on an area of the image to learn more.
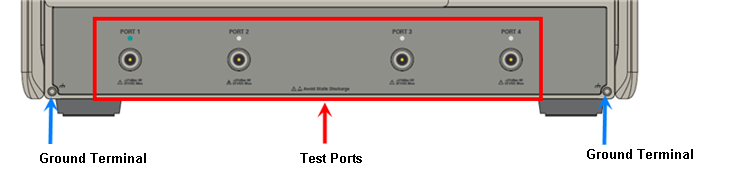
Rear-panel Tour
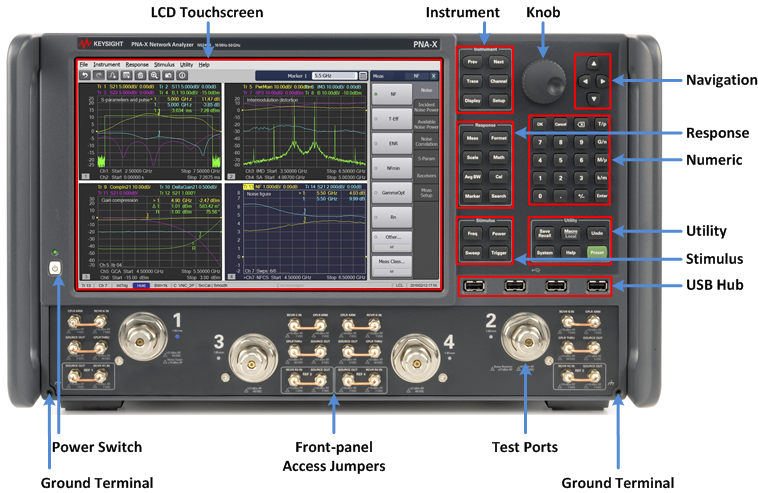
Used for choosing between power-on ( | ) and standby (O) state.
Learn to power ON and OFF the VNA.
VNA is equipped with a 12.1-inch TFT color, touch-sensitive LCD screen for displaying traces, scales, settings, softkeys and other measurement related information. The touchscreen LCD allows to manipulate softkeys by touching the LCD screen directly. For more on the LCD touchscreen, see Screen Display Tour.
Note:
Do not press the surface of the LCD touchscreen with a sharp object (e.g., a nail, pen, or screwdriver). Pressing the surface with a sharp-pointed object will damage the LCD screen surface or cause the screen to fail.
Valid pixels are 99.998 % and more. Below 0.002 % of fixed points of black, blue, green or red are not regarded as failure.
The models are available with 2 or 4 test ports.
See Specs for more information about the Test port connectors and Input damage levels.
This USB hub contains four USB ports to power your VNA peripherals. There are also four USB ports on the rear panel.
Limitation: The total power consumption for all eight USB ports is limited to 4.0 amps. If this limit is exceeded, all USB ports are disabled until a device is removed and power consumption falls below the limit. When first connected, Keysight ECal modules 8509x and N4431 draw significantly more current than other modules.
|
The FIRST TIME each USB device (ECal module, power sensor, and so forth) by serial number is connected to a specific VNA USB port, you must be logged in to the VNA with an Administrator account. Learn how. When a New Hardware Found dialog appears, click OK to install the device. After being installed, when that same USB device is connected to that same USB port, you can be logged in to the VNA with a Limited/User account. |
Connect a banana-type plug to this terminal for grounding to the VNA chassis.
Probe power is NOT provided on VNA models. Learn more about Active Probing
Manages the Traces and Channels on the VNA display.
|
Hard Key |
Invokes these Softkeys |
|
Prev |
Makes the previous Trace/Channel/Window active. |
|
Next |
Makes the next Trace/Channel/Window active. |
|
Trace |
Invokes the Traces softkey menu which allows you to manage traces. |
|
Channel |
Invokes the Channels softkey menu which allows you to manage channels. |
|
Display |
Invokes the Display softkey menu which allows you to manage display functions. |
|
Setup |
Invokes the Setup softkey menu which allows you to set up a measurement. |
Performs operations on measurement traces after data is measured - not including Data Analysis operations.
|
Hard Key |
Invokes these Softkeys - Click to learn more |
|
Meas |
Waves Auxiliary Meas Setup
|
|
Format |
Format 1
Format 2 |
|
Scale |
Main
Constants
|
|
Math |
Memory
Analysis
Time Domain
Time Gating
|
|
Avg BW |
Main
Smoothing
Delay Aperture
|
|
Cal |
Main
Port Extension
Cal Sets & Cal Kits
Fixtures
|
|
Marker Setup Marker Functions
|
|
|
Search |
Main
Peak
Target
Multi Peak & Target
Bandwidth & Notch
Comp & Sat
Normal Op Pt
|
Controls settings that determine what data (stimulus range), and how data (sweep type and triggering), is measured.
|
Hard Key |
Invokes these Softkeys - Click to learn more |
|
Freq |
|
|
Power |
Main
Port Power
Leveling & Offsets
|
|
Sweep |
Main
Sweep Timing
Source Control
Segment Table
|
|
Trigger |
Main
|
Performs global VNA operations.
|
Hard Key |
Invokes these Softkeys - Click to learn more |
|
Save |
Save State
Save Other
|
|
Macro |
Favorite 1 Favorite 2 Favorite 3 Macro 1 Macro 2 Macro 3 Key Setup
|
|
System |
Main
System Setup
Help
|
|
Undo |
Main
|
|
Help |
Launches the Help file. |
|
Preset |
Main
|
|
Hard Key |
Invokes these Softkeys |
|
OK |
Closes a dialog box and enters any values made in the dialog box. |
|
Cancel |
Closes a dialog box. |
|
Bk Sp |
Back Space. Backs up the cursor and deletes any previous selection. |
|
0 to 9 |
Selects values for measurement settings, then press Enter or G/n - M/u - k/m to complete the selection. |
|
T/p G/n M/u k/m |
Completes the value selection, assigning a unit of measurement.
|
|
Enter |
Enters the values that you select for the measurement settings. |
|
Decimal point |
Enters a decimal point to designate fractions of a whole number. |
|
+/- |
Plus - Minus Toggles between a positive and negative value entry if it is the first key pressed in the entry. |
Rotate to increase or decrease the value of the active entry.
These keys allow you to navigate through menus and dialog boxes and select choices from the active entry toolbar.
|
Hard Key |
Invokes these Softkeys |
|
Left / Right |
Moves left and right through menus. Moves tab-left and tab-right within dialog boxes. |
|
Up / Down |
Moves up and down through menus. Behaves as follows in a dialog box:
|
|
Click |
Makes a selection just like a mouse click. |