Traces, Channels, Windows, and Sheets on the Analyzer
It is critical to understand the meaning of the following terms as they are used on the analyzer.
Other Quick Start topics
Traces
Traces are a series of measured data points. There is no theoretical limit to the number of traces. However, the practical limit is the maximum number of windows times the maximum number of traces per window (24).
In addition, one memory trace can be stored and displayed for every data trace. Learn more about Math / Memory traces.
Trace settings affect the presentation and mathematical operations of the measured data.
The following are Trace settings:
Managing Traces
How to Add a trace
The only measurements that can be selected are those in the same measurement class as is currently assigned to the channel. To select a measurement other than these, first select the appropriate measurement class to a new or existing channel. Learn how.
A trace must be selected (active) before its trace settings can be changed.
How to know which trace is Active?
|
|
Using Hardkey/SoftTab/Softkey
|
Using a mouse
|
-
For Traces 1-7, press Trace > Trace 1-7 > click left side Trace 1-7 small button
(Example: Click on left side Trace 1 small button and Trace 1 is active when it turns green, so Trace 1 added).
-
For Traces 8-15, press Trace > Trace 8-15 > click left side Trace 8-15 small button
(Example: Click on left side Trace 9 small button and Trace 9 is active when it turns green, so Trace 1 is added).
-
Another method of adding traces is by pressing Trace > Trace 1-7 > New Traces....
-
For other traces numbers, press Trace > Trace Setup > Add Trace, then select New Trace, New Trace + Channel, New Trace + Window, New trace + Channel + Window, or New Traces....
|
-
Right click in the grid box and then select New Trace....
|
|

|
How to Select a Trace
The only measurements that can be selected are those in the same measurement class as is currently assigned to the channel. To select a measurement other than these, first select the appropriate measurement class to a new or existing channel. Learn how.
A trace must be selected (active) before its trace settings can be changed.
How to know which trace is Active?
|
|
Using Hardkey/SoftTab/Softkey
|
Using a mouse
|
-
Press Trace > Trace Setup > Select.
-
Select a trace number which corresponds to the desired measurement parameter.
|
-
Click on Trace Status label of any trace above the grid box.
|
|
|
How to Delete a Trace
|
|
Using Hardkey/SoftTab/Softkey
|
Using a mouse
|
-
For Traces 1-7, press Trace > Trace 1-7 > click left side Trace 1-7 small button
(Example: Click on left side Trace 1 small button and Trace 1 is inactive when it is not green).
-
For Traces 9-16, press Trace > Trace 8-15 > click left side Trace 8-15 small button
(Example: Click on left side Trace 9 small button and Trace 9 is inactive when it is not green).
-
For other traces numbers, press Trace > Trace Setup > Delete Trace, then select a trace number.
|
-
Right-click the Trace Status label above the grid box, then click Delete Trace.
|
|
|
How to Move a trace to a different Window
You can DRAG a trace from one window to another, or...
|
|
Using Hardkey/SoftTab/Softkey
|
Using a mouse
|
-
Press Trace > Trace Setup > Move Trace....
-
Select a window number in the following dialog, and then click OK.
|
-
Right-click the Trace Status label above the grid box, then click Move Trace....
-
Select a window number in the following dialog, and then click OK.
|
|
|
|
Move Trace dialog box help
|
|
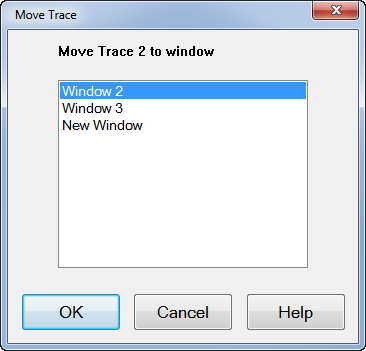
Note: Only ONE trace can be moved at a time.
- Click the Trace Status label to select the trace to move.
- Move Trace N to window - Transfer the selected trace to any Window listed or to a New Window.
|
Trace Max
How to maximize the active trace - the active trace is the ONLY trace on the screen display. All other traces are hidden.
|
|
Using Hardkey/SoftTab/Softkey
|
Using a mouse
|
-
Press Trace > Trace Setup > Trace Maximize (ON). With Trace Max (ON), select a different trace to make that trace visible.
-
To make all traces visible again, select Trace Maximize (OFF).
|
-
Right-click the Trace Status label above the grid box, then click .
-
Double click on the active trace to make all traces visible again.
|
|
|
Trace Hold
How to hold the active trace at the maximum or minimum points.
|
|
Using Hardkey/SoftTab/Softkey
-
Trace > Trace Setup > Trace Hold > OFF | Max | Min.
-
Restart resets the trace.
|
Using a mouse
Not available
|
|
|
Maximum/Minimum trace hold can be applied with several conditions:
-
Feature is applicable to any data trace, but NOT to memory traces.
-
When the stimulus or any data post processing setting is changed, the trace hold data will be reset. These settings include:
-
-
Smoothing Aperture.
-
Gating on/off.
-
Transform on/off.
-
Conversion state change, conversion type change.
-
Data Math Function (Data/Mem) change.
-
Equation Editor state change, formula change.
-
Parameter change.
-
-
Minimum/maximum comparison is done with formatted data. For Smith and Polar formats, absolute data is used and not phase.
-
Trace hold data can be recalled.
-
Data save files formats
-
-
SnP does NOT save trace hold data
-
Citifile, CSV, MDF, PRN DOES save trace hold data
Note: Citifiles can be recalled and viewed in the VNA.
Channels
Channels contain traces. The analyzer can have up to maximum 500 independent channels.
Note: Actual maximum number of channel depends on the setup. A large number of NOPs and traces limit the maximum number of channel.
Channel settings determine how the trace data is measured . All traces that are assigned to a channel share the same channel settings. A channel must be selected (active) to modify its settings. To select a channel, click the Trace Status button of a Trace in that channel. The following are channel settings:
Managing Channels
How to Select a Channel
A channel must be selected (active) before its settings can be changed.
To make a channel active, select a trace in that channel or click the Trace Status button of a Trace in that channel.
|
How to Add a channel
|
|
Using Hardkey/SoftTab/Softkey
-
Press Channel > Channel 1-8 > click left side Channel 1-8 small button
(Example: Click on left side Channel 1 small button and Channel 1 is active when it turns green, so Channel 1 is added).
-
For other channel numbers, press Channel > Channel Setup > Add Channel, then select New Trace + Channel or New Trace + Channel + Window.
|
Using a mouse
Not available
|
|
No programming commands are available for this feature
|
How to Delete a channel
|
|
Using Hardkey/SoftTab/Softkey
-
Press Channel > Channel 1-8 > click left side Channel 1-8 small button
(Example: Click on left side Channel 1 small button and Channel 1 is inactive when it is not green).
-
For other channel numbers, press Channel > Channel Setup > Delete Channel, then select a channel.
|
Using a mouse
Not available
|
|
|
Windows
Windows are used for viewing traces.
-
The analyzer can show an UNLIMITED number of windows on the screen with the following limitations:
-
-
Each window can contain up to 24 traces.
-
Windows are completely independent of channels.
-
See Customize the analyzer screen to learn how to make other window settings.
The following is a window containing two traces. Both traces use the same channel 1 settings as indicated by the annotation at the bottom of the window.

The window number shows in the lower-left corner of the window. The following shows window 5.

Managing Windows
How to Add a window
|
|
Using Hardkey/SoftTab/Softkey
|
Using a mouse
|
-
Press Display > Window 1-8 > click left side Channel 1-8 small button
(Example: Click on left side Window 1 small button and Window 1 is active when it turns green, so Window 1 is added).
-
For other windows, press Display > Window Setup > Add Window, then select New Window, New Trace + Window, or New Trace + Channel + Window.
|
-
Right-click any area of grid box and then select .
|
|
|
How to Delete a Window
|
|
Using Hardkey/SoftTab/Softkey
|
Using a mouse
|
-
Press Display > Window 1-8 > click left side Channel 1-8 small button
(Example: Click on left side Window 1 small button and Window 1 is inactive when it is not green).
-
For other windows, press Display > Window Setup > Delete Window, then select a window.
|
-
Right-click any area of grid box and then select .
|
|
|
How to Move a Window to a different Sheet
Note: This featue is NOT available on M948xA and E5080A.
|
|
Using Hardkey/SoftTab/Softkey
|
-
Select a Window to move.
-
Press Display > Window Setup > Move Window...
-
Select a sheet number in the following dialog, and then click OK.
|
|
|
|
Move Window dialog box help
|
|
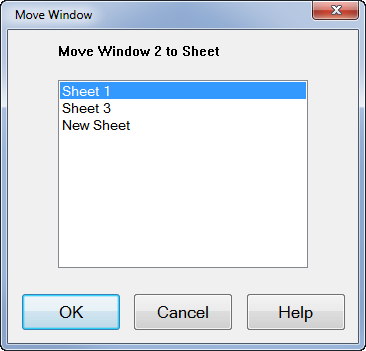
Note: Only ONE window can be moved at a time.
- Move Window N to Sheet N- Transfer the selected window to any sheet listed or to a New Sheet.
|
How to Change Window Layout
Note: This featue is NOT available on M948xA and E5080A.
This is a window auto-layout option, for quicker selection instead of selecting the trace, channel, window and sheet separately. 7 auto-layout options are available.
|
|
Using Hardkey/SoftTab/Softkey
|
-
Press Display > Window Setup > Window Layout.
-
Select 1 Window, 2 Windows, 3 Windows, 4 Windows, 1 Trace per Window, 1 Channel per Window, or Tile Windows.
|
|
|
How to maximize the active window - the active window is the ONLY window on the screen display. All other windows are hidden.
|
|
Using Hardkey/SoftTab/Softkey
|
Using a mouse
|
-
Press Display > Window Setup > Window Max (ON). With Window Max (ON), select a different window to make that window visible.
-
To make all windows visible again, select Window Max (OFF).
|
-
Right-click in any area of the grid box and then select Maximize.
|
|
|
Sheet
Sheets are used to group VNA windows. The sheet tabs provide an easy way to switch multiple display settings quickly.
Features and actions that can performed with tabbed sheets:
-
-
Add/Delete/Select sheet
-
Move window to sheet
-
Measurement can be performed on traces/channels in inactive sheets
-
Easy setup for channel per window
-
Easy setup for channel per sheet
Managing Sheet
How to Add Sheet
|
|
Using Hardkey/SoftTab/Softkey
|
Using a mouse
|
-
Press Display > Sheet Setup > Add Sheet.
-
The select one a New Sheet, New Trace + Sheet or New Trace + Channel + Sheet.
|
-
Click on the sheet tab.
|
|
|
How to Delete a Sheet
|
|
Using Hardkey/SoftTab/Softkey
|
Using a mouse
|
-
Press Display > Sheet Setup > Delete Sheet.
-
Then select a sheet.
|
-
Click on the sheet tab.
|
|
|
How to View a Sheet
|
|
Using Hardkey/SoftTab/Softkey
|
Using a mouse
|
-
Press Display > Sheet Setup > Select.
-
Then select a sheet.
|
-
Click on the sheet tab.
|
|
|
How to Change Sheet Title
|
|
Using Hardkey/SoftTab/Softkey
|
-
Press Display > Sheet Setup > Sheet Title....
-
In the pop up Sheet title box, enter the title and click OK.
|
|
|
How to Change Sheet Layout
This is a sheet auto-layout option, for quicker selection instead of selecting the trace, channel, window and sheet separately. 4 auto-layout options are available.
|
|
Using Hardkey/SoftTab/Softkey
|
-
Press Display > Sheet Setup > Sheet Layout.
-
Select 1 Sheet, 1 Trace per Sheet, 1 Channel per Sheet, or 1 Window per Sheet.
|
|
|