Clicking in the tree view displays the panes in the parameter view where you can configure a TD-SCDMA waveform and download it to the ESG or MXG/EXG vector signal generator. This software will do real-time coupling and clipping on the TD-SCDMA waveform parameters that you input and display the coupled and clipped values immediately.
The parameters configuration for TD-SCDMA waveform can be divided into four levels, and each level has its specific parameter set as listed below in detail.
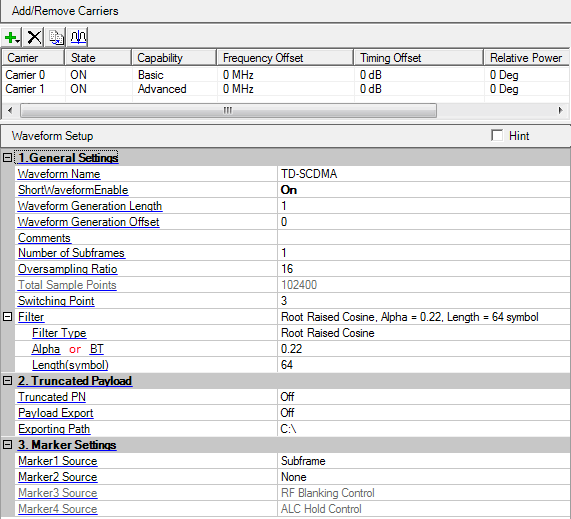
Waveform Setup – Waveforms can consist of up to 12 carriers in a single waveform. In the waveform setup window, you can add and remove carriers, and select the capability, basic or advanced, that you require. Set the waveform properties, such as: number of subframes, switching point for the uplink and downlink transition, and the oversampling ratio.
Carrier Basic or Carrier Advanced Setup – In the carrier node, select the midamble and scrambling code, and maximum user number for each timeslot. The code domain power graph at the bottom of each carrier window allows you to quickly assess your setup.
Channels for advanced capability (Physical & Transport channel) or Timeslots for basic capability – Using advanced capability, configure the TD-SCDMA common channels, dedicated channels, or HSDPA channels for just the parameters that you require, such as transmit timing offset for uplink, channel power level, and payload data type. Precoded reference measurement channels (RMC), as defined in TS34.122, can be mixed or combined with user-defined channels to quickly verify your test setups.
Resource Unit Setup (Basic) or Resource Unit Setup (Advanced) – Up to 16 codes can be allocated for each timeslot. A total of 112 resource units (RU) are available (7 traffic timeslots with up to 16 individually configurable code channels per timeslot). A color-coded graphic, such as the one shown below, displays the resource unit allocations for each channel. As you assign resource units, the status bar displays any allocation conflicts. (Using basic capability, you can view your resource unit allocation as you configure each timeslot.)
This table enables you to view the key parameters for each carrier in the waveform. You can also add or delete carriers using the buttons above the table (see descriptions below). Double-clicking a carrier row activates the setup tables for that carrier. You can use a maximum of 12 carriers in the waveforms.
Click the button  to open a drop-down menu which allows
you to add a
to open a drop-down menu which allows
you to add a  basic
or advanced
carrier to the current configuration. The new carrier is added immediately
above the currently highlighted carrier in the Carrier Configuration Summary
Table.
basic
or advanced
carrier to the current configuration. The new carrier is added immediately
above the currently highlighted carrier in the Carrier Configuration Summary
Table.
Click the button  to delete the highlighted
carriers in the Carrier Configuration Summary Table.
to delete the highlighted
carriers in the Carrier Configuration Summary Table.
Click the button  to copy the highlighted carrier and appends
the copy to the bottom of the carrier list.
to copy the highlighted carrier and appends
the copy to the bottom of the carrier list.
Click the button  to adjust the each carrier frequency offset
automatically.
to adjust the each carrier frequency offset
automatically.
Enter an alpha-numeric waveform file name of up to 22 characters. The name can include spaces and the following special characters: _ $ & # + - [ ]. If you enter a name with more than 22 characters, the software truncates the name to 22 characters when you click outside of the cell. The default name is .
The name you define here is displayed on the signal generator when you download the waveform.
Choices: Off | On
Default: Off
Set the state of the short waveform mode.
Range: 1 to 6 slots
Default: 1
Set the number of slots for the short length generated waveform.
Range: 0 to 6 slots
Default: 0
Sets the waveform generation offset.
Enter an alpha-numeric comment of up to 32 characters. You can enter a separate comment for each waveform.
Range: 1 to Max (Max number is determined by the signal generator memory size, e.g. 64 Msample memory)
Default: 1
Set the number of the subframes for the waveform.
Range: 2 to 32
Default: 16
Set the oversampling ratio for the waveform.
A larger oversampling ratio results in a more completely filtered image, but uses more waveform memory because it increases the number of waveform points. A smaller oversampling ratio reduces waveform file size, but reduces performance. The Oversampling ratio determines the Total Sample Points and the ARB Sampling clock of the signal generator. The ARB Sampling Clock of Signal Generator is set to Oversampling Ratio * 1.28e6
View the number of sample points in the generated waveform. You cannot edit this cell.
Total sample points = 6400 * Number Of Subframes * Oversampling Ratio
Range: 1 to 6
Default: 3
Set the switch point for Uplink/Downlink in a TD-SCDMA sub-frame. In the TD-SCDMA frame structure, the switching point determines how timeslots 2 through 6 are allocated between uplink and downlink. Timeslots before the switching point are allocated to the uplink; timeslots after the switching point are allocated to the downlink.
Choice: None | Root Raised Cosine | Raised Cosine | Ideal Low Pass | Gaussian
Default: Root Raised Cosine
Double-click this cell to expand choices for baseband filtering and associated parameters. A read-only summary of your filtering configuration appears in the adjacent cell.
Click the cell to choose from five options for baseband filtering:
No filter.
Root cosine, also referred to as square root raised cosine, filters have the property that their impulse response rings at the symbol rate. Adjacent symbols do not interfere with each other at the symbol times because the response equals zero at all symbol times except the center (desired) one. Root cosine filters heavily filter the signal without blurring the symbols together at the symbol times. This is important for transmitting information without errors caused by ISI. Note that ISI does exist at all times except the symbol (decision) times.
When it is turned on, a time domain raised cosine window is applied on the waveform to suppress the out-of-band power.
In the frequency domain, this filter appears as a low-pass, rectangular filter with very steep cut-off characteristics. Due to a finite number of coefficients, the filter has a predefined length and is not truly "ideal." The resulting ripple in the cut-off band is effectively minimized with a Hamming window.
The Gaussian filter does not have zero ISI. Wireless system architects must decide just how much of the Inter-Symbol Interference can be tolerated in a system and combine that with noise and interference. The Gaussian filter is Gaussian shaped in both the time and frequency domains, and it does not ring like the root cosine filters do. The effects of this filter in the time domain are relatively short and each symbol interacts significantly (or causes ISI) with only the preceding and succeeding symbols. This reduces the tendency for particular sequences of symbols to interact which makes amplifiers easier to build and more efficient.
Range: 0.05 to 1
Default: 0.22
Change the Alpha parameter for Root Raised Cosine and Raised Cosine filters. This field is unavailable for other filter selections.
Range: 0.1 to 1
Default: 0.7
Set the bandwidth time product, specifying the Gaussian filter performance. BT determines the extent of the filtering of the signal. This field is unavailable for other filter selections.
Range: 24 to 64
Default: 64
The symbol length of the filter determines how many symbol periods will be used in the calculation of the symbol. The filter selection influences the symbol length value.
The Gaussian filter has a rapidly decaying impulse response. A symbol length of 6 is recommended. Greater lengths have negligible effects on the accuracy of the signal.
The root cosine filter has a slowly decaying impulse response. It is recommended that a long symbol length, around 32, be used. Beyond this, the ringing has negligible effects on the accuracy of the signal.
The ideal low pass filter also has a very slow decaying impulse response. It is recommended that a long symbol length, 32 or greater, be used.
For both root cosine and ideal low pass filters, the greater the symbol length, the greater the accuracy of the signal. Try changing the symbol length, and plotting the spectrum to view the effect symbol length of the filter has on the spectrum.
Choices: ON | OFF
Default: OFF
Use this cell to enable or disable Truncated PN.
- Truncated the PN sequence to ensure that the PN sequence repeats integer times in the waveform, and exactly fills the length of the waveform, providing a predictable bit pattern for the BER measurement.
- The PN sequence won't be truncated. In this way, the end of the waveform is not guaranteed to be exactly the end of a PN9 period, where the excess bits will be cut.
This cell is only applicable for the PN sequence in Advanced Carrier Payload.
Choices: ON | OFF
Default: OFF
Use this cell to enable or disable the payload export function. When you turn it on, all of the payload files in the transport payload layer are exported to the exporting path set in the below cell.
Select the exporting path if you enable the Payload Export.
Choices: None | Subframe | User Defined | RF Blanking Control | ALC Hold Control
Default: Subframe
Select the marker points for marker 1 using the Marker Settings dialog box.
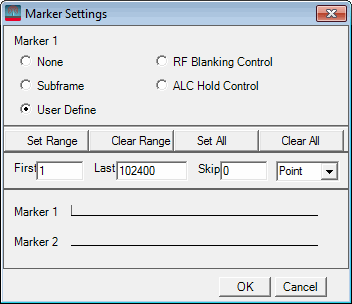
The signal generator outputs the marker 1 signal from the rear-panel EVENT 1 output. For more information, see the signal generator's User Guide.
Choices: None | Subframe | User Defined | RF Blanking Control | ALC Hold Control
Default: None
Select the marker points for marker 2 using the Marker Settings dialog box.
The signal generator outputs the marker 2 signal from the rear-panel EVENT 2 output . For more information, see the signal generator's User Guide.
Choices: None | Subframe | User Defined | RF Blanking Control | ALC Hold Control
Default: RF Blanking Control
Displays the marker points for marker 3.
The signal generator outputs the marker 3 signal from the rear-panel EVENT 3 output. For more information, see the signal generator's User Guide.
Marker 3 source is fixed to the RF Blanking Control by the software. You can not change the routing.
Choices: None | Subframe | User Defined | RF Blanking Control | ALC Hold Control
Default: ALC Hold Control
Display the marker points for marker 4.
The signal generator outputs the marker 4 signal from the rear-panel EVENT 4 output. For more information, see the signal generator's User Guide.
Marker 4 source is fixed to the ALC Hold Control by the software. You can not change the routing.