Power Control for E8267D PSG Signal Generators
Output power level control for signals that burst on and off in the
manner of WiMAX needs to be done differently for E8267D PSG signal generators,
as compared to E4438C ESG, N5182A MXG, N5182B MXG, or N5172B EXG signal generators.
This is due to differences in the automatic level control (ALC) circuitry
in these instruments. The ALC loop in the PSG requires more time to settle
to the desired power level, ranging from 1 ms
to 5 ms depending on the ALC bandwidth, with with a tradeoff between better
EVM performance or faster settling times. For example, the 1 kHz ALC bandwidth
setting gives reasonably good EVM but the settling time is about 500 ms.
By default, Signal Studio sets up the waveform so that the ALC is turned
on only during the highest-power symbol(s) in the waveform, which is usually
the preamble (see Power
Settings in the Tutorials section for more details). Since the preamble
for a 5 or 10 MHz OFDMA WiMAX signal is only about 103 ms
long, the ALC does not have sufficient time to set the PSG’s output power
level correctly during the preamble symbol. This can result in significant
errors in the output power level.
To address this situation, when connecting to a PSG, Signal Studio will
automatically send SCPI commands to turn off the ALC and set up the following:
-
Power Search mode is changed from the default value
of Manual
to Auto. This
will cause a new power search to be performed each time the frequency
or amplitude is changed, or when a new waveform is selected for playback.
-
Power
Search Reference is set to RMS.
This causes a power search to be performed based on the RMS voltage level
value that is stored in the waveform header. Signal Studio automatically
calculates this RMS value based on the relative power level of the symbol(s)
that have been chosen as the power reference (by default, this is the
preamble).
With these settings, each time Signal Studio downloads a waveform to
a PSG, a new power search will be performed to set the correct output
power level.
There are a few important things to note:
-
Because the ALC is turned off, the power level can drift
over time. You may want to measure this for your specific environment
and setup, since the amount of drift can vary due to factors such as temperature
stability and the types of cables used. You may need to periodically execute
a new power search to reset the power level. This can be done from the
front panel of the signal generator by pressing the
hardkey and then the
softkey.
-
The power search is executed quickly and there may still
be some error in the power level, especially if the current power setting
is much higher or lower than the previous power setting. Repeating the
power search will improve the power accuracy.
-
For longer measurements where power stability is important,
it may be possible to use the ALC in the PSG if the power leveling can
be done using enough symbols (see Using
ALC with the PSG from Signal Studio, below, for more details).
-
The process described above only works if you are using
Signal Studio to download waveform files directly into the PSG for playback.
If you choose to store the waveforms in the PSG and recall them later
for playback, you will need to set up the power search manually or have
your test software send the appropriate SCPI commands. Please see Manual Setup for Power Search,
below, for instructions.
Using ALC with
the PSG from Signal Studio
For improved power stability and accuracy, if there are at least 5 symbols
with the same power level in your waveform, you can change the Signal
Studio setup so that ALC can be turned on and used to level those symbols.
For example, if you are creating a basic mode waveform that consists of
a preamble followed by many symbols with the same modulation, you will
have the same power level over all of the data symbols. That provides
a longer portion of the waveform for the ALC to use for power leveling.
Here are the steps to follow to use ALC with your waveform:
-
Click on Waveform
Setup in the left navigation tree. Go to section
3, Marker and Other Settings,
and verify that Marker 3 Source is set to Burst
Envelope and Marker 4 Source is set to ALC
Hold (these are the default values). This ensures that the proper
markers are placed in the waveform file.
-
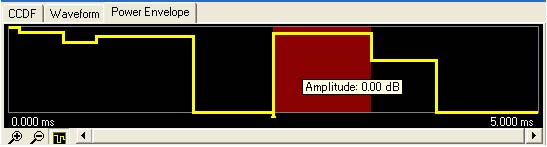
To view the power envelope of your waveform, click on
the Power Envelope
tab at the bottom of the Waveform Setup page. The yellow trace shows the
power envelope. Holding the mouse over each section will bring up a display
of the relative amplitude level in that section. The red portion shows
the symbols that are currently being used as the power reference. Select
the portion of the waveform that you want to use for power leveling by
clicking on it in the  Power Envelope
plot. The symbols with that power level will turn
red to indicate the new region for power leveling. Note that this is the
portion of the waveform that will have the output power indicated by the
amplitude setting on the PSG.
Power Envelope
plot. The symbols with that power level will turn
red to indicate the new region for power leveling. Note that this is the
portion of the waveform that will have the output power indicated by the
amplitude setting on the PSG.
-
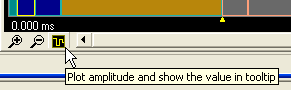
Verify that the section of the frame being used for
the power reference is at least 5 symbols long. To check this, click on
the desired zone in the tree view to display the frame and zone layout,
and click on the Plot Amplitude icon
to display the yellow power envelope trace and compare this trace to the
zone layout to see the number of symbols with each power level.
-
Click on Signal
Generator in the navigation tree on the left and go to ALC settings. Change the ALC state to On and set the
ALC Bandwidth to 1 kHz.
-
Go to Dual ARB Marker Utilities and verify that Pulse/RF Blanking
is set to Marker 3 and ALC
Hold is set to Marker 4 (these are the default values). This
tells the signal generator what functions to perform when these markers
are present.
-
Download the waveform file to the PSG. Verify that the
output power in the power reference symbols is approximately the same
as the amplitude setting on the PSG. If there is a significant error (e.g.
greater than 0.5 dB), the ALC may not have had sufficient time to level
the power properly, and you may need to choose a different portion of
the waveform with a larger number of symbols with the same power level
to be the power reference.
-
If desired, save the setup file (
> ) so that these settings
will be stored for later use.
Manual Setup for Power Search
If you store waveform files in the PSG’s nonvolatile or volatile memory
and then load them for playback, you will need to set up the PSG for ALC
off and RMS power search. This can be done once
and saved as an instrument state for easy recall later.
-
On the PSG, press ,
then load the desired waveform file and select it for playback. Turn the
ARB on.
-
Set the desired frequency and amplitude.
-
Press the
hardkey, then the following softkeys:
-
Turn the
on. A power search should automatically begin.
-
A new power search will automatically begin if the frequency
or amplitude are changed.
-
When a new waveform is selected, a new power search
should automatically begin.
-
To execute a power search manually, press the hard key and then the softkey.