Frequency Range


Frequency range is the span of frequencies you specify for making a device measurement.

See other 'Setup Measurements' topics

How to set Frequency Range

You can also make these settings and more from the Sweep Type dialog.

See the frequency ranges of all analyzer models.

Using Hardkey/SoftTab/Softkey

Using a mouse

  1. Press Freq> Main > Start, Stop, Center, or  Span.

  2. Enter desired frequency value.

Note: When number of ports is greater than 12, changing sweep parameters takes long time due to the calculation for collection. In order to avoid this, the Sweep Type dialog box is displayed instead of entry.

  1. Right click on the X-axis label or stimulus range area under grid line.

  2. Click on Start/Stop/Center....


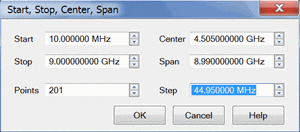
Frequency Start/Stop - Center/Span - Step dialog box help

Either of the following pairs of settings determine the frequency range. The last value that you enter determines the X-Axis labels. For example, if you enter the Start and Span values, the X-Axis will show Center and Span labels.

Start /Stop - Specifies the beginning and end frequency of the swept measurement range.

Note: The start frequency at preset may not be the minimum value in full range.

Note: The maximum frequency of M9808A, P50x8A is 54 GHz. However, the specification is applied up to 53 GHz. (The maximum frequency is 53 GHz for the units shipped with the A.13.70 and below. Re-calibration is required for upgrade.)

Center /Span - Specifies the value at the center and frequency range.

Either of the following settings determine the number of evenly-spaced data points across the frequency range.

Points - Specifies the number of evenly-spaced data points across the frequency range. Learn more about Data Points.

Step - Available ONLY in Linear sweep type. Specifies the frequency step size between evenly-spaced data points. Changes to this setting will cause the Points setting to adjust to the closest integer. Any 'remainder' will adjust either the Stop value or Span value depending on which is displayed on the X-Axis label.
Zoom

Zoom allows you to easily change the start and stop frequencies or start and stop power levels in a power sweep.

Zoom operates on the Active Trace and all traces in the same channel as the active trace, regardless of the window in which they appear.

How to Zoom in a measurement window

  1. Left-click the mouse or use a finger, then drag across a portion of a trace.

  2. Release the mouse or lift the finger and the following menu appears:

  3. Select from the following:

  • Zoom - changes the channel stimulus settings to the left and right border values of the Zoom selection

  • Zoom xy - changes the channel stimulus settings as above. In addition, the Y-axis scale of the active trace changes to the approximate scale of the Zoom selection.

  • Zoom Full Out - changes the channel stimulus settings to the full span of the current calibration. If no calibration is ON, then the stimulus settings are changed to the full span of the VNA model.

Notes

  • The stimulus settings are changed for ALL traces in the active channel, regardless of the window in which they appear.

  • If markers are in the selected area, they remain in place.

  • If markers are in the unselected area, they are moved to the right or left edge of the new span. When Zoom Full Out is selected, the markers are moved back to their original location.

Zoom is NOT available for the following:

CW Frequencies

Measurements with a CW Time sweep or Power sweep are made at a single frequency rather than over a range of frequencies.

How to set CW Frequency

Using Hardkey/SoftTab/Softkey

Using a mouse

  1. Set Sweep Type to CW Time or Power Sweep.

  2. Press Freq > Main > CW.

  3. Enter desired CW frequency.
  1. Set Sweep Type to CW Time or Power Sweep.

  2. Right click on the stimulus range area under grid box.

  3. Click on CW....


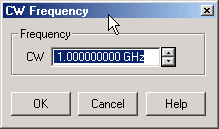
CW Frequency dialog box help

CW  Type a value and the first letter of the suffix (k,m,or g) or use the up and down arrows to select any value within the range of the VNA.

Frequency Resolution

The resolution for setting frequency is 1 Hz.

Auto Tune

The Auto Tune softkey is a feature of the Spectrum Analyzer measurement class (Option S9x09xxA/B, S9x090A/B). Each time this softkey is pressed, all defined distortion measurement bands for the modulation channel are automatically tuned.

Span All Meas Bands

The Span All Meas Bands softkey is a feature of the Modulation Distortion measurement class (Option S93070xB, S9x070A/B only). Each time this softkey is pressed, all defined distortion measurement bands for the modulation channel are automatically tuned.