Sweep Settings


A sweep is a series of consecutive data point measurements taken over a specified sequence of stimulus values. You can make the following sweep settings:

See Triggering and other 'Setup Measurements' topics

How to set Sweep Type

Using Hardkey/SoftTab/Softkey

Using a mouse

  1. Press Sweep > Main > Sweep Type.

  1. Right click on the stimulus range area under grid box.

  2. Click Sweep Setup....

  3. Select Sweep Type tab and select type.

  4. Click Apply to implement the setting changes.


Sweep Type dialog box help

Note: Sweep Settings are not applied until either OK or Apply is pressed.

Channel  The active channel when Sweep Type was selected. Sweep settings will be applied to this channel.

Sweep Type

Linear Frequency  Sets a linear frequency sweep that is displayed on a standard grid with ten equal horizontal divisions.

  • Start  Sets the beginning value of the frequency sweep.

  • Stop  Sets the end value of the frequency sweep.

  • Points  Sets the number of data points that the analyzer measures during a sweep (Default is 201). Learn more.

  • Power - Sets the power level or the source. Learn more.

  • IF Bandwidth - Sets the IF (Receiver) bandwidth. Learn more.

  • Use Center/Span- Changes from Start/Stop to Center/Span setup.

Log Frequency  The source is stepped in logarithmic increments and the data is displayed on a logarithmic x-axis. This is usually slower than a continuous sweep with the same number of points.

  • Start  Sets the beginning value of the frequency sweep.

  • Stop  Sets the end value of the frequency sweep.

  • Points  Sets the number of data points that the analyzer measures during a sweep (Default is 201). Learn more.

  • Power - Sets the power level or the source. Learn more.

  • IF Bandwidth - Sets the IF (Receiver) bandwidth. Learn more.

Power Sweep  Activates a power sweep at a single frequency that you specify.  Learn about power sweep

  • Start Power  Sets the beginning value of the power sweep.

  • Stop Power  Sets the end value of the power sweep.

  • CW Freq  Sets the single frequency where the analyzer remains during the measurement sweep.

  • Points  Sets the number of data points that the analyzer measures during a sweep (Default is 201). Learn more.

  • IF Bandwidth - Sets the IF (Receiver) bandwidth. Learn more.

CW Time  Sets the analyzer to a single frequency, and the data is displayed versus time. Learn more.

  • CW Freq   Sets the frequency where the analyzer remains during the measurement.

  • Power - Sets the power level or the source. Learn more.

  • Sweep Time  Sets the duration of the measurement, which is displayed on the X-axis.

  • Points  Sets the number of data points that the analyzer measures during a sweep (Default is 201). Learn more.

  • IF Bandwidth  Sets the IF (Receiver) bandwidth. Learn more.

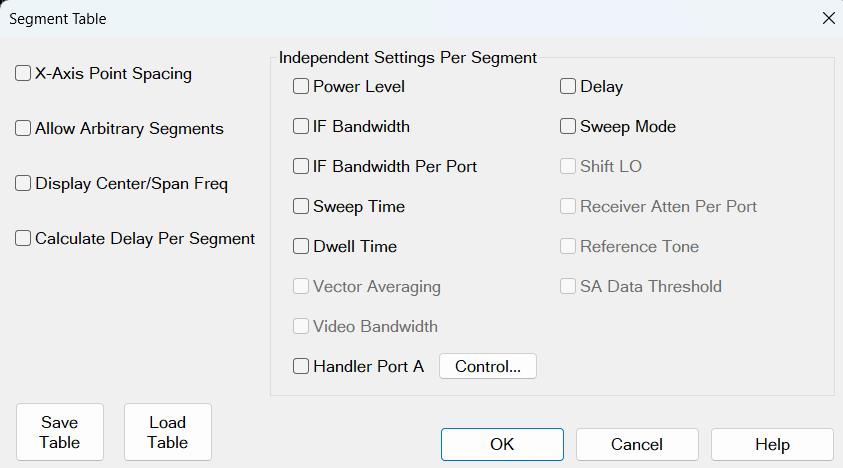
Segment Sweep  Sets the analyzer to sweep through user-defined sweep segments.  Learn how to make these settings.


    OK  Applies setting changes and closes the dialog box.

    Apply  Applies setting changes and leaves the dialog box open to make more setting changes.

    Cancel  Closes the dialog. Setting changes that have been made since the last Apply button click are NOT applied.
    Help - Display the Sweep Type dialog box help.


    Power Sweep

    A power sweep either increases or decreases source power in discrete steps. Power sweep is used to characterize power-sensitive circuits, with measurements such as gain compression.

    In the Sweep Type dialog, specify Start power, Stop power, and CW Frequency. Power can be swept over any attainable range within the analyzer ALC range.

    The remaining power settings apply in power sweep mode:

    Notes:

    Segment Sweep

    Segment Sweep activates a sweep which consists of frequency sub-sweeps, called segments. For each segment you can define independent power levels, IF bandwidth, and sweep time.

    Once a measurement calibration is performed on the entire sweep or across all segments, you can make calibrated measurements for one or more segments.

    In segment sweep type, the analyzer does the following:

    Restrictions for segment sweep:

    Note: Segment sweeps can be overlapped for converter measurement types.

    How to make segment sweep settings

    Using Hardkey/SoftTab/Softkey

    Using a mouse

    1. Press Sweep > Segment Table > Segment Table...

    1. Right click on the X-axis label or stimulus display area under grid line.

    2. Click Sweep Setup... then select Segment Sweep under sweep type.

    3. Click Segment Table....

    Segment Table dialog box help

    Segment Table Softkeys

    Add Segment - adds a sweep segment at last segment.

    Insert Segment - adds a sweep segment before the selected segment. You can also click the "down" arrow on your keyboard to quickly add many segments.

    Delete Segment - removes the selected segment.

    Delete All Segments - removes all segments.

    Note: At least ONE segment must be ON or Sweep Type is automatically set to Linear.


    Segment Table dialog box

    X-Axis Point Spacing - Check to scale the X-axis to include only the segments. Learn more.

    Allow Arbitrary Segments - Check to allow arbitrary frequencies (overlapped or reverse sweep). Learn more.

    Display Center/Span Freq - Check to display the center/span frequency.


    Independent Setting Per Segment

    Power Level - Sets the Power level for the segment. Also, the test port power can UNCOUPLE. See Power Coupling.

    IF Bandwidth - Sets the IF Bandwidth for the segment.

    IF Bandwidth Per Port - Sets the different bandwidth with different port for the segment.

    Sweep Time - Sets the Sweep time for the segment.

    Dwell Time - Specifies the time the source stays at each measurement point before the analyzer takes the data.

    Vector Averaging - Enables SA vector average for the segment.

    Video Bandwidth - Enables SA video bandwidth for the segment.


    Delay- Sets the time to wait just before acquisition begins for each segment.

    Sweep Mode - Sets the sweep mode to auto or stepped.

    Shift LO- Sets the state of Shift LO.

    Receiver Atten Per Port - Enables receiver attenuation per port for the segment.

    Receiver Gain - Sets Receiver Gain.

    Reference Tone - Enables SA multitone reference for the segment.

    SA Data Threshold - Enables SA data threshold for the segment.


    Save Table - Saves the setting changes in segment table.

    Load Table - Apply the setting changes in segment table.


    To Modify an Existing Segment

    To make the following menu settings available, the segment table must be displayed first. (Press Sweep > Segment Table).

    State - Click the box on the segment to be modified. Then, use the up/down arrow to turn the segment ON or OFF.

    Start - Sets start frequency for the segment. Click the box and type a value and the first letter of a suffix (KHz, Mhz, GHz). Or double-click the box to select a value.

    Stop - Sets stop frequency for the segment. Click the box and type a value and the first letter of a suffix (KHz, Mhz, GHz). Or double-click the box to select a value.

    Note: The segment table truncates the frequency resolution. To verify the frequency resolution that you input, create a marker at the start or stop frequency settings.

    Points - Sets number of data points for this segment. Insert a value or double-click the box to select a value.

    To set Power Level, IF Bandwidth/IF Bandwidth Per Port, Sweep Time, Delay, Receiver Attenuator Per Port, Sweep Mode and Shift LO independently for each segment:

    1. Press Sweep > Main > Sweep Type > Segment Sweep.

    2. Click on Segment Table > Segment Table....

    3. Check the box corresponding to the segment setting to set then click OK.

    4. Click in the box at the bottom of the display and use the up/down arrows to enter a value or double-click the box and select a value with the numeric keypad.

    Note: If the following are NOT set, the entire sweep uses the channel IFBW, Power, and Time settings.

    X-Axis Point Spacing  - Segment Sweep ONLY

    This feature affects how a segment trace is drawn on the screen.

    How to select X-Axis Point Spacing

    Using Hardkey/SoftTab/Softkey

    Using a mouse

    1. Press Sweep > Segment Table. > Segment Table....

    2. Check X-Axis Point Spacing.

    1. Right click on the X-axis label or stimulus display area under grid line.

    2. Click Sweep Setup... then select Segment Sweep under sweep type.

    3. Click Segment Table....

    4. Check X-Axis Point Spacing.

    For example, given the following two segments:

    Without X-Axis Point Spacing


    With X-Axis Point Spacing

    Arbitrary Segment Sweep

    This feature allows arbitrary frequencies to be entered into the segment sweep table. With this capability, segments can have:

    However, there are several limitation:

    How to enable Arbitrary Segment Sweep

    Using Hardkey/SoftTab/Softkey

    Using a mouse

    1. Press Sweep > Segment Table. > Segment Table....

    2. Check Allow Arbitrary Segments.

    1. Right click on the X-axis label or stimulus display area under grid line.

    2. Click Sweep Setup... then select Segment Sweep under sweep type.

    3. Click Segment Table....

    4. Check Allow Arbitrary Segments.

    Notes:

    Sweep Time

    The analyzer automatically maintains the fastest sweep time possible with the selected measurement settings. However, you can increase the sweep time to perform a slower sweep.

    How to set Sweep Time

    Using Hardkey/SoftTab/Softkey

    Using a mouse

    1. Press Sweep > Sweep Timing > Sweep Time.

    2. Input the desired sweep time.

    1. Right click on the X-axis label or stimulus range area under grid line.

    2. Click on Sweep Setup....

    3. Select Timing tab.

    4. Deselect the Auto Sweep Time box.

    5. Input the desired sweep time.


    Time dialog box help

    Sweep Time  Specifies the time the analyzer takes to acquire RF data for a sweep. The maximum sweep time of the analyzer is 86400 seconds or 1 day. Learn about other settings that affect sweep speed.

    Note: When a channel has an Aux In or SMU trace, the measurement time for DC voltage/current will be added.  

    Note: Ignore CW time as labeled on the X-axis and marker readout. It is NOT at all accurate.

      Sweep Setup

      How to make Sweep Setup settings

      Using Hardkey/SoftTab/Softkey

      Using a mouse

      1. Press Sweep > Sweep Timing.

      1. Right click on the X-axis label or stimulus range area under grid line.

      2. Click on Sweep Setup....

      3. Select Timing tab.


      Sweep Setup dialog box help

      Time

      Sweep Time - same as Sweep Time Softtab Help.

      Dwell Time - Specifies the time the source stays at each measurement point before the analyzer takes the data. Only applies to stepped sweep. The maximum dwell time is 20 seconds. See also Electrically Long Devices.

      Sweep Delay - Specifies the time to wait just before acquisition begins for each sweep. This delay is in addition to Dwell Time (per point) and External Trigger delay if enabled.

      Fast Sweep   Available ONLY with Opt. 103. Not available on M980xA and P50xxA. When checked, in Analog Sweep mode the analyzer source settling times are shortened in both frequency and power-control (ALC) circuits. In Stepped Sweep mode, the settling time at ALL data points are shortened. This nearly doubles the sweep speed at preset conditions, but at the expense of frequency accuracy and a few dB of amplitude variation. For ratioed measurements, such as S-Parameters, these errors substantially ratio out.

      • By default, Fast Sweep is always OFF to provide maximum accuracy and stability.

      • Fast Sweep is NOT allowed with Power Limit enabled.

      • Note: Performance specifications do NOT apply in Fast Sweep.

      Sweep Mode

      Auto -  Automatic adjusts the sweep time and dwell time. When "Auto Sweep Time" is checked, the sweep time and dwell time will disable to edit.

      Stepped  When checked (Stepped Sweep) the analyzer source is tuned, then waits the specified Dwell time, then takes response data, then tunes the source to the next frequency point. This is slower than Analog Sweep, but is more accurate when testing electrically-long devices.

      When cleared (Analog Sweep) the analyzer takes response data AS the source is sweeping. The sweep time is faster than Stepped, but could cause measurement errors when testing electrically-long devices.

      When the dialog check box is cleared, the analyzer could be in either Analog or Step mode. The mode can change from sweep to sweep. There is NO way to determine whether the analyzer is in Analog or Stepped Sweep. If you want to be sure what the current sweep mode is, then switch it to Stepped.

      Stepped sweep is automatically selected for a number of reasons. Here are some of the reasons:

      Sweep Sequence

      Note: This feature is not available on the M948xA, M980xA and P50xxA.

      Standard Sweep  When checked, the analyzer sweeps all data points for each source port in turn. For a 2-port analyzer, this means that all data points are swept in the forward direction, then all data points are swept in the reverse direction.  Even when NO reverse parameters are displayed (S22 or S12), reverse measurements are necessary when a full 2-port calibration is correcting the channel. This is the default behavior.

      Point Sweep  Available ONLY on standard S-parameter channels.  When checked, the analyzer measures all parameters at each frequency point before stepping to the next frequency. The display trace is updated as each data point is measured.

      • Point sweep usually results in slower sweeps and is useful only in rare circumstances.

      • Point sweep is the same as stepped sweep mode on the 8510 and 8530.  

      • PMAR is not compatible with Point Sweep mode.