Acquisition Setup
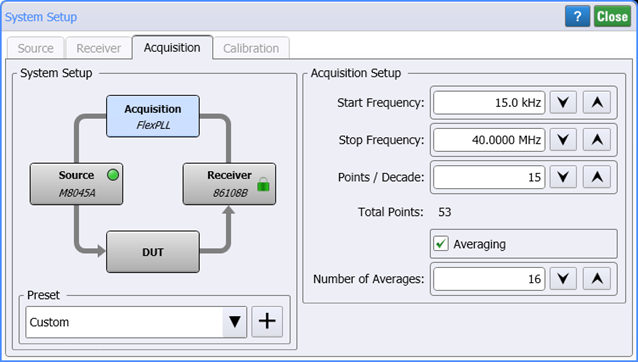
Use the System Setup dialog's Acquisition Setup tab to configure FlexPLL's Start Frequency, Stop Frequency, and Points/Decade for JTF swept measurements. Based on these settings, the dialog reports the Total Points that will be acquired on each measurement sweep.
To open this dialog, click Setup > Acquisition Setup and select Acquisition tab. Or, click the Acquisition button located at the bottom of the application.
System Setup
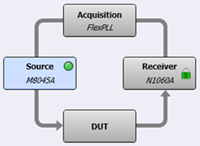 The System Setup diagram illustrates the current equipment hardware connections. You can click the four hardware blocks to move between the System Setup dialog's tabs.
Use the Preset field to save your current System Setup dialog setting so that they can easily and quickly be restored without having to remember or re-enter the individual settings. Click +, and enter a name for your preset. Your preset is now available in the Preset drop down. The following table shows all the settings from the System Setup dialog that are saved in the preset.
FlexPLL comes with several PICe presets as shown in the Supplied FlexPLL System Setup Presets table in this topic. You select one of these presets to automatically configure FlexPLL with the correct settings to use during the calibration step. After the calibration, you load another preset to configure FlexPLL's settings during measurements. Presets are simple XML files so you can view their contents with a text editor.
System Setup Presets
- PCIe Gen1 (81150A-60A Cal)
- PCIe Gen1 (81150A-60A Meas)
- PCIe Gen1 (M8000 Cal)
- PCIe Gen1 (M8000 Meas)
- PCIe Gen2 (81150A-60A Cal)
- PCIe Gen2 (81150A-60A Meas)
- PCIe Gen2 (M8000 Cal)
- PCIe Gen2 (M8000 Meas)
- PCIe Gen3 (81150A-60A Cal)
- PCIe Gen3 (81150A-60A Meas)
- PCIe Gen3 (M8000 Cal)
- PCIe Gen3 (M8000 Meas)
- PCIe Gen4 (81150A-60A Cal)
- PCIe Gen4 (81150A-60A Meas)
- PCIe Gen4 (M8000 Cal)
- PCIe Gen4 (M8000 Meas)
- PCIe Gen5 (81150A-60A Cal)
- PCIe Gen5 (81150A-60A Meas)
- PCIe Gen5 (M8000 Cal)
- PCIe Gen5 (M8000 Meas)
- PCIe Gen6 (81150A-60A Cal)
- PCIe Gen6 (81150A-60A Meas)
- PCIe Gen6 (M8000 Cal)
- PCIe Gen6 (M8000 Meas)
| Setting | Limits | ||
|---|---|---|---|
| Minimum | Maximum | Default | |
| Start Frequency | 1.5 kHz | 49.999 MHz | 1.5 kHz |
| Stop Frequency | 2.5 kHz | 50 MHz | 50 MHz |
| Points/Decade | 1 | 100 | 15 |
The Start and Stop frequencies that you enter in this dialog are coupled to the four frequency data entry fields that are displayed below the Jitter Transfer Function graph: Start, Stop, Center, and Span. Changes made to entries below the graph also changes the settings in the Acquisition Setup dialog.
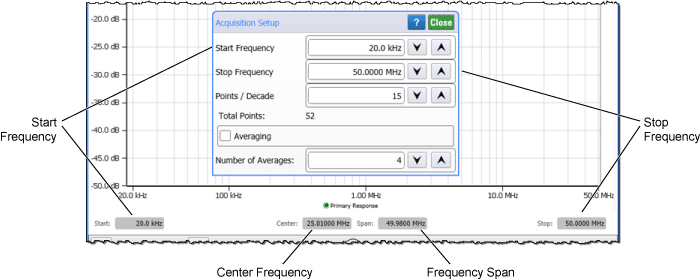
You can also enable Averaging of JTF data. The Number of Averages can be set from 2 to 64. As FlexPLL performs an acquisition sweep from the lowest to highest jitter frequency, data for the current jitter frequency is acquired the number of times specified for averaging and then these values are averaged to arrive at the final data point value. In other words, FlexPLL applies averaging to each data point as it is acquired and not across multiple sweeps. So if averaging is set to 4, the first point is measured 4 times and then averaged, the second point is measured 4 times and then averaged, and so forth to the last point.