19Interference Analyzer (SA Mode) – Option 236
Option 236 provides Spectrogram display, Waterfall display, and Record/Playback.
In this Chapter
Spectrogram and Waterfall Displays
Spectrogram and Waterfall displays provide a visual history of the measured spectrum. Each display type can be used to locate intermittent signals or to view signal levels and frequencies over time.
Spectrogram is a single horizontal line of color-coded power while Waterfall uses a 3-D color-coded display. The functional difference between these two displays is that Spectrogram provides less trace detail than Waterfall display. However, it also allows more traces to be viewed.
These two displays can NOT be used with Channel Measurements.
In SA mode, Traces can be recorded from, or played back into, any measurement type (such as Channel Power or Occupied BW) or any display type (such as Spectrogram and Waterfall). See “How to Record a Session” on page 593 to learn how to save traces.
Spectrogram Display (SA Option)
Spectrogram draws the most recent trace record at the bottom of the stack of previously-drawn trace records. Drawing the live trace on the display is optional.
Figure 19-1 Spectrogram display- Overlay view- with time markers 23 seconds apart. 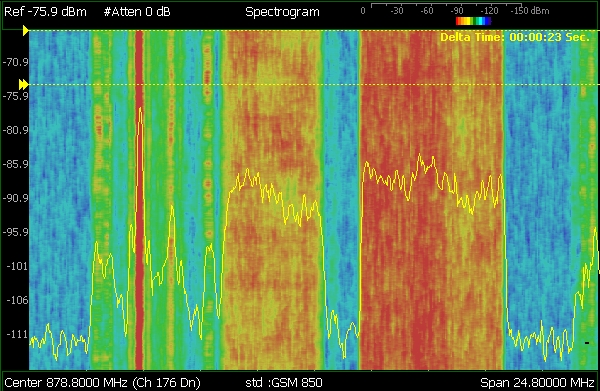
The following settings all contribute to the sweep time of an individual trace, and therefore, the total elapsed time that can appear on the screen in Spectrogram display:
—Frequency Range. Learn more in “Frequency Range” on page 159.
—Resolution BW and Video BW. Learn more in “Resolution Bandwidth (Res BW)” on page 197 and “Video Bandwidth (Video BW)” on page 197.
—Sweep Time (Acquisition). Learn more in.“Sweep Acquisition” on page 202
—Resolution (Number of Points). Learn more in “Points ” on page 212.
How to select Spectrogram
—Press Meas 1 > Interference Analysis > Spectrogram
How to modify the Spectrogram
You can change how the spectrogram is displayed relative to the data trace. This setting affects the total number of trace records that can be displayed.
For SA Mode:
1.Press Meas Setup 4 > Spectrogram Settings > Spectrogram View
2.Press choose from the following:
—Overlay Displays the data trace over the spectrogram with NO graticules. Total trace records: 340.
—Full Screen Displays the spectrogram with NO data trace. Total trace records: 340.
—Top Displays the data trace below the spectrogram. Total trace records: 130.
—Bottom Displays the data trace above the spectrogram. Total trace records: 130.
How to create Time Markers (SA Only)
Use Time Markers to determine the elapsed time between any two displayed records. The most recent record appears at the bottom of the screen.
Moving a time marker will also ’push’ the displayed spectrogram (by modifying the Playback Trace Number) to keep the marker on the screen (if possible). Markers that indicate (mark) a trace ’off screen’ will be displayed at the top or bottom of the plot - the location nearest to where that trace would be if the spectrogram plot extended off the screen.
1.Press Meas Setup 4 > Time Markers > Time
2.Then enter a value from 0 (the most recent sweep record) to the maximum value, using the numeric keypad,  arrows, or the rotary knob. A “>” indicates the Time Marker.
3.Then Delta
4.Then enter a value from 0 (the most recent sweep record) to the maximum value, using the numeric keypad, arrows, or the rotary knob. A “>>” indicates the Delta Marker.
—At the current sweep speed, the difference in time between these two markers appears at the upper-right corner of the view as Delta Time: hh:mm:ss Sec.
—An invalid number (very large positive or negative) appears when a trace record is not available at either marker. 00:00:00 Sec appears when both markers are not available.
Figure 19-2 Time marker display 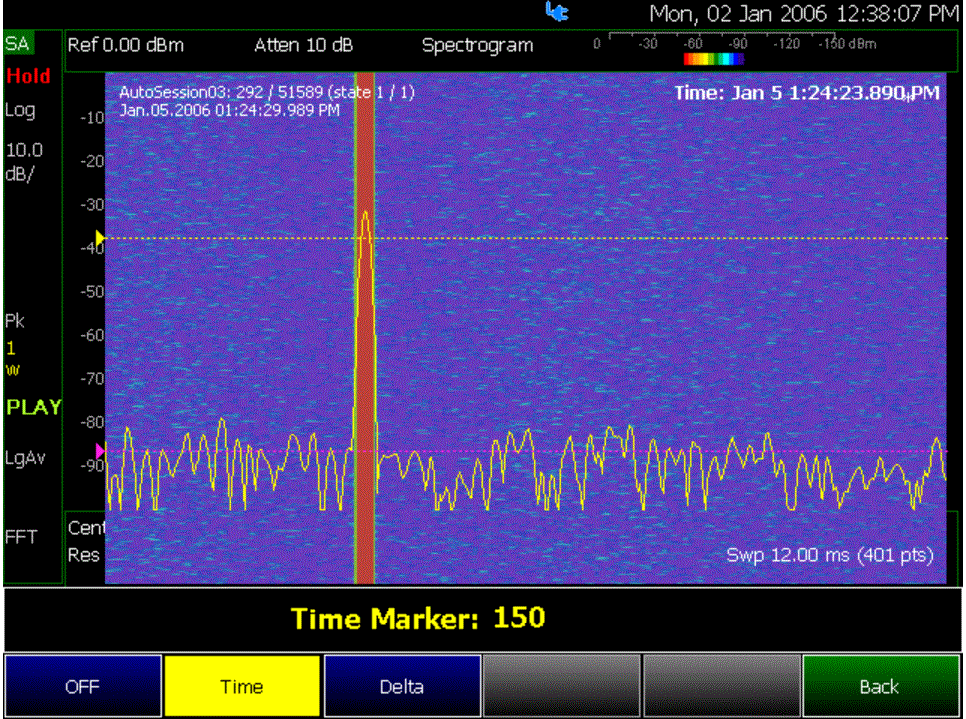
Figure 19-3 Delta marker display 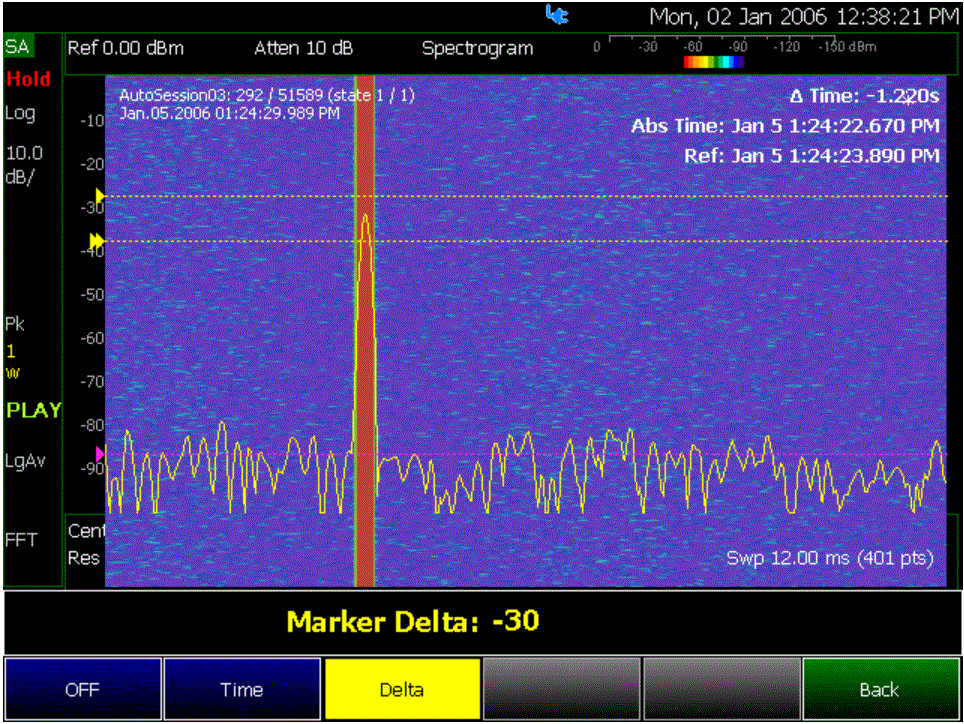
Common Settings for Waterfall and Spectrogram

Set Red and Blue Limits
The colors displayed on the Waterfall and Spectrogram represent the various measured power levels:
—Red = Highest power levels
—Blue = Lowest power levels
| The full Red-to-Blue color spectrum is visible only with Indoor display colors. Learn more in “Display Colors” on page 860. |
Adjust the Red and Blue limits to the power levels that you expect to measure.
The Blue limit must always be less than the Red limit.
For SA Mode:
—Press Meas Setup 4.
—Then Spectrogram Settings or Waterfall Settings
—Then choose from the following:
—Red Limit Using the arrows, rotary knob, or keypad, select the HIGHEST power level that you expect to measure. This power level, and those measured higher than this level, appear Red.
—Blue Limit Using the arrows, rotary knob, or keypad, select the LOWEST power levels that you expect to measure. This power level, and those measured lower than this level, appear Blue.
How to Restart the Spectrogram/Waterfall
Press Sweep 3 then Restart
Averaging
Averaging can be enabled on the underlying measurement. Press Meas 4 then Average Type. Learn more in “Average Type” on page 217.
Mode Preset
Mode Preset resets ONLY the Spectrogram and Waterfall display settings. It does not reset the measurement settings.
—Press Preset
—Then Mode Preset
The live trace is always drawn on a Waterfall display. Older trace records scroll up from the displayed trace and eventually off the screen. Because of this, locate the live trace on the bottom of the screen using the scale and reference settings. Learn how in “Scale and Units” on page 165.
| Although this document refers to past traces as ‘records’ these traces are not saved. They are only drawn on the FieldFox screen. See “Record Playback Example (SA Only)” on page 602 for how to save traces. |
The following settings all contribute to the sweep time of an individual trace, and therefore, the total elapsed time that can appear on the screen in Waterfall display:
—Frequency Range. Learn more in “Frequency Range” on page 159.
—Resolution BW and Video BW. Learn more in “Resolution Bandwidth (Res BW)” on page 197 and “Video Bandwidth (Video BW)” on page 197.
—Sweep Time (Acquisition). Learn more in.“Sweep Acquisition” on page 202
—Resolution (Number of Points). Learn more in “Points ” on page 212.
Waterfall Angle
This setting allows you to show more or less detail. More detail provides fewer (time) records.
—Press Meas Setup 4
—Then Waterfall Settings
—Then Waterfall Angle
—Then choose from the following:
—Moderate Compromise between detail and number of records.
—Steep Least detail with highest number of records.
—Gradual Most detail with lowest number of records.
—Wide Angle Moderate angle with increased space between records.
Learn how to set Red and Blue Limits in “Set Red and Blue Limits” on page 587.
Record/Playback (SA Option)
Record Playback allows you to record SA trace sweeps and play them back at a later time. Use this feature to monitor spectrum activity over a period of time.
You can record traces continuously, record a specified number of traces (segments), or record when triggered by a specified power level.
Traces can be recorded from, or played back into, any measurement type (such as Channel Power or Occupied BW) or any display type (such as Spectrogram and Waterfall).
When GPS is enabled, the current location and elevation are saved and played back with traces.
Recordings can be saved to the FieldFox Internal memory, an SD Card, or a USB flash drive.
A Recording Session is a collection of recorded traces and the instrument states that generated them.
Before recording can occur, a new session must be initiated or an existing session must be opened. Sessions can later be opened for playing or continued recording. Only one session can be open at a time.
You close the session when finished recording or playing. A session is also closed when the FieldFox is Preset (or Mode Preset), an Instrument State is recalled, or when Mode is changed from SA.
Each session is saved as a folder containing a set of files on the specified storage device.
How long can a recording session last?
There are many variables that determine the possible length of a recording session. But one key variable is the amount of available memory.
When a session is opened or a new session is initiated, an estimate is made of the maximum number of traces that can be saved based on the available disk space and the current number of data points (resolution). Recording will stop when that number is reached. This estimate always keeps 4 MB of available disk space on the specified storage device. You can decrease the number of traces to further limit recording. The resolution setting can NOT be changed after a session is opened.
To maximize the amount of space that is available, save recorded traces to a USB Flash drive or SD card. Learn how in “Manage Sessions” on page 601.
You can determine the length of time over which recording can occur by setting the Record Interval (the time between recorded traces) and other settings. Learn more in “Recording Configuration” on page 597.
To view and edit the maximum number of records
Just after opening or initiating a session...
—Press Session Data
—Then TraceRecordLimit <n> (n = Max number of traces that can be recorded).
—Clear All Records Empties that session of recorded traces. Learn more in “Manage Sessions” on page 601.
FieldFox Setting Changes during Record and Playback
During Recording
When any of the following State settings are changed during recording, the State counter is incremented (“About State and User Tags” on page 592) and the settings are saved to the Session file along with the first trace to be recorded with the new setting. During playback, the trace and display annotation will reflect the change on the screen.
State settings:
Refer to Table 19-1 for a list of the applicable state settings for the SA option.
Option | Settings |
|---|---|
SA | |
Average Type | |
Detector(s) | |
External Gain | |
Frequency Range | |
Preamp On/Off | |
Resolution BW | |
RF Attenuation | |
Source Settings | |
Sweep Acquisition | |
Trigger Settings | |
Video BW | |
Zero Span Sweep Time |
Other display settings, such as Scale and acquisition, can also be changed during recording but are not saved with the session file. Think of these as settings that help YOU see the recording and playback activity. They do NOT change the data that is recorded.
During Playback
The State setting changes listed above are NOT allowed during playback.
However, all other display settings can be changed during playback to help you analyze the recorded data.
In SA mode, when recordings are played back further trace processing is possible. The Trace State(s) can be modified for post processing, and different measurements such as Channel Power, Occupied BW, Spectrogram, and Waterfall can be activated. This is because in SA all these measurements are derived from the raw traces. If not compatible with the measurement type, a MEAS UNCAL message will appear on the screen.
Record/Playback Exceptions
—Markers can be activated and moved to help analyze recorded data. However, marker position control is only available when playback is Paused.
—Field Strength Corrections is saved with the session file and it is also allowed during playback. Learn about this Field Strength Corrections in “Field Strength Measurements” on page 169.
—Frequency Counter at Marker is NOT allowed during Recording or Playback. Learn about this feature in “Frequency Counter at Marker” on page 230.
When any of the State settings (listed above) are changed during a recording, a ‘state tag’ is inserted at the first trace number to be recorded with the new setting.
In addition, you can insert a ‘User Tag’ at any time during a recording session to indicate an external event, such as when an antenna is moved. During playback, you can move quickly to any of these tags, or scroll through these tags.
A symbol is used on the screen annotation to distinguish a User Tag from a State Tag when scrolling through tags during playback.
Screen Annotation
During a record or playback session, the following is displayed in the top-left area of the screen:
— AutoSession02: 92/95 (state 4/5)_*_
Sep.22.2018 09:15:15 AM
where:
—AutoSession is an auto-generated name for sessions. 02 is the auto-generated number, incremented with each new session. The name can be changed using Manage Sessions. Learn more in “Manage Sessions” on page 601.
—92/95 is the current and total trace number: currently trace is 92 of 95 total traces.
—state 4/5 is the current and total state tag or user tag number: 4 of 5 total tags.
—* (Asterisk) indicates that a state has changed. # (Pound) indicates that a User Tag has been inserted.
—Sep.22... is the date and time of recording.
When GPS is enabled` , the current location and elevation are annotated at the bottom of the playback display. Learn more in “GPS – Distance Settings” on page 877.
| If Recording or Playback is not occurring when you think it should, check the following: |
—Is the sweep in HOLD? (upper-left annotation)
—Is Recording or Playback Paused? (mid-left annotation)
—Is the Record or Playback Interval set too long? (Configuration settings.)
How to Record a Session
—Press Trace 6
—Then Record Playback
—SA Only: Optionally set resolution (points). Learn how in “Points ” on page 212. This can NOT be changed after a session is opened.
—Then either:
—New Session OR
—Recall Session then Open and select a session.
—Then Recorder Player
—Then Record
REC is displayed in the left of screen graticules.
During recording, choose from the following:
—Pause Resume Temporarily halts recording until pressed again. The incoming trace continues to sweep. Press again to continue recording.
—Stop Immediately stops recording. Then choose from the following:
—Press Play to start replaying the recording from the beginning.
—Press Record to continue recording.
—Press Trace 6
—If the session is already open, skip the following step. Otherwise:
—Then Record Playback
—Press Recall Session Then select a session to playback and press Open.
—Then Recorder Player
—Then Play
PLAY is displayed in the left of screen graticules during playback. When the end of the recording is reached, playback begins again at trace 1 and continues to loop indefinitely.
During playback, choose from the following:
—Pause Resume Temporarily halts playback. Then choose from the following:
—Pause Resume Press to continue playing.
—Play Press to restart playback.
—Stop Press to stop playback.
— Advanced Playback Activated automatically when paused. Opens a menu of advanced playback softkey choices:
Pause Resume | Temporarily pauses or resumes playback. |
Playback State/Tag | Enables you to continue playback from a state tag, or scroll through the state tags. Enter a value between 1 and the total number of state tags using the numeric keypad, |
Page Up | Page Up and Page Down navigate the recorded data one ’screenful’ at a time by modifying the Playback Trace Number. Page Down will advance Playback Trace Number to a higher value by the number of lines on the screen, and Page Up, will reduce Playback Trace Number to a lower value by the number of lines on the screen. |
Page Down | |
Playback Ref Line | Controls the placement of the pink line across the screen. The playback ref line is displayed 1 pixel under the trace identified by a Playback Trace Number. Said another way, the spectrogram trace identified by Playback Trace Number is drawn 1 pixel above the playback reference line.
|
Playback Trace Date/Time | This softkey launches a time/date entry dialog box. With the time/date collected from that dialog, the recorded trace with the time nearest (exact, or previous to the entered time) is set to the Playback Trace Number. This allows the user to jump to an approximate time in the recording, rather than navigating by index. See also, “Playback Trace Date/Time Dialog Box” on page 597. |
 Playback Ref Line is only available for spectrogram lines, but not for Waterfall, because there is no spectrogram line.
—Playback Trace Number Activated automatically when Paused. Allows you to continue playback from a specific trace, or scroll through traces manually. Enter a value between 1 and the total number of traces using the numeric keypad, arrows, or the rotary knob.
—Stop Immediately stops playback. Then choose from the following:
—Play Start playback from trace 1.
—Record Resume recording from the last recorded trace.
—Record Playback Setup Return to the setup menu to change Configuration settings or Close the session.
Figure 19-4 Spectrogram Measurement – Active Playback Ref Line Softkey
Figure 19-5 Waterfall Analysis Measurement – Inactive Playback Ref Line Softkey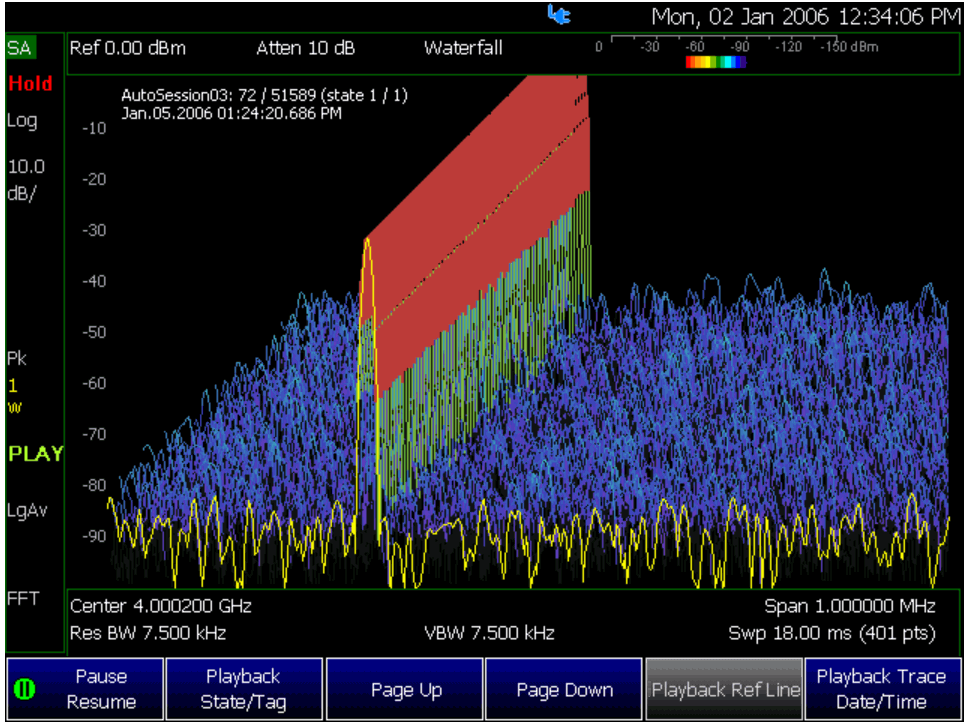
Figure 19-6 Playback Trace Date/Time Dialog Box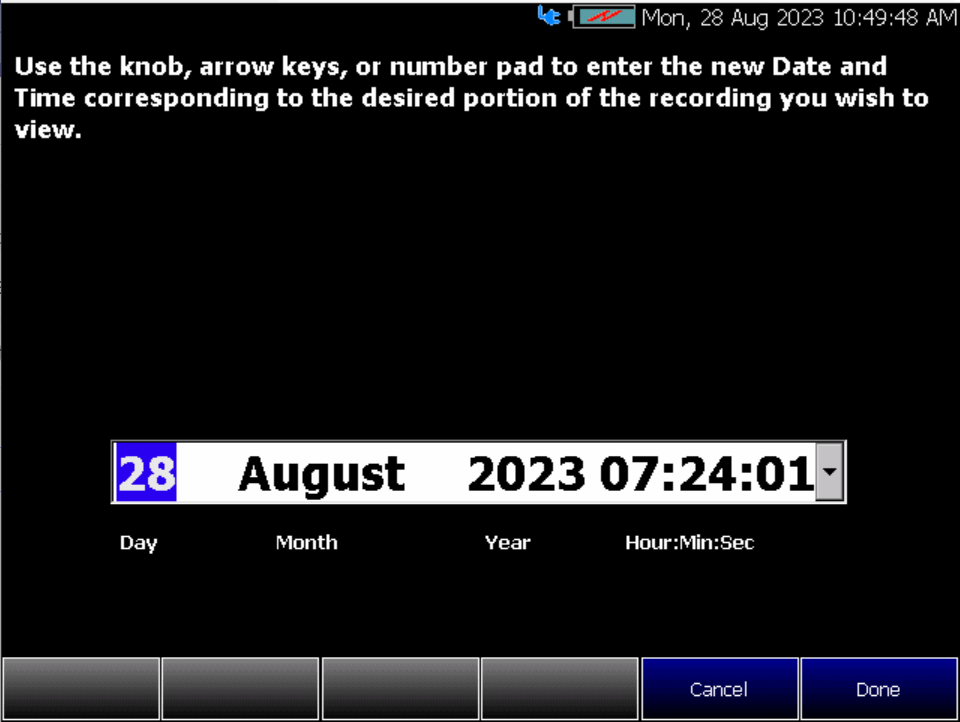
To change Recording Configuration settings:
—Press Trace 6
—Then Record Playback
—Then New Session or Recall an existing session.
If New Session is selected:
—Then Session Data and choose one of the following:
—Then CSV SaveStyle
——Single Trace (default) saves the currently displayed trace.
——Range Traces saves the currently displayed trace. This selection requires you to manually select a range of traces to be recorded in the Playback Configuration menu. Refer to “Playback Configuration” on page 601.
——AllTraces saves all traces.
—Then TraceRecordLimit to change the maximum recording file size.
—Then Clear AllRecords to clear all traces out of memory.
—Then Back to return to previous menu.
—Then Recording Configuration
Then choose from the following:
—Record Time Sets the amount of time to record traces. Default is MAX, which is to record indefinitely. Enter a value between 1s and 1 Ms (million) seconds using the numeric keypad, arrows, or the rotary knob. When set, a timer appears during recording in the lower-left corner which counts DOWN from the specified time.
—Record Source Sets where, in the FieldFox data flow, data is recorded. Learn more in “Record Source” on page 600. Choose from the following:
—RawMeas Records raw measurement data.
—Trace 1,2,3,4 Records data from the corresponding trace in its current state.
—Record Interval Sets the amount of time to wait between individual trace recordings. Default is MIN, which is to wait 0 seconds (record traces as fast as possible). Enter a value in seconds between 0 (no delay) and 10,000 seconds - about 3 hrs) using the numeric keypad, arrows, or the rotary knob.
—Segment Count Sets the number of traces to record, after which the recording will automatically pause. Press Pause/Resume or Record to capture another N traces, or Stop to end recording. Default is OFF, which is NO limit to the number of traces to be recorded.
When set, a counter appears in the lower-left corner which counts UP to the specified number of recordings.
Sets the power level which will trigger a recording. Set these power levels (mask) exactly as you would set Limit Lines. (See “All about Limit Lines” on page 834.) With Record ON, when any data point measurement is higher than an upper limit, or lower than a lower limit, recording begins. See Frequency Mask Trigger Configuration in the following section to learn how to configure the mask.
Typically you would use FreqMaskTrigger with Segment Count, but it can also be used with Record Time and Record Interval.
When used with Segment Count:
—When a mask limit is exceeded, subsequent traces are recorded until the specified segment count is reached. Once segment count is reached, exceeding another mask limit will again cause traces to be recorded until the segment count is reached, and so forth.
—To record only those traces that exceed the limit, set Segment Count to 1
—To record ALL traces after a limit is exceeded, set Segment Count OFF.
When used with Record Time, the timer counts down even when traces are not being recorded (limits are not being exceeded). Recording starts when a limit is exceeded and stops when the timer reaches 0.
When used with Record Interval, a trace is recorded when a limit is exceeded, then no recordings during the specified ‘wait’ interval, then the next trace is recorded, followed by another time delay, and so forth. This pattern repeats indefinitely if Segment Count is OFF, or (if ON) until Segment Count is reached.
Frequency Mask Trigger Configuration (SA Mode Only)
Create or recall a Frequency Mask to be used with the FreqMaskTrigger feature.
| Frequency Mask Trigger only applies to SA mode. |
| The Mask file is saved to, and recalled from, the Save /Recall Storage Device location – NOT from the Record Playback Storage Device location. These are two different settings. Learn how to set the Save /Recall Storage Device in “Set File Type and Select Device” on page 919. |
A mask that is in use during a recording is NOT saved with the recording and does NOT automatically appear during playback. Like Limits Lines, it is saved and recalled with a state file.
Although they are created in the same manner, Limit Line files and FreqMask files can NOT be used interchangeably.
—Press Trace 6
—Then Record Playback
—Then New Session or Recall an existing session. The current mask appears as soon as a session is opened.
—Then FreqMaskTrigger Configuration
—Then choose from the following
—Edit Mask Create or modify the current mask. Learn how to edit the Mask / Limit Line table in “All about Limit Lines” on page 834.
—Save Mask Saves the current mask to a file.
—Recall Mask Loads a mask file.
| The RawMeas data setting only applies to SA Mode. |
For SA mode, the simplest way to use Record Playback is to record RawMeas data, which can then be played back into all of the current Trace States.
However, for more complicated processing, refer to the following diagrams. These figures illustrate where in the FieldFox data flow data is recorded and played back.
| For this discussion, it is important to understand Trace States. Learn more in “Trace Display States (SA mode)” on page 213. |
Figure 19-7 FieldFox SA Mode: Data Flow and Record Playback Data Points
SA Data Recording:
—Data can be recorded at the Raw Meas block where data is acquired after ResBW, VideoBW, and Detector processing, but before any trace state processing.
—Data can be recorded from Traces 1,2,3, or 4 which includes the trace state (Max Hold, Min Hold, and so forth).
—Recording from a Clear/Write trace yields exactly the same data as recording from the Raw Meas block.
—Data is ALWAYS played back at the same location in the data flow: just after the Raw Meas block, through all currently active Traces, and onto the display.
—See an example using Record Playback with Max Hold traces in “Record Playback Example (SA Only)” on page 602.
By default, trace sweeps are played back as fast as the trace can be drawn on the screen. The following setting allows you to slow playback. In addition, you can manually scroll through individual traces using Playback Trace, or scroll through State and User Tags using Playback State/Tag. Learn more in How to Playback a Session in “How to Playback a Session” on page 594.
To slow the playback of a session:
1.Record a new session or Open an existing session.
2.Press Playback Configuration
3.Press Playback Interval
—Enter a value in seconds between 0 (no delay) and 100 using the numeric keypad, arrows, or the rotary knob. After using the keypad, select a multiplier key. Learn about multiplier abbreviations.
—Press Enter
4.Press First Trace to define the first trace in a Range of traces to be recorded/played/saved.
2.Press Record Playback The following selections are available ONLY when a session is NOT open.
3.Press Storage Device to select the media which stores the sessions to be managed. This is a different setting from the Save/Recall Storage Device setting.
4.Choose from the following:
—Internal FieldFox memory (default)
—SD Card An external SD Card (must be inserted)
—USB An external USB flash drive (must be inserted)
5.Press Manage Sessions
6.Choose from the following:
—Rename Using the FieldFox labeler, change the name of the session. AutoSession (n) is the default name where (n) is the next-available number. Learn more in “How to use the FieldFox labeler ” on page 916.
—Sort Arrange the listing of sessions by Name, by Date, or by Size.
—Delete After a confirmation prompt, removes the contents of the selected session from the list.
—Copy Copies the selected session to a different storage device, or the same storage device with ‘Copy(n)_’ appended to the beginning of the name so that duplication is prevented.
—Copy All Copies ALL of the listed sessions to a different storage device, or the same storage device with ‘Copy(n)_’ appended to the beginning of the names so that duplication is prevented.
—Delete All Deletes ALL of the listed sessions.
Record Playback Example (SA Only)
The following “Interval Recording” example shows how you can record spectral activity over a longer period of time with less trace storage.
1.Press Trace 6 then, with Trace = 1, press State then Max Hold
2.Press Record Playback > New Session > Recording Configuration then
3.Press Record Source to Trace1
4.Press Record Interval to 10 s (seconds).
5.Press Back > Recorder Player
6.Press Record At the end of each 10 second record interval, the Max Hold trace is recorded and the Max Hold processing is reset for the next 10 second record interval.
7.Press Stop to end the recording.
This session can be played back into any Trace State. For example:
Play the Max Hold recording into a Clear/Write trace to see the data exactly as it was recorded.
1.Press Trace 6 then with Trace = 1 and press State then Clr/Wr
2.Then Record Playback > Play
Play the Max Hold recording into a Max Hold trace to show the accumulation of “Max Hold” activity over the entire recording.
1.Press Trace 6 then with Trace = 1 and press State then Max Hold
2.Then Record Player > Play