Click Quick Setup in the tree view. Click the 802.16-2004 (WiMAX) button in the right pane to display the main window.
This example shows how to use the MAC PDU frame setup mode to configure both the downlink and the uplink portions of the frame in order to generate a downlink only (TDD) waveform with UL-MAP and UCD. A similar procedure can be used for the other available output modes.
Step 2: Configure the Project Property Parameters
Step 3: Configure the Signal Generator Settings
Step 4: Configure the Downlink Frame Structure
Step 5: Configure the Uplink Frame Structure
Click Quick Setup in the tree view. Click the 802.16-2004 (WiMAX) button in the right pane to display the main window.
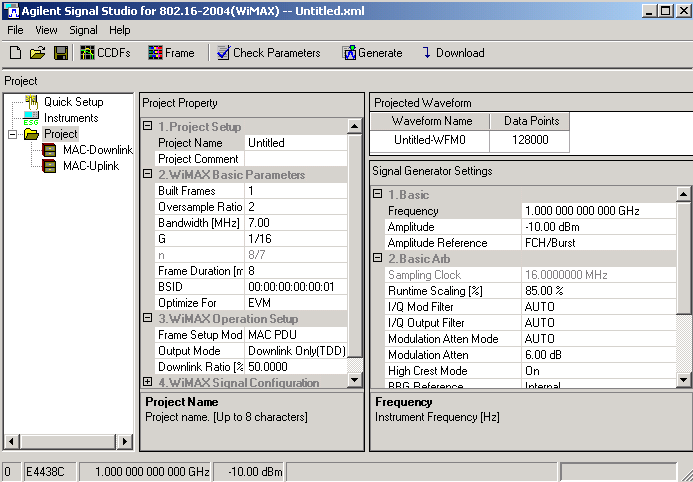
Notice that Project is highlighted and the parameter view displays three panes: Project Property, Projected Waveform, and Signal Generator Settings.
Step 2: Configure the Project Property Parameters
In the Project Setup table:
Change the default Project Name (Untitled) to a unique name of eight characters or less. You may also enter a Project Comment to describe the waveform.
Use the WiMAX Basic Parameters table to edit the waveform generation parameters. Set up a waveform with the following characteristics:
Bandwidth: 3.5 MHz
G: 1/8 (G is the ratio of the cyclic prefix or guard interval time to the useful signal time.)
Frame Duration: 5 ms
BSID: any desired value (This is the base station ID in standard MAC address format.)
In WiMAX Operation Setup, leave MAC PDU (default) for the Frame Setup Mode.
For the Output Mode, you will use the default Downlink Only (TDD) to create a time-division duplex (TDD) waveform that only contains the downlink subframe. This mode allows you to configure an uplink to provide information for creating the UL-MAP and UCD, without having the uplink signal actually included in the waveform. TDD mode means that the frame time is split between the downlink and uplink. See Output Modes for other available modes.
With Downlink Only (TDD) selected, the Downlink Ratio (%) cell will be active. A value (1 to 99) sets the percentage of the frame time to be used for the downlink. This ratio also determines the start time for the uplink. The value is rounded to the nearest sample time. For this example, enter 65.
Click the Frame
button in the tool bar to see the graphical result. A small yellow triangle
( )
indicates the division point. The uplink start timing (in samples and
time) can also be viewed by clicking MAC-Uplink
in the tree view.
)
indicates the division point. The uplink start timing (in samples and
time) can also be viewed by clicking MAC-Uplink
in the tree view.
Step 3: Configure the Signal Generator Settings
Set Frequency
to 3.5 GHz and the Amplitude to
By default, the signal generator amplitude setting refers to the average power level of the FCH/Burst. However, as defined in the IEEE 802.16-2004 standard, the preamble power level will always be 3 dB higher than the level of the rest of the burst. If you create a waveform that only has a preamble, select Preamble as the Amplitude Reference.
|
|
The Amplitude Reference also determines the portion of the waveform that is used by the signal generator for ALC leveling. In some cases, choosing Preamble as the Amplitude Reference instead of FCH/Burst may result in better RCE (EVM), since the RCE (EVM) of the signal can vary based on the data in the waveform. |
Step 4: Configure the Downlink Frame Structure
Click MAC-Downlink in the tree view to display the MAC-Downlink Settings window. The window shows the settings that are common to the entire downlink frame.
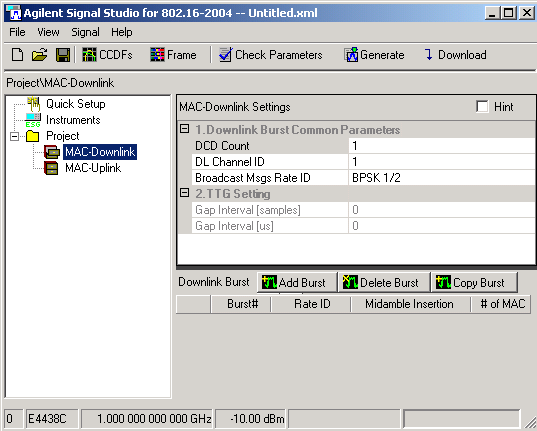
For this example, set the Broadcast Msgs Rate ID to QPSK 1/2. but leave the default values for the other settings.
|
|
According to the standard, broadcast messages are part of the first DL burst. The Signal Studio software treats it as a separate component for clarity, but this Rate ID should match the modulation type of the first DL burst to create a standard-compliant WiMAX signal. |
In the bottom of the window, click the Add Burst button three times to add three downlink bursts. Each burst should have a different modulation/coding, and they should be ordered by decreasing robustness (e.g. BPSK first, then QPSK, 16QAM, and 64QAM).
Make the following selections for Rate ID:
Burst 1: QPSK 1/2
Burst 2: 16QAM 3/4
Burst 3: 64QAM 2/3
The check box for Midamble Insertion allows you to insert a midamble (short preamble) before the burst. Leave the boxes unchecked for this example. # of MAC indicates the number of MAC PDUs in the burst. The default is one.
In the tree view, click DL Burst #1 to access the DL Burst window. The top portion shows the parameters for the burst that you configured in the previous MAC-Downlink window. In the bottom half, you can add, delete, copy, or change the order of MAC PDUs. Each MAC PDU represents a set of data being sent to a specific user on a particular connection identifier (CID). For this example, use the default of one MAC PDU.
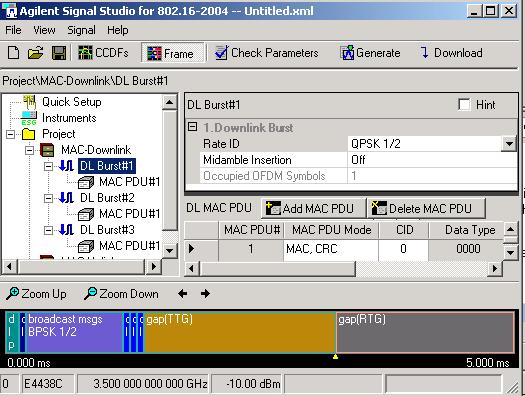
Double-click in the first column in the MAC PDU table
(where ![]() shows the currently selected burst), or click MAC
PDU#1 in the tree view to display the MAC PDU window.
shows the currently selected burst), or click MAC
PDU#1 in the tree view to display the MAC PDU window.
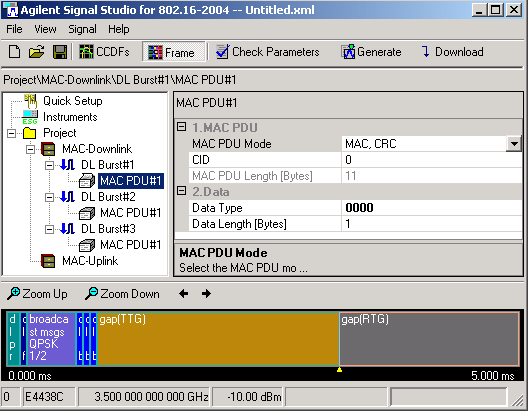
For this example, leave the default value for MAC PDU Mode. Click Data and then the down arrow to the far right of the cell to display the Data Type Entry window. Select PN9 for the data type and click OK to return to the MAC PDU window. Enter 300 bytes for the data length.

Click DL Burst#2 in the tree view. In the right pane, click Add MAC PDU to add a second MAC PDU to this burst. In the tree view, click MAC PDU#1 under DL Burst#2 and set the following parameters:
CID: Change this to 2 (arbitrary number).
Data type: Choose PN9.
Data Length: Enter 300 bytes.
Click MAC PDU#2 under DL Burst#2 and set the following parameters:
CID: Change to 5.
Data type: Choose PN15.
Data Length: Enter 350 bytes.
Click MAC PDU#1 under DL Burst#3 and set the following parameters:
CID: Change to 1.
Data type: Choose PN9.
Data Length: Enter 800 bytes.
Step 5: Configure the Uplink Frame Structure
Even though you are creating a Downlink Only (TDD) waveform, you will configure an uplink signal to provide data for generating the UL-MAP and UCD.
In the tree view, click MAC-Uplink to bring up the MAC-Uplink Settings window.
The top portion shows the parameters common to the entire uplink signal. For this example, leave all of these parameters at their default values.
In the lower part of the window, click Add User three times to add three uplink users. The software will automatically add an uplink preamble and burst for each user. You can edit the cells with a white background from this window or from the corresponding UL User# window (see the following step). Select the following Rate ID and attenuation values:
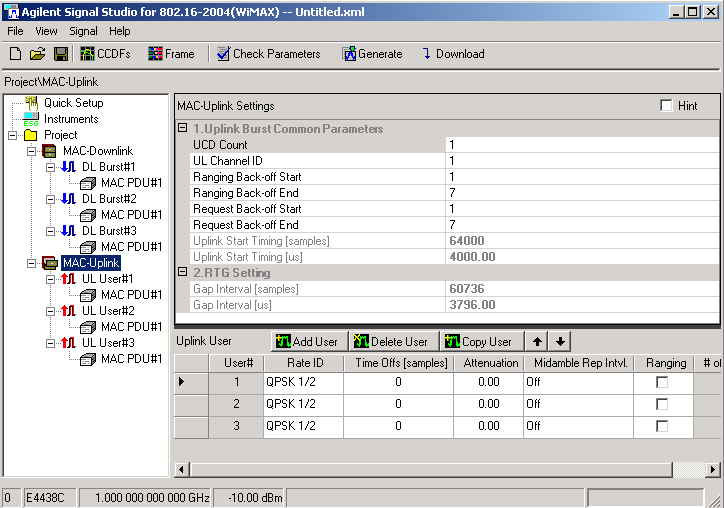
ULUser#1: Rate ID: 64QAM 2/3
UL User#2: Rate ID: 16QAM 1/2, Attenuation: 0.05
UL User#3: Attenuation: 1.00
Note that the uplink users do not have to be in any particular order with regards to the modulation type of each burst.
Click UL User#1 to display the UL User window. In the top half of the window, you can edit the parameters for this burst or insert a gap following the UL User burst, with the length defined by either samples or time. In the bottom portion, you can add MAC PDUs to each UL User burst. For this example, use the default of one MAC PDU for each UL user and leave the gap setting at zero.

Under UL User#1 in the tree view, click MAC PDU#1. Set the Data Type to PN9 and the Data Length to 400 bytes.
Under UL User#2 in the tree view, click MAC PDU#1. Set the Data Type to the fixed pattern 1100 and the Data Length to 200 bytes.
Under UL User#3 in the tree view, click MAC PDU#1. Set the Data Type to 0101 and the Data Length to 150 bytes.
Click the Check Parameters button in the tool bar to verify that the configured bursts do not exceed the length of the defined frame. If the configuration is valid, a result message "Parameters are fine" will be shown in the status bar at the bottom of the window. If not, a message "Defined frame exceeds the maximum frame length" appears.
From the tool bar, click Generate. The software generates an I/Q waveform file in accordance with the current physical channel configuration and waveform generation setup. Waveform generation time varies proportionally with the complexity and length of the waveform. Messages showing the waveform generation progress and status are displayed in the status bar.
From the tool bar, click CCDFs to toggle the graph view on and off. The graph view enables you to examine waveform characteristics, such as baseband spectrum, I and Q signals, and CCDF curves, prior to downloading the file to the signal generator.
From the tool bar, click Download to generate and download the waveform to the signal generator. The waveform file automatically begins to play.
|
|
In some configurations, the generated waveform size exceeds 8 Msamples. In that case, it isn't possible to transfer the waveform into an ESG/PSG with Options 001 or 601. Use an ESG or PSG with Options 002 or 602 for more waveform memory. |
You can re-enable local control of the signal generator by pressing the Local hardkey, enabling you to modify signal generator settings from the front panel. The waveform file cannot be modified after downloading it to the signal generator. However, the carrier frequency and amplitude can be changed.
You can use the 89601A software (version 5.3) with option B7S (802.16 Modulation Analysis) to view the waveform on a signal analyzer such as the E4406A (VSA) or others in the PSA family.
Related Topics
MAC-Downlink
MAC-Uplink
MAC PDUs
Related Website
