When more than one module is installed, you can choose to configure them as a Multiport VNA or as Multisite VNAs.
PXI VNAs
USB VNAs
(M98xxA) When S95551B is installed on your controller, you can create a multiport (Multi module) system for any modules.
(M937xA) With option 551 purchased for any single module, you can create a Multiport system as long as the single module with option 551 is included somewhere in the chassis.
For example:
The dialog shows 6 modules installed in the chassis in slots 5, 6, 7, 8, 15, 16. The module in slot 5 (PXI13) has option 551. In this case, slots 5, 6, and 7 are selected. Click Run. Those three modules behave as a Multiport (6-port) VNA. That instance of the SFP, and your remote programs, will allow you to calibrate and make measurements at ports 1 through 6. Each test port has a source, measurement receiver, and reference receiver.
(M937xA) The software supports up to 16 modules connected together to form a 32-port VNA.
(M980xA) The software supports up to 66-port VNA with eleven 6 port M980xAs.
(M983xA) The software supports up to 36-port VNA with eighteen M983xAs
M983xA can be configured with M980xA. See https://www.keysight.com/find/m980xa-mm for the detailed limitation.
M980xA: seven-teen 2 port modules, total 34 ports.
M980xA: eleven 6 port modules, total 66 ports.
M983xA: eighteen modules, total 16 ports.
M983xA and M980xA:
Five M983xAs and two M9804A-200, total 14 ports (10+4)
Four M983xAs and five M9808A, total 18 ports (8+10)
Two M983xAs and ten M980xA, total 24 ports (4+20)
The modules MUST be physically configured as a Multiport VNA.
(M937xA) Learn how in the M937xA Installation Guide at the M937xA documentation website.
(M98xxA) See https://www.keysight.com/find/m980xa-mm for M98xxA multi module configuration.
Each VNA module has ports labeled 'Test Port 1' and 'Test Port 2'. In a Multiport VNA, test ports become virtually numbered beginning with the module in the lowest numbered slot to the highest numbered slot. In our example 6-port VNA, the module in slot 6 would be Test Port 3 on top, and Test Port 4 on bottom. The module in slot 7 would be Test Port 5 on top, and Test Port 6 on bottom.
The first module, from left to right, is the Master module. To control the Reference, Triggering, and LO signals for the Multiport VNA, you make settings on the first module. The other modules follow.
When the different models are installed, the frequency range is limited with the lowest model. For example, M9804A (20 GHz) and M9800A (4.5 GHz) are used in multi-module configuration, the maximum frequency range of VNA application is set at 4.5 GHz.
Module Number - A few remote commands require the module number. This is the order in which the module appears in the Multiport VNA. In the above example, Module 1 is in slot 5, module 2 is in slot 6, and so forth.
(M937xA) The selected modules in a Multiport VNA MUST be sequential and must include at least ONE module with opt 551. For example, to configure a 6-port VNA using the above installed modules, you could choose Slots 5, 6, 7. You could NOT choose 5, 7, 8; they are not sequential. Nor could you choose 6, 7, 8; they do NOT include PXI13 which has option 551.
(M98xxA, M983xA) In the multi-module configuration, the phase is not corrected between modules. Multi-module Phase Calibration allows you to correct the phase between modules.
(M98xxA, M983xA) When you use the reference signal in the multi-module configuration, the Configure Reference IN signal function can improve the reference clock stability.
(M980xA, M983xA) In the multi module configuration, SA multi module calibration is required when Cal All is executed in order to improve the power level accuracy.
(M981xA) The Direct Receiver Access setup is required.
See Also: Programming Multiport and Multisite configurations
Multisite measurement for M937xA/M98xxA is available at default. While the one PXI VNA is running, you can also create a different, fully-functioning VNA which would run at the same time as the VNA. The only practical limit to the number of VNA instances is the CPU speed of the host controller. The benefit of creating Multisite VNAs is measurement throughput. You could test multiple devices at the same time.
Here is how to create a Multisite VNA:
With the first VNA already running, again click the desktop icon, which restarts the Launcher dialog.
The Launcher dialog shows the same selected slots as the previous time. The selection is 'sticky' to allow you to quickly run the same configuration as before.
Click each to unselect the previously-selected slots.
Then select one or more of the previously-unused VNA modules. In our example, this would be slots 8, 15, and 16.
Click Run and another SFP display appears.
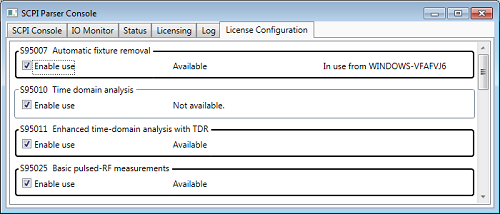
Multisite measurement for standard measurements on M98xxA is available at default. However, if you want to use two or more S95xxxB applications on multisite, the floating licenses are required additionally. For example, if you use the automatic fixture removal function in three sites, total three licenses of S95007B (three floating licenses, or two floating and one another type such as node-locked license) are required. The combination of several S95xxxB floating licenses and one S95xxxA node-locked/transportable license are also supported. If you already have had a S95xxxA node-locked or transportable license, order S95xxxB floating licenses for multsite. The floating license is not available on S95xxxA. When you use only one S95xxxB application on multisite, floating license is not mandatory. For example, when you have one S95007B automatic fixture removal and one S95010B time domain node-locked licenses, you can use S95007B for one site and S95010B for another site by disabling "Enable use" on each site as shown bellow.
How to use two or more S95xxxB application in multsite:
Install the floating licenses in the Keysight License Manager 6 (KLM6) on your controller or license server.
Launch the VNA application as many as you need. The VNA will check out the licenses from the KLM6 automatically up to the number of licenses.
The number of in-use licenses is shown in the license usage tab of KLM6.
When you do not want to consume a license on a certain site, uncheck the "Enable use" for the target license on the License Configuration tab in the SCPI Parser Console. Reboot the VNA firmware after changing the settings.
Click System > System Setup > Remote Interface.... Then check Show SCPI Parser Console to show the SCPI Parser Console.
With option S97551A/B purchased for any single module, you can create a Multiport system as long as the single module with option S97551A/B is included in the configuration.
Note: Only two units can be configured. Three or more units cannot be configured.
The modules in a Multiport VNA MUST include at least ONE module with opt S97551A/B.
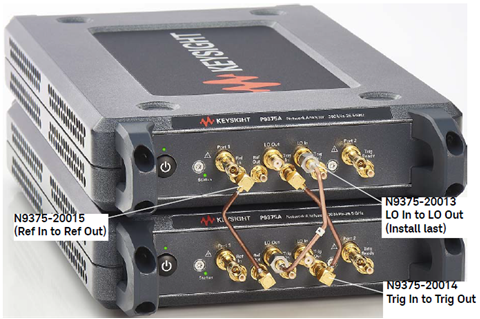
Each VNA module has ports labeled 'Port 1' and 'Port 2'. In a Multiport VNA, test ports become virtually numbered beginning with the module having the semi-rigid cable connections to its Ref Out, Trig Out, and LO Out. For example, in the graphic above, the module on the bottom (master) will have 'Port 1' and 'Port 2' and the module on top will have 'Port 3' and 'Port 4'.
To control the Reference, Triggering, and LO signals for the Multiport VNA, you make settings on the first module. The other module follows.
When the different models are used, the frequency range is limited with the lowest model. For example, P5008A (53 GHz) and P5020A (4.5 GHz) are used in multi-module configuration, the maximum frequency range of VNA application is set at 4.5 GHz for all ports.
The software supports up to 2 modules connected together.
It is not allowed to configure different USB VNA families. Example: P5000B cannot be configured with P5000A. P9370B can be configured with P9382B.
Family categories: P50xxA, P50xxB, P93xxA, P93xxB,
Module Number - A few remote commands require the module number. This is the order in which the module appears in the Multiport VNA.
See Also: Programming Multiport and Multisite configurations
The modules MUST be physically configured as a Multiport VNA. Y1701A Multiple USB instruments configuration kit is available.
Use a torque wrench for 3.5 mm to fasten the connectors (Keysight P/N 8710-1765, 0.9 Nm)
Note: It is not allowed to configure different families. For example , the configuration of P937xB and P502xB is not possible.
Y1701A-003 Interconnect cables for multiport configuration of P50xxA/B, P937xB, P938xB (above 20 GHz)
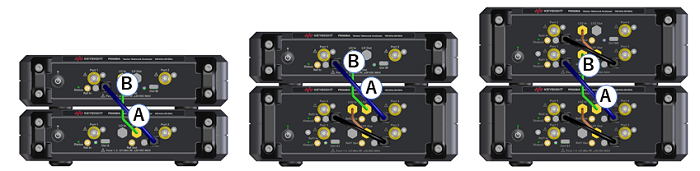
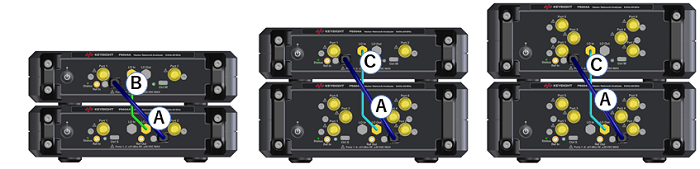
Note: The 1H chassis should be placed above the 2H chassis in the middle case of the picture
Designator |
Part number |
Description |
Qty |
A |
P5000-61603 |
Cable Assembly, Control 175mm-LG |
1 |
M9800-01201 |
Angle, Control Cable Assembly |
2 |
|
0515-4351 |
Screw-SKT-HD-Cap HEX-SKT M3X0.5 4mm-LG |
2 |
|
B |
P5000-61601 |
Cable Assembly, LO jumper, 1H |
1 |
C |
P5000-61602 |
Cable Assembly, LO jumper, 2H |
1 |
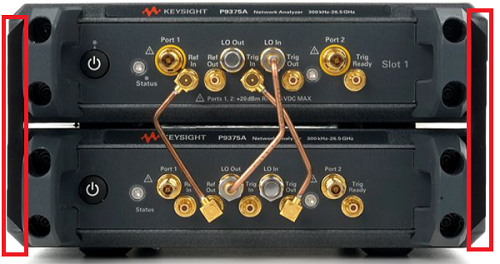
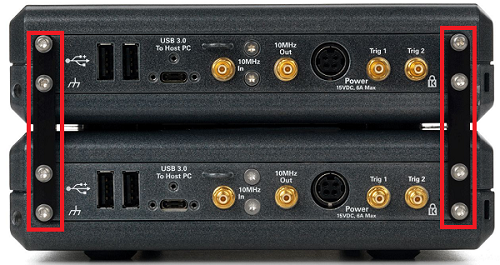
The kit to fix double-decker USB VNAs is also available. Y1701A-101 Latch kit for connecting two 1-slot (1H) USB instruments. Y1701A-202 Latch Kit for connecting 2 slot (2H) to 2 slot (2H) USB instruments
Either of the following configuration can be implemented. The two units can be connected with daisy chain.
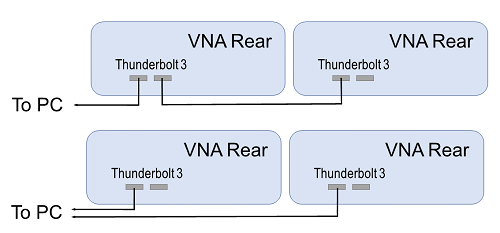
Note: Some Thurderbolt 3 interface on the PC may not support the multi unit configuration.
|
|
|
Upper unit |
|||
|
|
|
2-port P500xA/B (opt.200) |
4-port P5020A/B to P5024A/B (opt.400) |
6-port P502xA/B (opt.600) |
4-port P502xA/B (opt.402 for all models, opt.400 above 20 GHz) |
|
Lower |
2-port P500xA/B (opt.200) LO Jumper Control Cable |
Y1701A-302 P5000-61604 P5000-61603 |
Not applicable |
Not applicable |
Not applicable |
|
4-port P5020A/B to P5024A/B (opt.400) LO Jumper Control Cable |
Y1701A-303 P5000-61607 P5000-61603 |
Y1701A-303 P5000-61608 P5000-61603 |
Y1701A-303 P5000-61608 P5000-61603 |
Y1701A-303 P5000-61608 P5000-61603 |
|
|
6-port P502xA/B (opt.600) LO Jumper Control Cable |
Y1701A-303 P5000-61607 P5000-61603 |
Y1701A-303 P5000-61608 P5000-61603 |
Y1701A-303 P5000-61608 P5000-61603 |
Y1701A-303 P5000-61608 P5000-61603 |
|
|
4-port P502xA/B (opt.402 for all models, opt.400 above 20 GHz) LO Jumper Control Cable |
Y1701A-304 P5000-61605 P5000-61603 |
Y1701A-304 P5000-61606 P5000-61603 |
Y1701A-304 P5000-61606 P5000-61603 |
Y1701A-304 P5000-61606 P5000-61603 |
|
P502xM
Use Y1701-304
In the multiport configuration using 2 modules, it is critical that the correct chassis number be assigned to the "master" chassis. The master chassis must have the lowest chassis number.
With a 4 port system using 2 chassis, there is a 50% chance that the wrong master is selected by the IO Libraries. If that is the case, after launching the firmware in 4 port mode, the following error is displayed:
Warning: Missing frequency reference.
To resolve the issue, you can either:
After setting up the hardware for multiport, launch the IO Libraries and display the PXI/AXIe Chassis view.
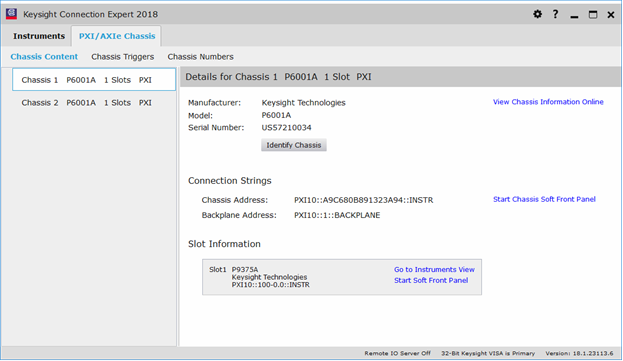
Click on the Chassis Number selection.

Change Chassis 1 to be Chassis 3, then click the Accept button.
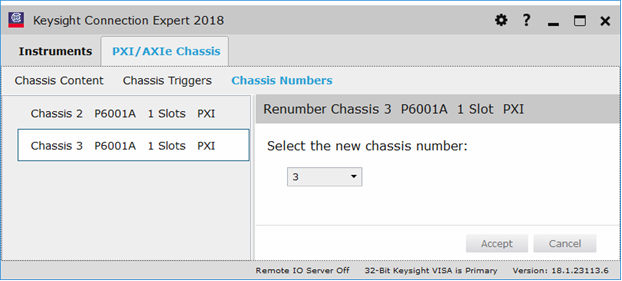
Chassis 2 now becomes the primary chassis and Chassis 3 is the secondary chassis.
Note: In a multisite configuration, the P937xA is limited to a maximum of 4 modules. The P50xxA/B, P93xxB are limited to a maximum of 2 modules.
The benefit of creating Multisite VNAs is measurement throughput. You could test multiple devices at the same time.
Here is how to create a Multisite VNA:
With the first VNA already running, again click the desktop icon, which restarts the Launcher dialog.
The Launcher dialog shows the same modules as the previous time. The selection is 'sticky' to allow you to quickly run the same configuration as before.
Click each to unselect the previously-selected modules.
Then select one or more of the previously-unused VNA modules.
Click Run and another SFP display appears.