This topic discusses all aspects of performing an ECal:
Perform a 4-Port Cal with ONE 2-Port ECal Module
ECal is a complete solid-state calibration solution. Every ECal module contains electronic standards that are automatically switched into position during a measurement calibration. These electronic standards have been measured at the factory and the data stored within the memory of the ECal module. The analyzer uses this stored data, along with the measured data, to calculate the error terms for a measurement calibration.
ECal modules are available in 2-port and 4-port models and a variety of connector types, covering many frequency ranges. See Analyzer Accessories for more about available ECal modules and ordering information.
You can perform the following calibrations with ECal:
1-Port Reflection calibration
Full 2-Port calibration
Full 3-Port calibration
And so forth...
Verify the validity of a mechanical or ECal calibration with ECal confidence check.
You can improve accuracy, repeatability, and avoid costly repair of equipment in the following ways.
Practice proper connector care. See Connector Care.
Protect equipment against ESD damage. Read Electrostatic Discharge Protection.
NEVER exceed the following Damage levels to the ECal module.
For highest accuracy, do not exceed the following ECal Compression levels when calibrating:
|
Model |
Compression level |
Damage level |
|
N469x series |
-5 dBm |
+10 dBm |
|
N4432x series N4433x series N443xD series |
-7 dBm |
+20 dBm |
|
N4431B |
+7 dBm |
+20 dBm |
|
N755xA series |
-15 dBm |
+10 dBm |
|
N756xA series |
-10 dBm |
+15 dBm |
|
8509x series |
+9 dBm |
+20 dBm |
The power level can be increased after calibration with minimal impact on measurement accuracy.
Connect ECal Module to the Analyzer
ECal modules are controlled and powered through a USB connection. When you connect the module, the type of module, frequency range, and connector type are automatically recognized.
For PXI modules, connect the ECal module to a USB port on the remote or embedded controller.
Important Note: DO NOT connect/disconnect USB devices during ECal calibrations. Doing so may cause problems with the calibration.
Notes:
Unused ECal modules that have completed a calibration may remain connected to the USB port.
You can connect and disconnect the ECal module while the analyzer is operating. However, DO NOT connect or disconnect the module while data transfer is in progress. This can result in damage or at least corrupted data.
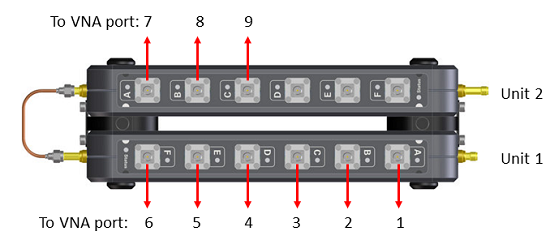
N756xA Multi-port ECal module does not support the auto port orientation but executes the connection check when Do orientation is checked. The following measures must be taken to ensure the calibration is performed properly:
Note: Multiport ECal for PXI Switches application offers more flexible connection setup.
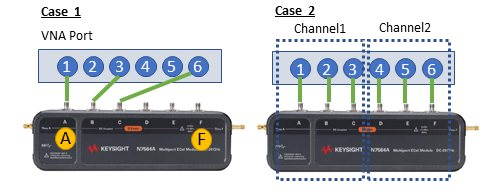
N756xA ECal port must be connected from the port A on the first unit. Do not skip a port on the Ecal.
The VNA port number and N756xA ECal port number must be sequential each other.
In Cal All, the rules are applied on all ports in channels, not each channel. Example: Cal All can execute on the setup (Ch1: port 1/4/7, Ch2: port 2/5/7, Ch3: 3/6/9) in the connection example below.
In the multi-unit configuration, the units must be ordered sequentially by the serial number
"Unable to orient Ecal" is displayed if the Do Orientation is checked and the connection is incorrect.
Connection Example
The serial number of unit 1 should be smaller than the one of unit 2.
Correct Connection Examples
Case 1: Skipping VNA ports is acceptable
Case 2: Use "CAL ALL" instead of Smart Cal or Ecal (under Other Cals) . The Smart Cal and Ecal cannot execute on Channel 2. Because the channel 2 starts from the port C on Ecal.
Incorrect Connection Examples
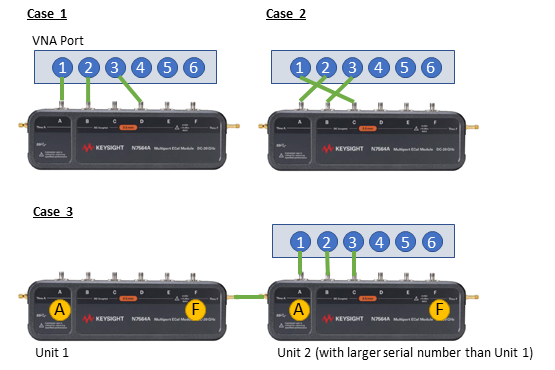
Case 1: The port C is skipped.
Case 2: The port connection is not sequential.
Case 3: The connection does not start from the port A of unit 1. (In the multi-unit configuration, the units must be ordered sequentially by the serial number.)
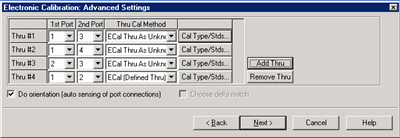
How to Perform a Calibration Using ECalSelect an ECal module that has connectors of the same type and gender as the DUT. If such an ECal module is not available, a module with connectors different from the DUT can be used by using Advanced Settings or User Characterization. See Also: Perform a 4-Port Cal with ONE 2-Port ECal Module Connect the ECal module ports to the analyzer ports. During the calibration process the analyzer can either automatically detect how the ECal module is connected, or the orientation can be performed manually.
Note: N755xA series ECal modules do not require a warm-up period.
|
|
Using Hardkey/SoftTab/Softkey |
|
|
|
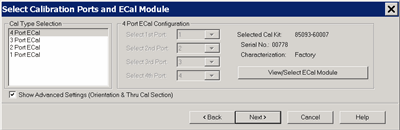
Allows you to select calibration type and settings. Cal Type Selection / Configuration Select the number of ports to calibrate. Then select the port number configuration. 4 Port ECal 3 Port ECal 2 Port ECal 1 Port ECal- (Reflection) Advanced Settings are not available. View/Select ECal Module Click to Select the ECal module if more than one ECal module is connected to the USB. Also, Select the User Characterization within the module. Learn more about User Characterization. Show Advanced Settings Check to display the Advanced Settings when Next is clicked. Calibrate source and receiver power Check to perform a Guided Power Calibration. Learn more. Back Return to Cal Wizard Begin dialog. Note: ECal isolation is not performed. The inherent isolation of the analyzer is better than that attained with correction using an ECal module. Note: Terminate any unused ECal ports with a 50 ohm load. Refer to Determining Effects of Not Terminating Unused ECal Ports. Note: Do not connect any USB memory during ECal calibration. |
|
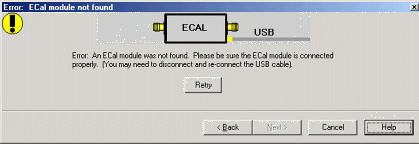
When this dialog appears, the ECal module is not connected or has not been recognized by the network analyzer. Retry Check the USB connections and click to continue. Notes:
|
|
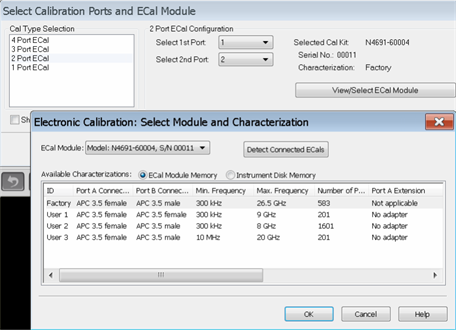
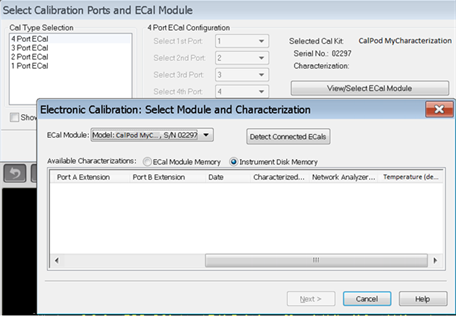
Note: User Characterizations listed in the dialog below that have no temperature shown cannot be temperature-compensated during calibrations. Also, this is true of CalPod as ECal characterizations that were performed prior to this temperature capability in the VNA firmware, because temperature was not measured-and-recorded. However, the firmware will still recognize those and allow them to be used for cals.
ECal Module Select one of the ECal modules that are connected to the analyzer. Detect Connected ECals Click to rescan the USB for ECal modules. Available Characterizations ECal Module Memory - Displays the factory and user characterizations that are stored in the ECal module. Instrument Disk Memory - Displays the user characterizations that are stored in Disk Memory. Learn more User Characterizations in Disk Memory. Temperature - Displays the temperature reading at the time a characterization was performed. The information in the Calset Properties dialog confirms which of those characterizations were temperature-compensated during calibration. The (compensated) notation for a CalPod indicates that the CalPod’s characterization was temperature-compensated when that cal’s error terms were computed (it also implies the factory thermal data for that CalPod must be present on the VNA). Whereas the (uncompensated) notation indicates that temperature-compensation could not be done for that characterization during the cal, which could mean either that one is an older characterization that didn’t record its temperature, or else factory thermal data for that CalPod serial # was not installed on the VNA. Select the characterization data to use for the calibration. Once selected, that characterization becomes the default selection until the analyzer is turned OFF and restarted. When restarted, Factory again becomes the default selection. |
|
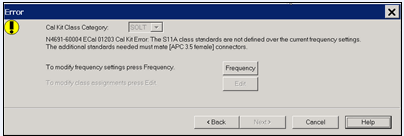
When this dialog appears, the current cal standards (or ECAL module) does not cover the current frequency range of the measurement. Do one of the following to correct the problem: Cal Kit Class Category Not available with ECal modules. Frequency Change the frequency range of the active channel. Edit Not available with ECal modules. Back Select a different characterization that covers the required frequency range. Cancel Re-characterize the module with an increased frequency range. |
|
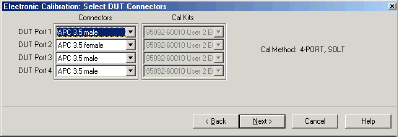
If the ECal module or selected User Characterization has more than one connector type, then the following dialog box is presented which allows you to describe the DUT connector type. Otherwise, click next to proceed to Advanced Settings (if checked) or ECal Steps. Connectors The available connectors are listed for each DUT port. |
|
|
|
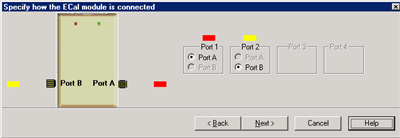
This dialog box appears when the Do orientation checkbox in the previous dialog box is cleared. Click the ECal Port that is connected to each VNA port. |
|
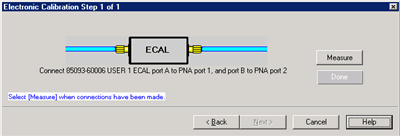
Note: Beginning in VNA Rev. 6.0, ECal can be performed with External triggers. Learn more. Displays the instructions for each measurement required for calibration. Measure Measures the ECal standards. Done Click when last standard has been measured. |
When complete, you can save the new calibration. Learn how.