N8844A Data Analytics (Publishing)
Use the Data Analytics Measurements dialog to select the scalar measurements to publish to an N8844A data analytics server. The fields shown in this dialog change depending on one of two Publish modes that are selected in the Data Analytics Setup dialog box: Selected or Custom.
Comparing Publishing Modes
| Ability to… |
Publishing Mode |
| Selected |
Custom |
| Select single measurements |
♦ |
♦ |
| Quickly select all measurements |
♦ |
|
| Quickly clear all measurements |
♦ |
|
| Assign a custom name to a measurement |
|
♦ |
| Set upper and lower measurement limits |
|
♦ |
| Publish up to the number of displayed measurements |
♦ |
|
| Limited to 16 measurements |
|
♦ |
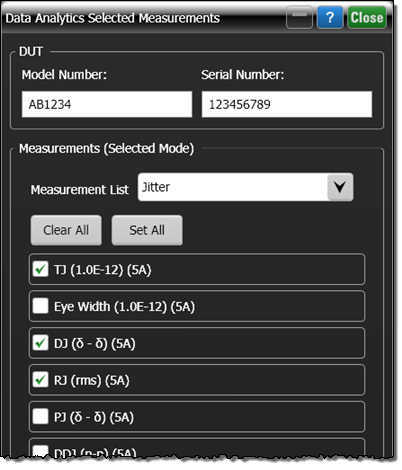
To select measurements (Selected Publish Mode)
- In the Data Analytics Setup dialog, select the Selected Publish Mode and then click Select….
- Use the DUT Model Number and Serial Number fields to identify your Device Under Test (DUT). In the N8844A, these fields become properties on which you can filter your data. For example, if you publish multiple Fall Time measurements from five different DUTs, you can view a scatter plot that groups the measurements according to the DUTs.
- From the drop-down Measurement List field, select the name FlexDCA's measurement results panel that lists the measurements that you want to upload into the repository.
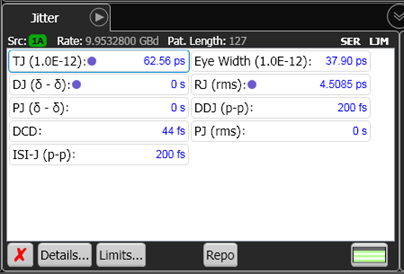
- Select the individual measurements to upload. When a measurement is selected for publishing, a purple dot
 is displayed next to the measurement in the results panel. For example, in the following figure three blue dots identify the TJ, DJ, and RJ measurements as selected for publishing.
| dialog Settings |
Corresponding Jitter Panel |
|
|
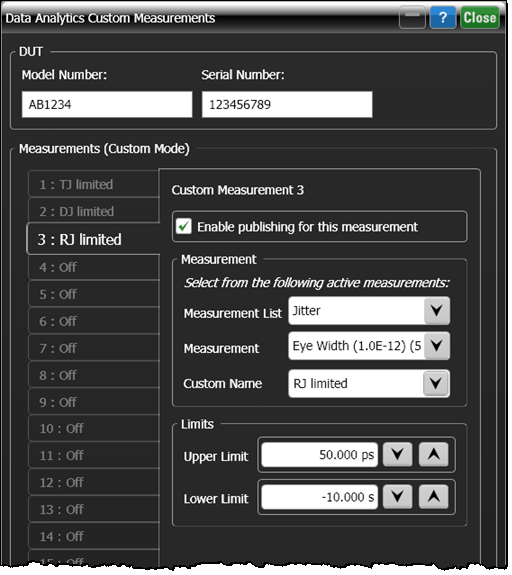
To select measurements (Custom Publish Mode)
- In the Data Analytics Setup dialog, select the Custom Publish Mode and then click Customize….
- Use the DUT Model Number and Serial Number fields to identify your Device Under Test (DUT).
- In the Measurements field, select one of 16 numbered tabs and make your selections for that tab:
- In the Measurement List field, select the FlexDCA measurement results panel that lists the measurements that you want to upload into the repository.
- In the Measurement field, select the measurement and in the Custom Name field, enter a name so that you can easily identify the measurement in the repository.
- Adjust the Limits fields as needed to bound the limits of valid measurement results.
- Select Enable publishing for this measurement. This selection can only be made after the above selections have been made.
- For selected measurements, a purple dot is displayed next to the measurement in the results panel. For example, in the following figure three blue dots identify the TJ, DJ, and RJ measurements as selected for publishing.
| dialog Settings |
Corresponding Jitter Panel |
|
|