SCPI Recorder
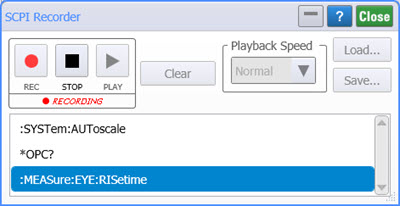
The SCPI recorder is a powerful tool that enables you to quickly discover, record, and learn about the commands needed to perform almost any task remotely. When you've recorded your commands, you can play them back and save them as a macro. Click REC and the recorder performs the following tasks:
- Captures most setting changes (mouse clicks or keyboard presses).
- Translates the setting into an equivalent SCPI remote-programming command.
- Records the SCPI command within the dialog.

 Click REC to begin recording. The button turns red to alert you that any mouse clicks or keyboard presses will be recorded. When you have captured all your commands, click the record button again to end the recording.
 During recording, click STOP to end the recording.
 Click Play to play back your recording and observe the commands as they are executed. Playback always starts at the highlighted command, which is shown in a blue box as seen in the above figure. Click any command in the dialog to highlight that command. During playback, the SCPI recorder displays the a time stamp for each command. Time stamps are valuable when investigating timing issues. Use Playback Speed to control the rate that the commands are played: Slow, Normal, or Fast.
 During playback, click PAUSE to temporarily stop the playback.
 During playback, click Device Clear when a command is waiting a unacceptable length of time to complete. This can happen, for example, during limit testing when a command locks the remote interface until 100 failed samples are detected. This task could take a very long time.
:LTESt:MTESt:FAILures 100; *OPC?
 Click Clear to delete your recorded commands from the dialog.
 Click Save to save your recorded commands into a script file (.scpi) that can be reloaded into the dialog at any time by clicking Load.
The default user data folder for saving script files is \SCPI Scripts.
SCPI script file are ASCII files, so you can edit them as well as create new script files using a text editor. SCPI scripts are often small snippets of code that may depend on FlexDCA being set to very specific settings. As a result, your scripts may not work in the same manner in different situations. This can be alleviated by starting your scripts with commands that configure starting conditions. For example, the first few lines in the following code configures FlexDCA from a default setup before making a rise time measurement. To include comments in your scripts, precede the comments with two forward-slash characters as shown in this example script:
:SYSTem:DEFault
:TRIGger:SOURce FPANel
:TRIGger:BWLimit CLOCk
:SYSTem:MODE EYE         // Place FlexDCA in Eye/Mask mode
:SYSTem:AUToscale
:TRIGger:PLOCk ON
:MEASure:EYE:RISetime // Measure risetime
:MEASure:EYE:RISetim?
When FlexDCA is installed, a registry entry is created to associate script files (.scpi) with Notepad. This makes it easier to open script files.
Windows Clipboard
Select your recorded commands and press Ctrl-C to copy the commands to the Windows clipboard.
- Click to select a command.
- Shift click to select multiple commands.
- Ctrl click to select non-adjacent commands.
- Ctrl-A selects all commands.
- Ctrl-C copies all selected commands. You can also right-click and then click Copy.
- Ctrl-V to paste commands in another application.