Step 3. Create and Run Test Plans
- Click on a Station tab.
- If you plan to remotely operate FlexOTO, turn on FlexOTO's SCPI Recorder so that you can capture FlexOTO Station SCPI commands as you configure the Test Program. The SCPI Recorder quickly lists the commands needed to perform your tasks.
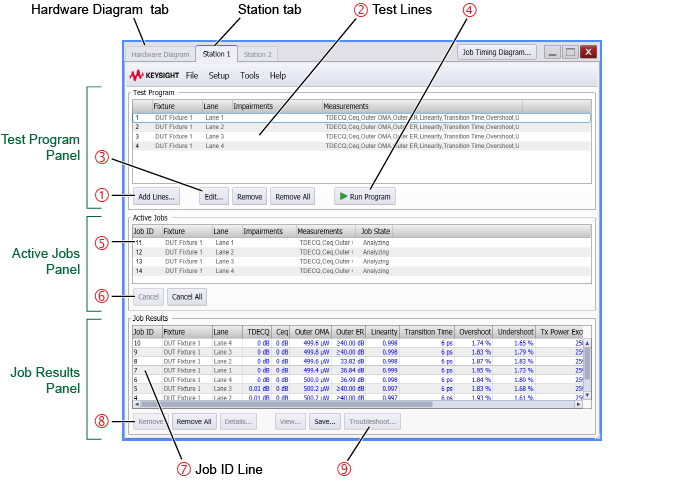
- In the Test Program panel, click Add Lines 1. This opens the Test Program Measurement Setup dialog. In the dialog, configure your Test Plan and then click Add Lines and Close to add the test lines 2. Each line defines a test of a specific DUT Fixture/Lane combination.
- If needed, use the Edit, Remove, and Remove All buttons 3 to modify the Test Plan:
- Edit allows you make edits to a selected line.
- Remove deletes the selected line.
- Remove All deletes the entire test plan.
- Add Lines to append additional lines to the test plan with different conditions.
- If additional Station tabs are displayed, repeat the above steps to create a Test Plan for each Station.
- After all test plans are created, select each Station tab and click Run Program 4 to start the measurements.
- Observe each Station's Active Jobs panel to see how the Test Plan is progressing 5. While the Test Plan is executing, use the Cancel and Cancel All buttons 6 to end testing of any of the active jobs.
- After the Test Plan completes, the measurement results 7 are listed by Job ID in the Job Results panel. If you run your Test Plan multiple times, all of the results will be listed in the panel until the Remove or Remove All button 8 is clicked.
- Click Save to save all test results to a zip file that includes a Excel spreadsheet of the results table and eye diagram images if selected to be saved in the Measurements field of the Test Program Measurement Setup dialog.
- Click Stop on the SCPI Recorder, and click on the list of recorded commands. Type Ctrl-A followed by Ctrl-C to copy the recorded commands to the Windows clipboard. You can paste the recorded commands into your program.
- Click Troubleshoot 9 to enter troubleshooting mode where FlexOTO is temporarily disabled and the FlexDCA application is displayed. FlexDCA is FlexOTO's measurement engine. Using FlexDCA, you can change measurement settings including presets to investigate how a measurement result was derived. When you want to return to FlexOTO, simply exit FlexOTO.

Avoid damaging the inputs of DCA-M modules. The front panel of many optical switches list the maximum power above which the switch is damaged. Be aware that the switch's maximum power level may far exceed the maximum safe power limits to DCA-M module inputs. Never exceed the maximum power level shown on the DCA-M module's front panel.
Clicking Run Program is equivalent to the :TPRogram:EXECute? SCPI command which starts the measurement acquisition and returns a comma delimited string of Job ID numbers. Job ID's identify a line in the Job Results panel that lists results for a specific DUT's Lane. You'll pass Job ID numbers to :JOBS subsystem commands in order to return various measurement results.