Click Cancel at any time during the process, or
Click the ![]() (unlock)
icon next to the Test Suite name to
(unlock)
icon next to the Test Suite name to ![]() (lock) the
Test Suite settings.
(lock) the
Test Suite settings.
Test Suites allow you to quickly and easily repeat a measurement sequence, including your DUT configuration, measurement settings, and measurement and calibration choices.
You can create, modify, or run a Test Suite from the Test Suite dialog. Once you have created a Test Suite, you can complete that identical measurement and view selection again with as few as THREE mouse clicks. This process is similar to automating, or creating a macro, to record your settings.
Measurement Settings The Test Suite dialog allows you to 'skip' steps in the standard measurement sequence. The selection on the page that you choose to skip is the selection that was made when you created the Test Suite. In this way, skipping a step ensures that the settings are ALWAYS made the way you intended.
Calibration Settings If you choose to 'Load existing calibration data', and skip the Select Cal Set step that becomes visible when that selection is made, the same Cal Set is applied by name when the Test Suite is run. Therefore, if you rename or delete the Cal Set, the Test Suite cannot apply that Cal Set. Otherwise, if you choose to Perform a new calibration, then you can skip several steps in the calibration process.
View Settings At the Select Analysis View step, you can apply a template to analyze your measurement data. Learn more about Templates. If you assign a template, then edit the Test Suite to skip the Select Analysis View, the Test Suite automatically loads that template by name.
Save Test Suite When the last step is finished, the Test Suite is automatically saved. To prevent auto-save from occurring:
Click Cancel at any time during the process, or
Click the ![]() (unlock)
icon next to the Test Suite name to
(unlock)
icon next to the Test Suite name to ![]() (lock) the
Test Suite settings.
(lock) the
Test Suite settings.
Edit test Suite After your Test Suite is created, it can be easily edited. To streamline your Cal and Measurement setup, do not skip steps the first time through the process. Then, when you are have confidence in your Cal Set and Measurement settings, then set the Test Suite to skip steps. When finished, lock the Test Suite.
Note: The Cal Set files and Template files are stored separately from the Test Suite. They are edited outside of the Test Suite. However, the names of these must NOT change or they will fail to be loaded by the Test Suite.
See the PLTS Test Suite Flow Diagram
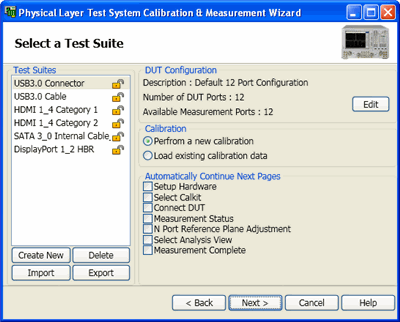
To start the Test Suite dialog:
Click File, then New or click the New icon on the Standard toolbar.
At the Welcome dialog, check Test Suites, then click Next.

Click Create New, then type a name for your new Test Suite. When the wizard completes, the new Test Suite will contain your measurement settings, calibration choices, and "View" selection.
OR Under Test Suites, click any existing Test Suite. NOTE: The Test Suite that you choose must have the same, or less than, the Available Measurement Ports (see DUT Configuration) of the PLTS test system that is currently in use.
Then select from the following choices:
Scroll up to see the Test Suite Overview DUT ConfigurationShows the number of ports used by the selected template. When a new template is created, the Number of DUT Ports is the same as the Available Ports. Click Edit to change the Number of DUT ports and configuration. Calibration
Automatically Continue Next PagesWhen any of the following boxes are checked, that page will NOT appear when Next> is pressed. The setting that is made is the default setting, or the setting that was made when that page last appeared. TIP: To have the page NOT appear, but have a known setting, clear all boxes and make all settings the first time through the wizard. Then restart the wizard, select the same template, and check the boxes that you do NOT want to see again. Click to learn about each of the selections:
TIP: Click
Test Suite ButtonsImport - Load an xml file that contains a previously-exported (saved) Test Suite. Export - Saves the selected Test Suite to an *.xml file for use on another PLTS computer. Delete - Removes the selected Test Suite from PLTS. |