Perform Differential Crosstalk TRL Calibration
Requires Advanced Calibration (5xP) PLTS license.
This topic describes the process to perform a Differential Crosstalk (Balanced) TRL Calibration.
A Differential Crosstalk TRL calibration is a 2-tier calibration process. First, the PNA is calibrated to the point where a test fixture is located. Then, a Differential TRL Crosstalk calibration is performed with standards in the test fixture. This characterizes the usual 12 error terms and the leakage, or cross talk between the differential paths.
This procedure assumes that a Differential TRL Cal Kit has already been fabricated and the appropriate definitions for each standard are saved. See Differential Crosstalk Edit TRL CalKit
If the Differential fixture is symmetrical (the left and right halves are mirror-images), then consider using the Automatic Fixture Removal feature, which is easier and potentially as accurate.
Use the Calculate Cal Set feature to use Differential Crosstalk standard measurements to compute and apply a Cal Set to an existing measurement.
-
Perform or recall a coaxial calibration using the VNA Cal Wizard
-
Perform or recall a Differential Crosstalk calibration:
-
Select a Differential Crosstalk Cal Kit
-
Perform / Measure Differential Crosstalk Standards
-
Save Differential Crosstalk Cal Set (*.dut file)
-
Connect the DUT (Perform Continuity Check)
-
Measure DUT
-
Select Analysis View
To start the Differential Crosstalk TRL Cal Wizard
Click Calibration, then Differential Crosstalk Cal, then Start Cal Wizard
This procedure starts by performing a coaxial calibration using the PLTS Calibration and Measurement Wizard. This calibration can be any type, but it must be accurate. The Calibration plane is at the end of the test cables.
|
Perform or load a calibration dialog
|
|
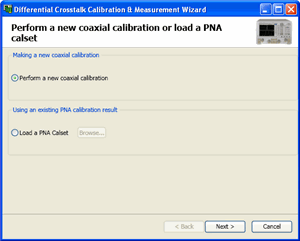
Perform a new coaxial calibration Select and click next to start a new calibration on the PNA using the VNA Cal Wizard.
Load a PNA Cal Set Select and click Browse then select a Cal Set that is stored on the PNA. The Cal Set much match the current DUT configuration and PNA settings.
|
The remainder of this topic provides help for the tier 2 TRL Calibration.
See the VNA Cal Wizard for help with the tier 1 cal.
|
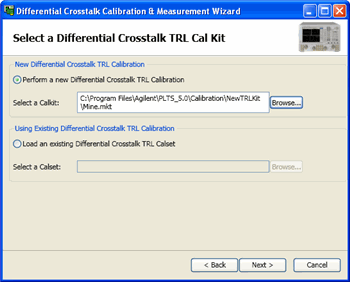
Select a Differential Crosstalk TRL Cal Kit dialog
|
|
Perform or Load a Differential Crosstalk TRL Calibration
-
Select a CalKit Click Browse, then navigate to a Differential Cal Kit (*.mkt file) that is saved on the PC.
-
Load an existing Differential Crosstalk TRL Calibration Click Browse, then navigate to a Differential Crosstalk Cal Set that is saved on the PC.
|
|
Differential Crosstalk TRL Calibration dialog
|
|
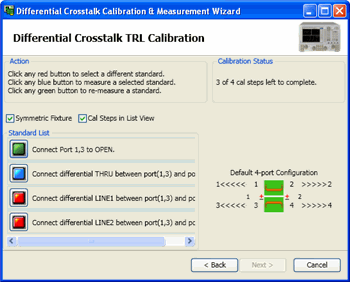
With the PNA calibrated at the coaxial connectors, measure the Differential Crosstalk Calibration standards in the fixture. At the end of the calibration, the standards are saved to S4P files so that they can be recalled later in the Calculate Calset dialog.
Symmetric Fixture Check when the test fixture is symmetric from left to right and from top to bottom.
Cal Steps in List View Check to cause the calibration steps to show the prompt next to the button, as shown in the image above.
-
Click each RED button to prepare to measure that standard.
-
Connect that standard then click the BLUE button.
-
When measured, the button turns GREEN.
-
To remeasure a standard, connect any standard again and click the corresponding GREEN button
-
Click Next when all standards are measured.
|
|
Save Differential Crosstalk TRL Calset dialog
|
|
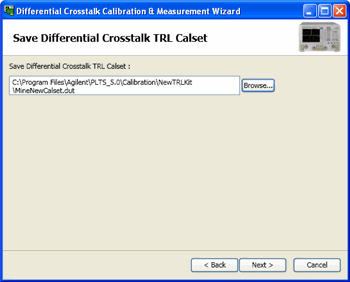
Click Browse, then navigate to a folder and type a filename for the new Cal Set.
|
|
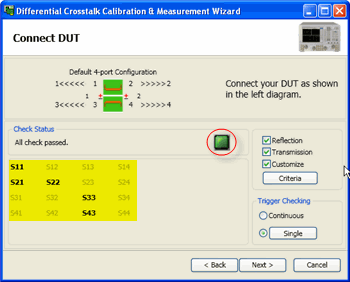
Connect DUT (Perform Continuity Check) dialog
|
|
This dialog allows you to test the connection of the DUT before making a measurement.
Click Next> to bypass this step and continue to the Measure DUT page.
Continuity Check helps to ensure that connections to the DUT are secure. Select the parameters that you want to check, and click Criteria to enter the Pass/Fail criteria for each parameter. These settings can be saved, and later recalled for use in subsequent measurements.
Reflection, Transmission, Customize Check each box to list the parameters that are available for testing to the specified criteria. Click each parameter (in the highlighted area above) to select for testing. The BOLD parameters are selected.
Pass/Fail indicator (Green box in red ring above)
Criteria Click to launch the Continuity Check Criteria dialog.
Trigger Checking
Click Next> when the DUT is connected to your satisfaction.
|
|
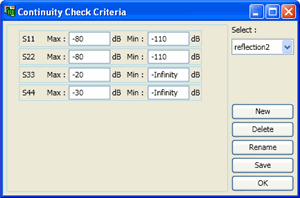
Continuity Check Criteria dialog
|
|
This dialog is used to establish the Pass/Fail criteria for the Continuity Check.
Note: The MEAN value of each parameter trace, not each data point, is compared to the Min and Max criteria.
Select Choose an existing criteria. If only 'default' exists, click New to create new criteria settings.
New Click to launch the Input New Name dialog. Type a name for the new criteria settings. The name of the settings in the above image is "Reflection".
Delete Removes the selected Criteria settings.
Rename Allows you to rename the selected Criteria through the Input New Name dialog.
Save Click to save the current settings to the selected Criteria.
OK Close the dialog.
|
|
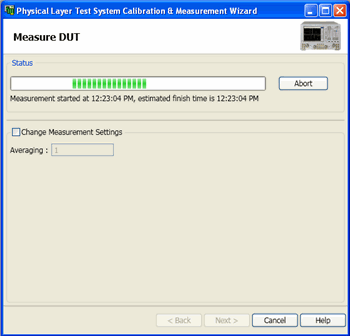
Measure DUT dialog
|
|
Change Measure Settings/ Averaging Check, then change Averaging value.
Click Next to begin the measurement.
|
|
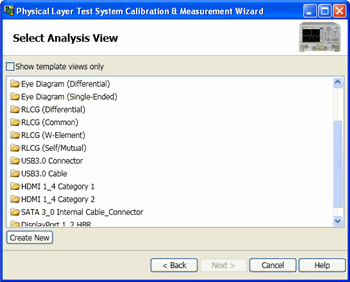
Select Analysis View dialog
|
|
Select the Analysis type that will be used to display data. This can be changed at any time. Learn how.
|