VMC Setup and Calibration is very similar to SMC. See FCA Overview to learn about the features that are common to these two applications.
The following information is unique to VMC:
How to make a VMC Fixed Out measurement
DUT Input (RF) must be connected to PNA port 1.
DUT Output (IF) can be connected to any other PNA port.
Notes:
When using a PNA-X with an Internal Second Source, the external source is NOT necessary.
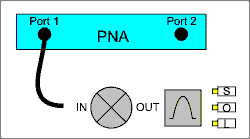
The Reference mixer provides a phase reference for the measurements. The reference mixer is connected in the reference receiver path of the network analyzer, between the source out and receiver R1 in ports, as shown below.
The reference mixer is considered part of the test system setup like the test cables. It remains in place during the entire calibration and measurement process. The reference mixer is switched in and out of the measurement path by the PNA as needed. See how to manually switch the reference mixer.
The reference mixer does not need to be reciprocal and does not have to match the calibration mixer or the mixer-under-test in performance. The only requirement of the reference mixer is that it cover the same frequency range as the mixer under- test. In general, it is valuable to select a reference mixer that can be used with a variety of different setups. For example, a broadband mixer can be used in place of several narrow-band alternatives.
A low pass filter on the output of the reference mixer can be used to suppress the LO leakage signal that comes out of the reference mixer output. It is not strictly needed, but ensures that the PNA will not have any source unlock or unlevel errors due to the LO leakage.
Connect the Reference Mixer INPUT to PNA Ref 1 Source out
Connect the Reference Mixer OUTPUT to PNA Rcvr R1 In
The Calibration mixer/filter is characterized either before or during a VMC calibration. It is used during the VMC calibration as the THRU standard. The calibration mixer/filter combination must meet the following requirements:
The mixer must be reciprocal over the frequency range of the mixer under test. This means that it has the same magnitude and phase response in the up-converting and down-converting directions (C21 = C12) as shown in the following diagram.
If the Input and Output frequency ranges are overlapping, the mixer must have Input to Output Isolation greater than 10 dB more than the conversion loss in the overlapping range.
The filter must reject the undesired mixing product, and pass the desired mixing product, at the output of the cal mixer. This requirement can be made easier by characterizing the mixer/filter as a downconverter. Learn more.
Note: With a corrected VC21Swept LO measurement, the phase data is displayed relative to the phase of the calibration mixer that was used during the VMC calibration. In addition, Group delay display format is NOT valid.
See an example of a Fixed Output VMC Measurement
The reference mixer is ALWAYS connected in the same orientation as the DUT, since the output frequency of the reference mixer has to match that of the DUT. The same applies to the calibration mixer/filter if it is characterized as part of a full VMC cal.
If you characterize the calibration mixer/filter separately, you can characterize it as either an upconverter or downconverter. Learn more.
Note: When using a PNA-X with Internal Second Source, the external source is NOT necessary.
Connect External Sources to the PNA GPIB Controller port.
Learn how to Configure an External LO Source
On the PNA-X front panel, press Meas then [Measurement Class]
Select VMC, then either:
OK delete the existing measurement, or
New Channel to create the measurement in a new channel.
A VC21 measurement is displayed.
To select additional parameters to display, click Trace, then New Trace, then select a parameter from the list.
|
Important Note: Connecting your DUT to the PNA: RF and IF terminology is NOT used in FCA because the PNA does not know how the DUT is labeled or how it will be used. Instead, the general terms INPUT and OUTPUT are used.
INPUT and OUTPUT Frequencies are specified using the Mixer Setup dialog box. |
The DUT input is always connected to PNA port 1. However, the DUT output can be connected to any other PNA port.
VC21, VC31, or VC41 Conversion Loss/Gain (default) - stimulus at Input, response at Output
S11 - stimulus and response at Input
S22, S33, or S44 - stimulus and response at Output
R1 (or R) - stimulus at Input, measures absolute power at the R1 receiver (uncorrected)
B, C, or D - stimulus at Input, measures absolute power at the output receiver (uncorrected)
Reverse conversion loss is NOT offered because of the reference mixer.
Measure a DUT with an Embedded LO
How to start the VMC Mixer Setup dialogTo provide quicker access, use the Setup softkey. Learn how. |
|
|
Using front-panel |
Using Menus |
|
|
|
|
|
The following VMC Mixer Setup dialog tabs are presented:
Sweep Tab (shared with SMC)
Power Tab (shared with SMC)
Mixer Freq Tab (shared with all converter apps)
Mixer Power Tab (shared with all converter apps)
Mixer Setup Tab (shared with all converter apps)
The Calibration Wizard guides you through this process. The first three steps characterize the calibration mixer that is used as the THRU standard during the calibration process.
Perform a 2-port SOLT calibration over the INPUT frequency range of the DUT, and another 2-port SOLT calibration over the OUTPUT frequency range. Use either a mechanical calibration kit or an ECal module.
Characterize the input and output match of the calibration mixer/filter combination with the external LO connected and the output terminated with an open, short, and load. Learn how to connect the calibration mixer/filter. Once characterized, an S2P file is saved and can be recalled for use in subsequent VMC calibrations using the same stimulus settings.
Note: Use an *.S2PX file for SEGMENTED VMC measurements. Learn more.
Connect the reference mixer between the Source Out and Rcvr R1 front-panel connectors. Connect the output port of the calibration mixer/filter combination to PNA Port 2 (or at the end of the cable attached to the port).
Measure the calibration mixer/filter combination as the THRU calibration standard.
The PNA calculates the error terms necessary to make corrected phase measurements of your mixer/converter under test.
The following dialog boxes are presented during VMC Calibration and VMC Mixer Characterization.
|
|
How to Perform a VMC Calibration
|
|
|
Using front-panel |
Using Menus |
|
|
To perform Mixer Characterization ONLY |
|
|
|
|
|
|
|
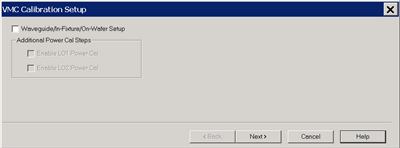
Waveguide/In-fixture/On-Wafer Setup Check to embed or de-embed circuit networks on the input and output of your mixer under test. Starts the following dialog box. Additional Power Cal StepsEnable LO1 / LO2 Power Cal Check when LO1 / LO2 is controlled (on the Mixer Setup tab) to perform a Power Cal on the LO source(s). |
|
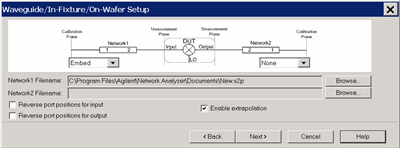
This dialog box appears ONLY if you checked the Waveguide/In-fixture/On-Wafer Setup box in the previous Cal Setup dialog. Allows you to embed or de-embed circuit networks on the input and output of your mixer under test. For Network1 (Input) and Network2 (Output) select Embed, De-embed, or None. Browse Click to navigate to the .S2P file that models the network to embed or de-embed. Reverse port positions for input/output Check to cause the Fixture/Adapter to be configured with Port 2 connected to the PNA and Port 1 to be connected to the DUT. The image in the dialog is updated to reflect that change. Enable Extrapolation Check (default setting) to apply a simple extrapolation when the S2P file has a narrower frequency range than the channel. The values for the first and last data points are extended in either direction to cover the frequency range of the measurement. A warning message is also displayed when extrapolation is necessary. To Embed or De-embed
|
|
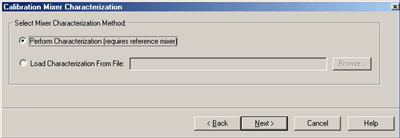
What is Calibration Mixer Characterization? For a brief explanation, see Calibration Mixer. Select Mixer Characterization MethodPerform Characterization (requires a reference mixer) Performs a Mixer characterization in addition to the VMC calibration. The mixer characterization file will be saved at the end for use in subsequent VMC calibrations. Choose this selection if you do NOT already have a mixer characterization file to load. Load characterization from file Loads an S2P calibration mixer characterization file. Click Browse to locate the file. Note: Load an *.S2PX file for SEGMENTED VMC measurements. Learn more.
"Invalid Mixer Characterization File" is displayed if the frequency range of the S2P file is smaller that those of the measurement. Note: A Mixer Characterization Cal can be performed separately. Learn how. |
|
This dialog box appears ONLY if your settings in the Mixer Setup dialog box indicate that your DUT is being tested as an upconverter (input < output). It allows you to characterize the Calibration Mixer / Filter as a downconverter (input > output) or an upconverter. The following example shows why you would choose to characterize the calibration mixer as a downconverter. Consider a DUT being used as an upconverter. The input frequency is 70 MHz, the LO is 20 GHz, and the selected (+) output frequency is 20.07 GHz. If we chose (-) in the mixer setup dialog, the output frequency would be 19.93 GHz.
|
|
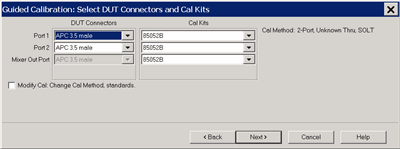
Allows you to specify the connector type and Cal Kit for each DUT port. Port n For each listed PNA port, specify the DUT connector type and gender, and the Cal Kit to use. Mixer Out Port Output port of the image filter that is connected to the calibration mixer. Specify the Cal Kit / standards to use for the measurement of the calibration mixer / filter combination. Note: When selecting a cal kit for the Mixer Out Port, be sure that the kit has standards with connectors that can mate to the mixer output port. If you choose an ECal, the ECal must have at least one port that can mate to the mixer output port. Note: If your DUT connectors are:
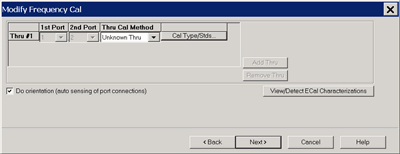
Modify Cal Check to start the Modify Cal dialog. If performing a Mixer Characterization Cal at the same time as VMC Cal, two Modify Cal dialogs will be presented, one after the other. |
|
For VMC calibrations - NOT for Mixer Characterization. Thru Cal Method For each Thru connection, choose the Thru method. Learn more about these choices. Cal Type/Stds Click to start the Modify Calibration Selections dialog box. The following selections are available ONLY if using an ECal module. Do orientation When this box is checked (default) the PNA senses the ECal model and direction in which the ECal module port is connected to the PNA ports. If power to the ECal module is too low, it will appear as if there is no ECal module connected. If you use low power and are having this problem, clear this check box to provide the orientation manually. Orientation occurs first at the middle of the frequency range that you are calibrating. If a signal is not detected, it tries again at the lowest frequency in the range. View/Detect ECal Characterizations Appears only if an ECal module is selected for use. Click to invoke the View ECal Modules and Characterizations dialog box. Displays a list of ECal modules that are connected to the PNA. |
|
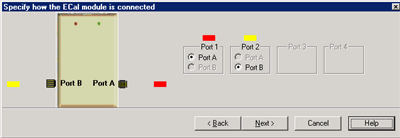
This dialog box appears when the Do orientation checkbox in the previous Modify Frequency dialog box is cleared. Click the ECal Port that is connected to each PNA port. |
|
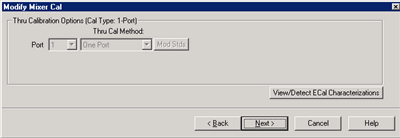
Mixer Characterization ONLY. The Thru standard is not measured. Therefore, the Thru Cal Method choices are not available. View / Detect ECal Characterizations Available ONLY if using an ECal module. Invokes the Select ECal Module and Characterization dialog box. |

|
Select the ECal Port to be connected to the Output of the Calibration Mixer dialog box help |
|
Select the ECal Port to be connected to the output of the image filter of the Calibration Mixer / Filter combination. See connection diagram of Calibration Mixer / Filter combination. |

|
Prompts for standards to be measured. Connect the standard, then click Measure. Measure Measures the mechanical standard and continue to the next calibration step. [ReMeasure] Replaces Measure after standard has been measured. Allows you to remeasure a standard. Done Click to proceed to the Calibration Complete dialog. Available only after all measurements for the calibration are complete. Back Returns to the previous dialog box. Next Does NOT make a measurement. Proceeds to the next required step. Cancel Exits the Calibration Wizard. |
|
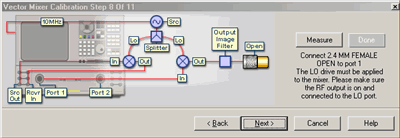
Connect the Open, Short, and Load standards to the image filter output, then click Measure.' This portion of the calibration characterizes the calibration mixer. The connection is different depending on if the calibration mixer is an upconverter being characterized as a down converter.
Done Click to proceed to the Calibration Complete dialog. Available only after all measurements for the calibration are complete. |
|
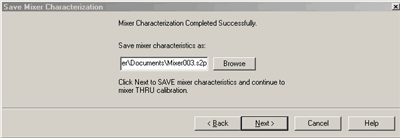
Allows you to save the characterization data of your calibration mixer. When performing another VMC calibration using the same calibration mixer, this S2P file can then be recalled. Browse Navigate to the location where you want to save the characterization data of your calibration mixer. Either use the default file name or enter a custom file name. Next Saves the mixer characterization file and continues with the next step in the full system calibration routine. Finish Replaces Next if you are only characterizing the calibration mixer instead of performing a full system calibration. Saves the mixer characterization file and exits the mixer characterization routine. |

|
Finish Save to the channel's calibration register. Save As User Cal Set Starts the Save as User Cal Set dialog box AND save to the channel's calibration register. Cancel Calibration is NOT applied or saved. Learn about Calibration Registers. Learn about User Cal Sets |

|
This dialog appears ONLY when Adapter Removal or Unknown Thru calibrations are performed. The following values were estimated from the measurement. Most of the time, they are adequate. However, for CW sweep or frequency sweep with large step sizes, the accuracy of the values may be improved. Adapter delay To improve this value, measure and record the delay of the adapter with a dense step size. Enter that value here. The required precision value is the accuracy that is required to characterize the delay value. Nominal phase offset (Waveguide ONLY). To improve this value, measure and record the phase offset of the Waveguide adapter with dense step size. Enter that value here. When one connector is coax and the other connector is waveguide, the phase offset has an ambiguity of 180 degrees. For consistency, the estimate provided here is always between 0 and 180 degrees. You can change this estimate to any value between -180 degrees and +180 degrees. For FCA calibrations, this dialog box appears twice: once for the input frequencies and once for the output frequencies. The values can be slightly different. |
Last Modified:
|
4-Jan-2012 |
Fixed LO Cal enable |
|
21-Oct-2010 |
MX New topic |