Other topics about Starting Measurement Cycle (Triggering) and Detecting End of Measurement
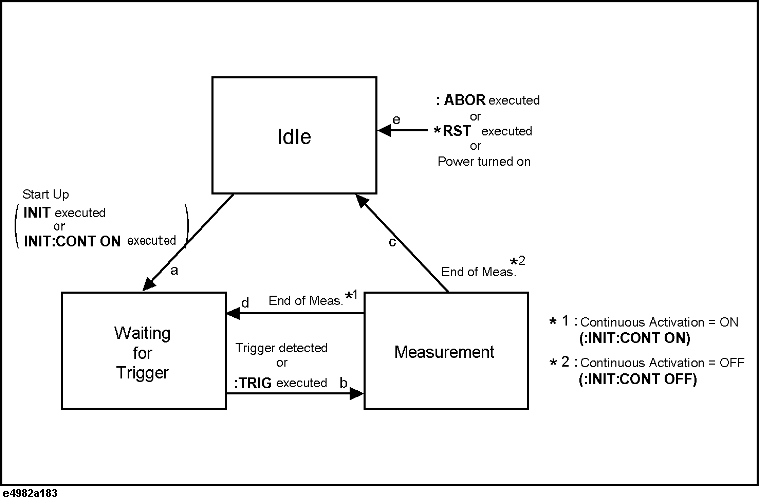
The trigger system detects the start of a measurement cycle (triggering) and controls the pre-measurement delay time. As shown in the figure below, the trigger system has three states: Idle, Waiting for Trigger, and Measurement.
Trigger System
The following subsections describe each state and how the trigger system switches among the three states.
The trigger system is in Idle state (arrow e in the Trigger System figure above) when you power ON the instrument or issue one of the following commands:
The trigger system is in Waiting for Trigger state (arrow a in the Trigger System figure above) when you activate it with one of the following commands:
:INIT:CONT(“ON” specified)
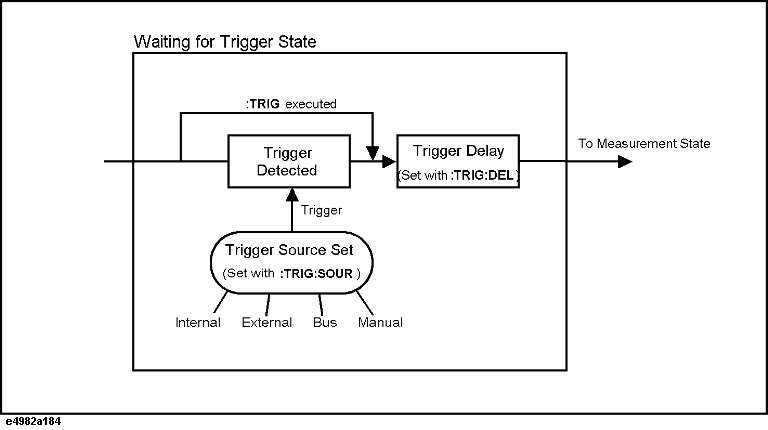
The trigger system is in Measurement state (arrow b in the Trigger System figure above) after the elapse of the trigger delay time (set with the :TRIG:DEL command) if the instrument is triggered (a trigger is detected) or the :TRIG command is issued while the trigger system is in Waiting for Trigger state.
As shown in the table below, how the instrument is triggered differs depending on which trigger source is specified. To specify the trigger source, use the :TRIG:SOUR.
|
Trigger source |
How the instrument is triggered |
|
Internal trigger |
The instrument is automatically triggered within itself. |
|
External trigger |
The instrument is triggered when a trigger signal is input through the Ext TRIGGER connecter or handler interface. |
|
GPIB/USB/LAN trigger (Bus) |
The instrument is triggered when the *TRG command. |
|
Manual trigger |
The instrument is triggered when the Trigger key on the front panel is pressed. |
Transition from Waiting for Trigger state to Measurement state
In Measurement state, the trigger system waits until the measurement point delay time (set with the :TRIG:SEQ2:DEL command) elapses and then starts measurement for each measurement point.
When the instrument has finished measuring the DUT at the single specified point (for single-point measurement) or at all the points defined in the active table (for list measurement), the trigger system switches to either Idle or Waiting for Trigger state depending on whether continuous activation is OFF or ON (set with the :INIT:CONT command):
If continuous activation is OFF:
Switches to Idle state (arrow c in the Trigger System figure above).
If continuous activation is ON:
Switches to Waiting for Trigger state (arrow d in the Trigger System figure above).
Issue the :TRIG:SOUR command to set the trigger source to Internal trigger.
If the trigger system is in Idle state (that is, it is not currently active), issue the :INIT:CONT command to turn ON continuous activation of the trigger system.
Issue the :TRIG:SOUR command to set the trigger source to GPIB/USB/LAN trigger.
If the trigger system is in Idle state (that is, it is not currently active), issue the :INIT:CONT command to turn ON continuous activation of the trigger system.
Trigger the instrument whenever you want to perform measurement. An external controller can trigger the instrument with one of the following two commands:
|
Command |
Query response |
Applicable trigger source |
|
Yes (returns measurement results) |
GPIB/USB/LAN trigger |
|
|
No |
All |
To start the next measurement cycle, repeat step 3.
If the trigger system is active (that is, not in Idle state), issue the :ABOR command to stop the trigger system.
Issue the :TRIG:SOUR command to set the trigger source to Internal trigger.
You can activate the trigger system using the :INIT command at any time. Consequently, the instrument will be automatically triggered by Internal trigger and perform one measurement cycle.
To start the next measurement cycle, repeat step 3.
See Using SRQ to Detect End of Measurement