Configure an External Device


Once configured (as shown in this topic), an external device will appear in, and be controlled from, relevant VNA dialogs as though it were internal to the VNA.

The following (separate) topics discuss how to set properties for these types of devices:


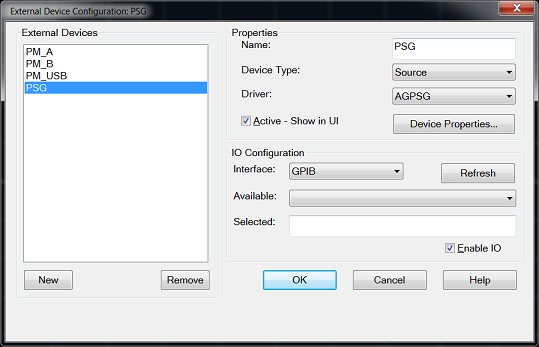
 External Device Configuration Dialog Box

How to access the External Device Configuration dialog box

VNA Applications have additional methods of launching this dialog.

Using Hardkey/SoftTab/Softkey

  1. Press Setup > External Hardware > External Device....

See Remotely Specifying a Source Port

External Device Configuration Dialog Box Help

Important Notes:

  • This dialog is used to configure the following types of external devices:

  • To configure an external source using this dialog, VNA must have FOM option. Without this option, you must control an external source manually. See Synchronize an External Source for help with manual source control.

  • By default, an external device is de-activated when the VNA is preset or when a Instrument State is recalled. This behavior can be changed with a Preference setting, so that it remains active through a Preset or Instrument State recall.

  • External Device properties are NOT saved in an Instrument State file. However, the reference to the External Device from relevant VNA dialogs is saved. Therefore, recalling a state file that refers to a device that is NOT present will result in a “Device configuration not found” error.

  • Multiple configurations for the same physical device can be Active. However, only one configuration for the same external source can have the I/O Enabled.

External Devices  

The devices that are currently configured appear in this list. The number of devices that can be configured is limited by the specified Interface.

New - Click to create a new device configuration. The default name is Device<n>, where <n> is the next number for 'Device'.

Remove - Click to remove the selected device from the list.

Properties

Name - Enter a device name as it will appear when referring to this device in VNA dialog boxes. Edit the name at any time. However, duplicate names are not allowed.

  • Because External Devices can be used with FOM ranges, do NOT name an external device any of the following FOM range names: “primary”, “receivers”, or “source”, “source1”, source2” and so forth. Learn more about FOM ranges.

  • Do NOT use a parameter name such as "S11" or "R1".

Device Type - Select one of the following:

  • Power Meter (PMAR) - Learn more

  • Pulse Generator - Only the Keysight 81110A Pulse Generator is supported. Learn more

  • Source (RF) - Learn more

  • None - returned remotely before setting Device Type.

Driver - Select the appropriate model to be configured.

(AG is short for Keysight).

For Power Meter device type, the driver is automatically choose AGPM.

For Source device type, choose the driver from the following list:

  • AG836XX (8360 and 8340)

  • AGESG  (ESG)

  • AGEXG  (EXG) See configuration note.

  • AGGeneric - For sources that are NOT listed but can be controlled using SCPI. Click Device Properties, then Edit Commands to send commands to these sources. Learn how.

  • AGMXG (MXG) - The MXG must have at least firmware A.01.44 for FOM power sweep to work correctly.

  • AGPSG  (PSG)

  • HP834XX

    Note: Any device types have only ONE driver.

    Active - Show in UI - Check to make the device available for use in the relevant dialogs. An instrument state that is saved with an Active device (checked) will include the device in the state file. Otherwise, if the Active box is cleared, the device will NOT appear in the state file. Learn more about Instrument State files.


    Device Properties - Click to launch the Properties dialog for relevant Device type:

    IO Configuration

    Interface - Select the interface that is used to connect the device to the VNA. These devices will then appear in the 'Available' field. Choose from:

    • GPIB - Devices connected to the System Controller GPIB port.

    • USB - Devices connected to the VNA USB ports. See Important First-time USB connection note.

    • Aliases - Devices that are connected to ANY interface for which you created an alias. See Configure Alias and LAN devices.

    • LAN - Devices connected to a network using a LAN connection. The VNA must also be connected to the network.

    Note: Devices connected to LAN must first be configured in Keysight IO libraries before they will appear on the Available list. See Configure Alias and LAN devices.

    Available - Shows a list of devices that are connected to the specified IO Interface.

    Refresh - Click to rescan the specified interface for devices.

    Selected - Enter the IO configuration or select from the available list of IO Interfaces found.

    Enable I/O - Clear this box to disable communication with the selected device. Do this to configure a device that is not yet connected to the VNA.

    • Communication with devices is attempted when Enable I/O is checked, Active is checked and OK is pressed.

    • When communication is attempted, devices with Enable I/O checked are queried for selected limits, such as frequency, power, and number of points. If there are limit problems, the VNA sends an error and the affected channels are put into Hold. These limits are enforced by the dialog box in which they are set. Resolve the reported limit problem and then restore the triggering.

    • If communication with a device is lost the affected channels are put into Hold.

    Configure Alias and LAN Devices

    Use this procedure to configure a device using a LAN interface. Also, use for ANY device for which you want to set an alias (easily-recognized) name. The alias name appears in the Available field when Aliases is selected as the Interface.

    1. On the VNA, minimize the VNA application (System > Main > Minimize Application).

    2. In the system tray (lower-right corner) right-click the IO icon and then click Keysight Connection Expert.

    To Add a LAN Device:

    1. In Keysight Connection Expert, click .

    2. Select Add LAN Instrument (TCPIP0) or USB0, then click OK.

    3. Click Add Address and then enter the IP address of the external source.

    4. Click Test Connection to verify communication.

    5. Click OK.

    To create an Alias for a connected device:

    1. In the list of connected instruments, right click the external source, then Add VISA Alias.

    2. Enter the same Device name that was, or will be, used in the External Device Configuration dialog.

    Last Modified:

    18-May-2016

    First Release