83495A Clock Recovery Module
Starting with firmware release A.06.90, 86100D Compatibility mode is no longer being actively tested and supported.
The 83495A module can recover the clock for all 10 GBd rates from 9.953 GBd to 11.32 GBd. There are no designated channels for this module, and the module is active as soon as it is installed in the instrument mainframe.The optical connections on Option 100 modules use single-mode fiber. The optical connections on Option 101 modules use multimode fiber. This module provides two clock signals: a rear-panel clock signal is divided by eight before being passed to the trigger and a front panel Recovered Clock Out that is a full-rate clock. If triggering becomes unlocked, the rear-panel recovered clock output is disabled and triggering will stop. However, the front-panel Recovered Clock Out will not be disabled even though the clock is not valid.
The minimum required 86100-series firmware version for this module is A.04.00.
Maximum signal input for the 83495A module is 6Vp-p electrical and 12 mW optical. Damage will occur at input powers above these levels.
The 83495A cannot be used with an 11898A Extender module.
Specific jitter frequencies in the vicinity of 4 MHz may appear amplified or attenuated due to the scope timebase delay and clock recovery group delay. This effect can be compensated for, by adding a length of cable between the optical output and the reference receiver input.
Keysight 83495A Option 100 modules use 9/125 μm single-mode fiber. Connecting multimode fiber to the Optical Input connector results in large reflections and insertion loss.
Keysight 83495A Option 101 modules use multimode fiber. Connecting the output to the Optical Input connector on single-mode modules results in large reflections and insertion loss.
To support this module, the mainframe must have the required minimum firmware revision installed.
You use the Clock Recovery dialog to configure the module. You can select the entire 9.953 GBd to 11.32 GBd range for clock recovery or Trigger On Data, which bypasses the internal clock recovery circuits and passes the data to the rear-panel recovered clock connector via an AC coupled limit amplifier. It is similar to not having a clock recovery module and using a splitter to divide the input signal and routing one portion to the front-panel trigger input. While triggering on the data provides a quick method of checking the data waveform, be aware that the displayed response may be missing 75% of the data patterns. This happens because triggering occurs at either the 1-to-0 or 0-to-1 data transition, and, as a result, the instrument will only be triggered when a transition occurs in the data instead of triggering on any symbol period as with a clock. For example, consider a pattern such as 1111000. Only the transition between the 1-to-0 triggers the instrument. Transitions between adjacent lows and highs will not cause trigger events. The recovered clock will still be available at the Front Panel Recovered Clock Out even when set to trigger on the data.
You can select the loop bandwidth for the recovered clock from two settings: < 4 MHz and < 300 kHz (default setting). The loop bandwidth setting applies both to the Recovered Clock and the Front Panel Recovered Clock Out paths. The narrow loop bandwidth provides a more complete view of the jitter on the waveform data; if the signal has jitter components with frequencies in the 4 MHz loop bandwidth range, the wide loop bandwidth tracks out low-frequency jitter showing more of a jitter free signal.
See Also
- Available Accessories
- Modules
Loss of Lock Conditions
Square Wave Patterns
Loss of lock, or false lock, conditions may be caused by square wave patterns due to the reduced number of signal transitions inherent in this type of pattern. Users of applications that require using such a continuously repetitive pattern, for example 5 consecutive 1's followed by an equal number of 0's (1111100000), should consider triggering the scope on data. Non-repetitive use of consecutive 0's or 1's, such as that found in PRBS patterns, do not cause this type of module lock problems.
Optical Mode Scramblers (Option 101, Multimode)
The 83495A Option 101 module uses a 62.5 micron multimode fused fiber coupler to provide light for the clock recovery circuit. An input signal that does not have sufficient higher order modes excited in the input fiber may reduce the coupling/split ratio, causing intermittent or loss of lock conditions. An example of this condition is launching from a single mode laser that may have power distributed in a very narrow center region of the fiber core.
Keysight recommends that an external optical mode scrambler be used with 83495A Option 101 (Multimode) modules. A scrambler optimizes the input fiber mode distribution, helping to prevent loss of lock conditions, by filling the module's 62.5 micron multimode input fiber. Optical mode scramblers are available from several vendors outside of Keysight.
To help determine if a module loss of lock condition is caused by an inadequately filled fiber, you may be able to increase the number of modes in the fiber by trying the following techniques:
- Back out the optical input connector slightly
- Insert a 62/125 multimode patchcord in between the single-mode fiber and the front panel input. Excite the higher modes by stressing the fiber with tight loops
To use the front panel clock, Keysight 83495A modules require an instrument with the enhanced trigger option.
If the display shows a clock recovery lock lost status message, clock recovery cannot be established on the signal. Make sure that your signal is attached with a power level greater than minimum (see the specifications) and that the symbol rate is within the range 9.953 GBd to 11.32 GBd. Also make sure that the correct source (optical or electrical) is selected. On 83495A modules, you do not need to select a symbol rate. The module automatically locks to any rate within the continuous range of rates from 9.953 GBd to 11.32 GBd.
Front-Panel Features
Figure. Module Front Panels
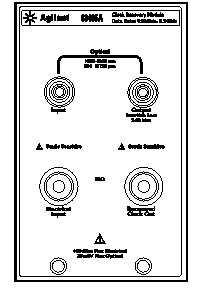
Optical and Electrical Input Connectors
Optical and electrical signals can be input for clock recovery using the appropriate input connector. To make the optical signal available to a receiver module, the slightly attenuated optical input signal is available at the Optical Output connector. The optical connector includes an adapter that can easily be changed to match the type of connectors that are used on your fiber-optic cables.
Optical Output Connector
The signal available at the Optical Output connector is the slightly attenuated signal input on the Optical Input connector. The optical connector includes an adapter that can easily be changed to match the type of connectors that are used on your fiber-optic cables.
Light energy can radiate from the front panel Output connectors on Keysight 83495A modules. The light emitted from this connector is the slightly attenuated light that is input to the front-panel Optical Input connector.
Recovered Clock Out Connector
The front-panel Recovered Clock Out connector provides an auxiliary output of the recovered clock that tracks and follows the input data with very fast jitter (a wide bandwidth jitter transfer function).
To configure the clock recovery
- Connect the data signal to the 83495A clock recovery module:
- For electrical signals, use a splitter to send part of the signal to the receiver module's input and part of the signal to the clock recovery module's electrical Input.
- For optical signals, connect the data signal to the module's optical Input connector. Connect the clock recovery module's Output to the receiver module's data input connector.
-
 Press the Trigger button located at the bottom of the application. In the dialog box's General Trigger Setup tab, select for the Source:
 - Left Module or Right Module (dependent upon the module position). This specifies triggering the instrument via the recovered clock on the module's rear-panel connector.
- Front Panel. Connect the module's front-panel Clock Out to the instrument's Trigger input connector. The trigger level is automatically set when using this module.
-
 Click the CDR button that is located on the bottom of the application. Or, click Setup > Clock Recovery Setup. This opens the clock recovery setup dialog.
 - In the Clock Recovery Setup dialog box, select the Source from the list. Select the Data Rate and the Loop Bandwidth.
Optical Output: Light energy can radiate from the front-panel Optical Output connector on 83495A modules. The light emitted from this connector is the slightly attenuated light that is input to the front-panel Optical Input connector.
If the display shows a clock recovery lock lost status message, clock recovery cannot be established on the signal. Make sure that your signal is attached with a power level greater than minimum (see the specifications) and that the symbol rate is within the range 9.953 GBd to 11.32 GBd. Also make sure that the correct source (optical or electrical) is selected. On 83495A modules, you do not need to select a symbol rate. The module automatically locks to any rate within the continuous range of rates from 9.953 GBd to 11.32 GBd.