Connecting DCA-X (Flex-on-Flex)
N1010A FlexDCA PC application can directly connect to FlexDCA on an N1000A. This is known as a Flex-on-Flex connection, and it can be made over LAN, USB, or GPIB. N1010A FlexDCA is compatible with Windows 7, Windows 8, and Windows 10 but is not compatible with Windows XP.
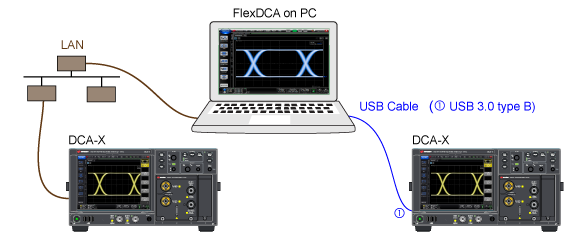
- Turn the DCA-X on and connect the type of cable that is appropriate for the connection that you want to establish. The cable will be either for LAN, USB, or GPIB. For GPIB, you can use a USB-to-GPIB adapter or install a GPIB card in the PC. For connection via USB, use a USB 3.0 type A to Type B cable where the Type B plug is connected to the DCA-X's rear-panel Type B receptical which is shown in the following picture.
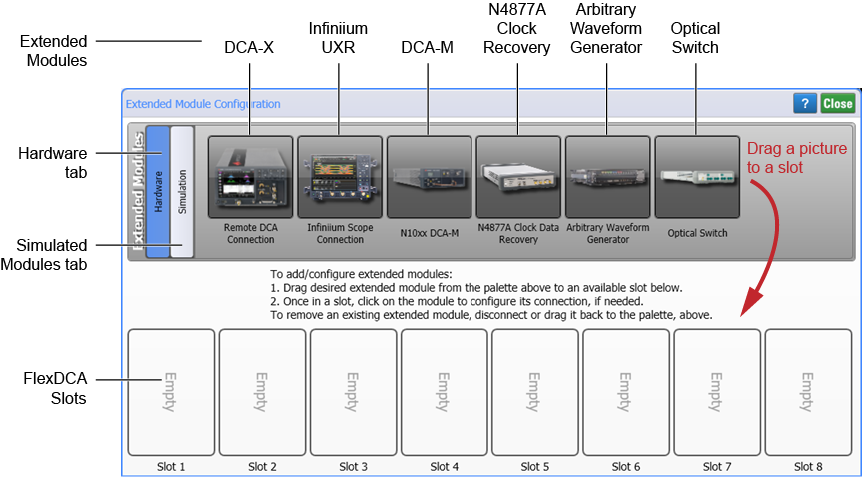
- Click Setup > Configure Extended Modules. Or, click the
 icon that is displayed to the right of the channel buttons along the bottom of the display.
 - In the Extended Module Configuration dialog, click the Hardware tab.
- Drag the picture of an DCA-X to Slots 1-4 as shown in the following picture. On FlexDCA on a DCA-X, slots 1 through 4 are permanently assigned to the physical DCA-X slots. Slots 5 through 8 can be assigned to simulated modules or supported external instruments.
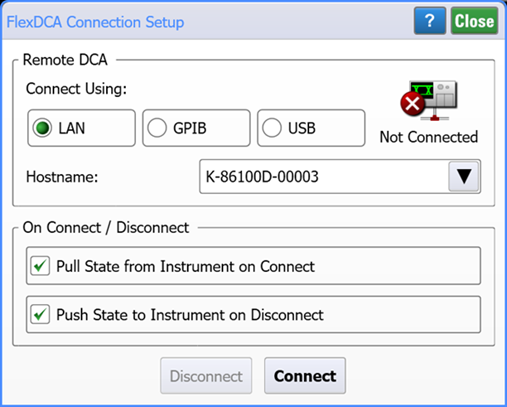
- Click the Setup button to open the FlexDCA Connection Setup dialog. You can also open this dialog by clicking Setup > DCA Connection Setup.
- In the dialog, select the connection type: LAN, GPIB, or USB.
- Connect Using field
- Select a connection via the LAN, GPIB, or USB to the DCA-X. Most users prefer a LAN connection so this is the default setting. For GPIB, you can use a USB-to-GPIB adapter or install a GPIB card in the PC.
- Hostname field (LAN connection)
- This field is the computer name of the DCA-X or its IP address. On the DCA-X, click Help > About and scoll down to the end of the list to locate the computer name.
- SICL Interface and GPIB Address fields (GPIB connection)
- Enter the GPIB address for the DCA-X.
- USB Device field (USB connection)
- FlexDCA autodetects the DCA-X when the USB cable is connected. The identification string includes the DCA-X's serial number. Although the DCA-X displays Under Remote Control, control is reserved and you must click the dialog's Connect button to establish full control.
- In the DCA Connection Mode field, select the connection mode:
- Select Standard for most connections. This ensures that you will be able to use the mini (one-slot) modules, such as the N1055A TDR/TDT module as well as TDR/TDT mode. This requires that the version of both DCA-X's FlexDCA and the N1010A FlexDCA be greater than A.05.30. It is recommended that they also be the same version.
- Selecting Compatibility mode allows you to use some older two-slot modules.
- Click Connect to make the connection. When the connection is made, the N1000A's display and front-panel keys are locked and do not respond to user input. The connection status icon displayed in the menu bar shows the connection status.
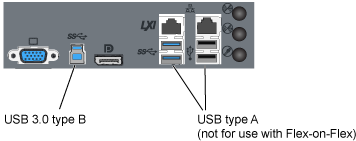
Do not connect the USB cable to the DCA-X's rear panel USB Type A receptical. The USB Flex-on-Flex connection only works if the cable is connected to the USB Type B device-side receptical.
| Icon | Description |
|---|---|
|
|
FlexDCA is not connected to DCA-X |
|
|
FlexDCA is connected to DCA-X |