6. Optical Connector Care
Optical Connector Care
Keep all fiber-optic connectors clean using professional fiber-optic cleaning products. Many products are available and are easily located via an internet search on "fiber optic cleaning products". You can purchase tools designed specifically for the type of fiber-optic connector that you are using. Replacing a damaged fiber-optic connectors can cost thousands of dollars, not to mention lost time! This expense can be avoided by observing the important precautions described in this topic. Treat all fiber-optic connectors like the high-quality lens of an expensive camera.

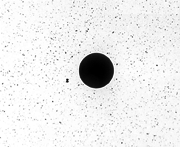
This picture shows the end of a clean, problem-free fiber-optic connector. The dark center circle is the fiber's 125 μm core and cladding which carries the light. The surrounding area is the soft nickel-silver ferrule.

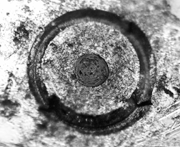
This picture shows a fiber end that is dirty from neglect or improper cleaning. Loose particles or oils are smeared and ground into the end of the fiber causing light scattering and poor reflection. Not only is the precision polish lost, but this action can also grind off the glass face and destroy the connector.

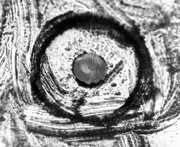
This picture shows physical damage to the glass fiber end caused by either repeated connections made without removing loose particles from the fiber end or by using improper cleaning tools. This damage can be severe enough to transfer the damage from the connector end to a good connector that comes in contact with it.
Always remove both ends of fiber-optic cables from any instrument, system, or device before visually inspecting the fiber ends. Disable all optical sources before disconnecting fiber-optic cables. Failure to do so may result in permanent injury to your eyes.
Improper connector care, cleaning, or use of mismatched cable connectors can invalidate the published specifications and damage connectors. Clean all cables before applying to any connector. Repair of damaged connectors due to improper use is not covered under warranty.
When making connections, tighter is not better. The purpose of the connector is to bring two fiber ends together. Once they touch, tightening only causes a greater force to be applied to the delicate fibers.
Keysight Technologies strongly recommends that index matching compounds not be applied to their instruments and accessories.
Cleaning Optical Connections
Keysight instrument fiber-optic input and output connectors often employ either lever adapters (for example on an N109X-series DCA-M) or screw-on universal adapters (for example on an 86105C). These adapters, when removed, have no fiber-optic parts and can be cleaned using the procedure in this topic.
If flammable fluids are used to clean connectors, the fluid shall not be placed on the instrument during use or when connected to mains voltage. Cleaning the connectors shall take place in ventilated area to allow fluid vapors to dissipate, and reduce the risk of fire.
No liquids of any kind should be placed on top of instrument due to top cover ventilation over electrical components.
Cotton swabs can be used as long as no cotton fibers remain after cleaning. Although foam swabs can leave filmy deposits, these deposits are very thin, and the risk of other contamination buildup on the inside of adapters greatly outweighs the risk of contamination by foam swabs.
Cleaning connectors with alcohol shall only be done with the instruments power cord removed, and in a well-ventilated area. Allow all residual alcohol moisture to evaporate and the fumes to dissipate prior to energizing the instrument.
- To remove a screw-on universal adapter from a module, turn the adapter counter clockwise.
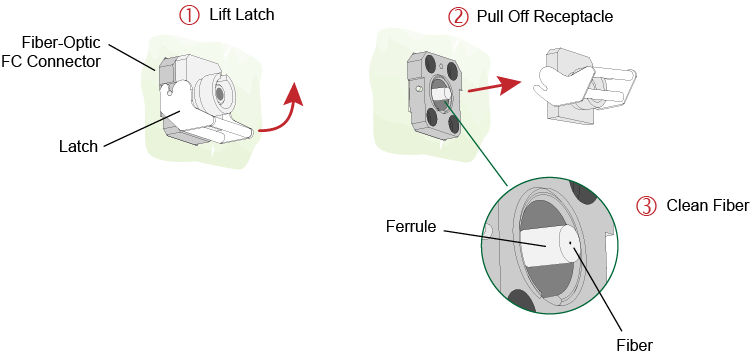
- To remove a lever adapter from module, lift the receptacle latch as shown in the following picture.
- Carefully pull off the receptacle without touching the ferrule or fiber end.

- Clean the adapter with the foam swab.
- Dry the inside of the adapter with a clean, dry, foam swab.
- Blow through the adapter using filtered, dry, compressed air. Nitrogen gas or compressed dust remover can also be used.
Do not shake, tip, or invert compressed air canisters, because this releases particles in the can into the air. Refer to instructions provided on the compressed air canister.