MATLAB Example 3. Pre-Emphasis Application
In this MATLAB example, you'll learn how to modify the pre-emphasis measurement that you created in Example 2 to be a MATLAB standalone application. MATLAB standalone applications can be run using the MATLAB Runtime without have to install MATLAB.
MATLAB Applications are created using the MATLAB Compiler. The resulting *.exe file can be run without having MATLAB installed on the DCA-X or PC. However, the MATLAB Runtime must be installed on the DCA-X or PC where FlexDCA is installed and the MATLAB Runtime version must be the same version as was targeted when the MATLAB Application was created.
Procedure
- Complete Example 2. The resulting PreEmphasis.xml and Butterworth.m files should be in FlexDCA's user measurements folder (\Documents\Keysight\FlexDCA\User Measurements).
- Using a text editor, open the PreEmphasis.xml file. Change the content of the file's <Script> element from PreEmphasis.m to algorithm.exe. We will create algorithm.m which will be compiled into algorithm.exe.
- Make a copy of the PreEmphasis.m file and rename the copy algorithm.m. The name of a script file for a standalone application must always be algorithm.m.
- Open the algorithm.m scipt file in MATLAB. Make the following edits to the script as shown in this listing:
- Add a algorithm function definition before the first line in the script as shown in green.
- Add the reference
InputVars.shown in red before every input variable in the script. Do not forget to add the period character "." betweenInputVars.and the variable. For example,SrcDatabecomesInputVars.SrcData. - Add a structure of output variables shown in blue to the end of the script.
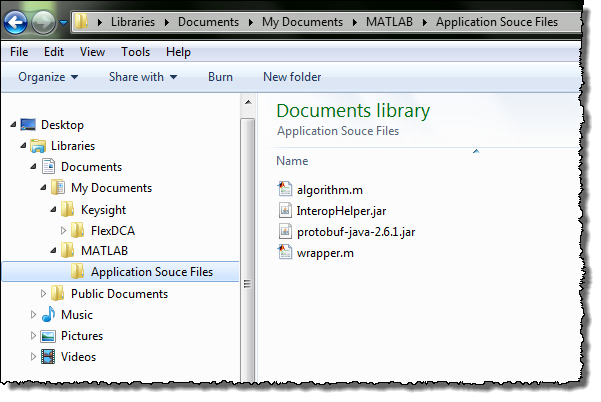
- Create a folder to which you will save the files that will be compiled into your standalone application. The following simplified picture shows a project folder (Application Source Files) created within MATLAB's default project folder. You can give your folder any name that you like. Place the files shown in the picture into your folder. The file are:
- Copy the algorithm.m scipt file that you created in the previous step.
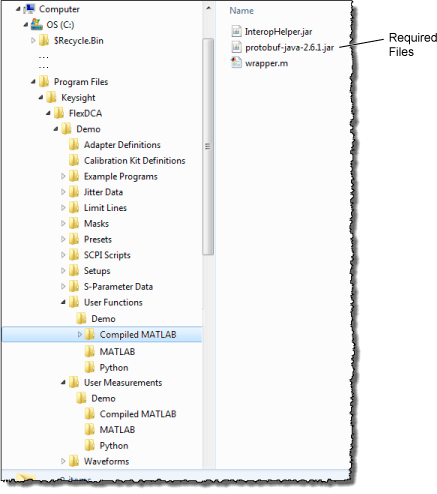
- Copy three additional files that are required when compiling a MATLAB scipt into a MATLAB standalone application:
- InteropHelper.jar
- protobuf-java-2.6.1.jar
- wrapper.m.
- Your folder for compiling your script should now have the files shown in the following picture.
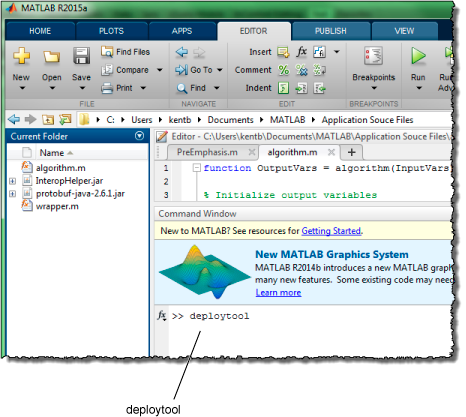
- In MATLAB's Command Window, run the deploytool command to view the Compiler dialog.
- In the Compiler dialog, double click Application Compiler to run the compiler.
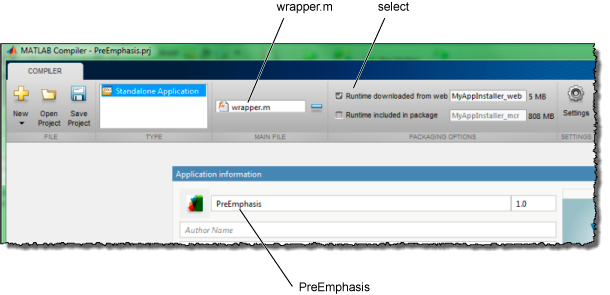
- In the MATLAB Compiler, click the button to add the wrapper.m script from your source folder. Select Runtime downloaded from web as show in this picture. Finally, in the Application information field enter the name for your application. This will be the name given to your .exe file.
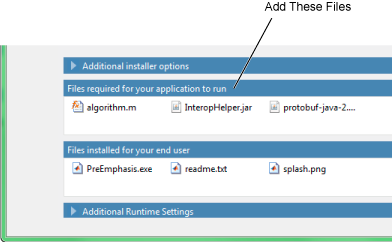
- In the Files required for your application to run field, click the
 button and add the algorithm.m, InteropHelper.jar, and protobuf-java-2.6.1.jar files as shown in the following picture.
 - Save your standalone application project, and click the Compiler's Package button.
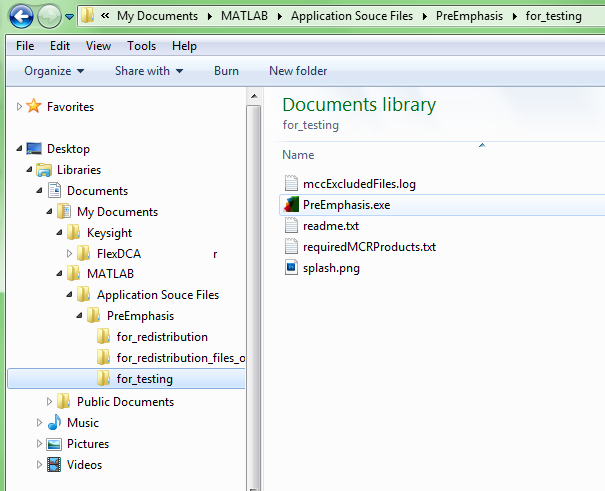
- When the compile completes, close the MATLAB compiler and open File Explorer. MATLAB has placed the compiled files for the application in the \for_testing folder as shown in this picture. The executable file is PreEmphasis.exe. Remember, at the start of this lesson you edited the PreEmphasis.xml file's <Script> element to use the PreEmphasis.exe file.
- Copy the PreEmphasis.exe file to FlexDCA's user functions folder (\Documents\Keysight\FlexDCA\User Functions).
- On each PC or N1000A where you want to run your executable, perform the following steps:
- Install FlexDCA
- Place the PreEmphasis.xml and PreEmphasis.exe files in FlexDCA's user measurements folder (\Documents\Keysight\FlexDCA\User Measurements).
- Install the correct MCR version.
- In FlexDCA's User measurement tab, click the User Meas Setup button.
- In the dialog, select an available tab.
- Click Browse and select your XML configuration file, PreEmphasis.xml and close the dialog.
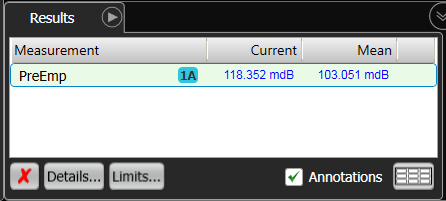
- Click on your new Pre-Emphasis measurement button and view the results in the Results panel.
All letters in algorithm.m must be typed in lower case. Naming the function Algorithm.m will break the script.
PreEmphasis.xml
<?xml version="1.0" encoding="utf-8"?>
<Measurement xmlns:xsd="http://www.w3.org/2001/XMLSchema"
xmlns:xsi="http://www.w3.org/2001/XMLSchema-instance">
<Script>PreEmphasis.py</Script>
<Name>Pre-Emphasis</Name>
<Abbreviation>PreEmp</Abbreviation>
<!-- <Icon>MyPicture.png</Icon> -->
<Comments>This measures the amount of pre-emphasis on a signal.</Comments>
<MeasurementType>1 Source</MeasurementType>
<ValidMode>Scope</ValidMode>
<Dependent Name = "Amplitude">
<SourceIndex>1</SourceIndex>
</Dependent>
<Dependent Name = "Peak-Peak">
<SourceIndex>1</SourceIndex>
</Dependent>
</Measurement>
algorithm.m
function OutputVars = algorithm(InputVars)
% These values need to be set by the script.
% Set Status to Correct only when Result is computed.
Result = 0.0;
Units = 'dB';
Status = 'Invalid';
ErrorMsg = '';
% Do nothing if there is no input waveform.
if isempty(InputVars.SrcData)
return;
end
% Variables only get cleared when a MATLAB measurement is installed.
% So, clear dependent measurement results to prevent another MATLAB
% measurement from creating them and confusing the script.
clear Vpp Vamptd;
% Iterate through MeasData to find V p-p and V amptd
NumMeas = length(InputVars.MeasData);
for i=1:NumMeas
if strcmp(InputVars.MeasData(i).Name, 'Peak-Peak') && strcmp(InputVars.MeasData(i).Source1, Source)
Vpp.Result = InputVars.MeasData(i).Result;
Vpp.Status = InputVars.MeasData(i).Status;
Vpp.Source = InputVars.MeasData(i).Source1;
elseif strcmp(InputVars.MeasData(i).Name, 'Amplitude') && strcmp(InputVars.MeasData(i).Source1, Source)
Vamptd.Result = InputVars.MeasData(i).Result;
Vamptd.Status = InputVars.MeasData(i).Status;
Vamptd.Source = InputVars.MeasData(i).Source1;
end;
end;
% Verify required measurements have been made.
if (~exist('Vpp') || ~exist('Vamptd'))
ErrorMsg = ['Error: Unable to retrieve "Peak-Peak" and "Amplitude" measurements.\n' ...
'Please be in Oscilloscope Mode and make "Peak-Peak" and "Amplitude" '...
'measurements from Amplitude Measurement Tab on ' Source '.'];
return;
end;
% Compute Result
Result = 20 * log10(Vpp.Result/Vamptd.Result);
% Status of dependent measurements
if (strcmp(Vpp.Status, 'Correct') && strcmp(Vamptd.Status, 'Correct'))
Status = 'Correct';
elseif (strcmp(Vpp.Status, 'Invalid') || strcmp(Vamptd.Status, 'Invalid'))
Status = 'Invalid';
% Return now before possibly setting to Questionable later.
return;
else
Status = 'Questionable';
end
OutputVars = struct(...
'Result', Result,...
'Units', Units,...
'Status', Status,...
'ErrorMsg', ErrorMsg);
end
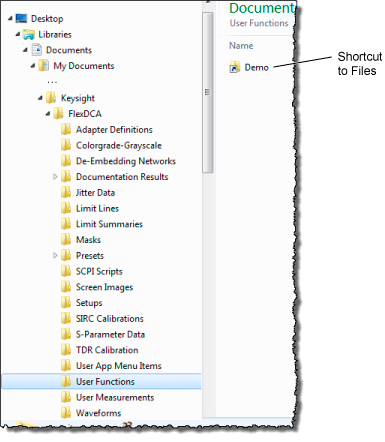
| From the shortcut folder located in \My Documents\Keysight\FlexDCA\User Functions |
Directly from the folder \Program Files\Keysight\FlexDCA\Demo\ User Functions\Demo Compiled MATLAB |
|---|---|
|
|
Do not place the Butterworth.xml file into this folder.


You may have to wait a few seconds for the waveform to appear.