Important Note about Importing Data into PLTS:
|
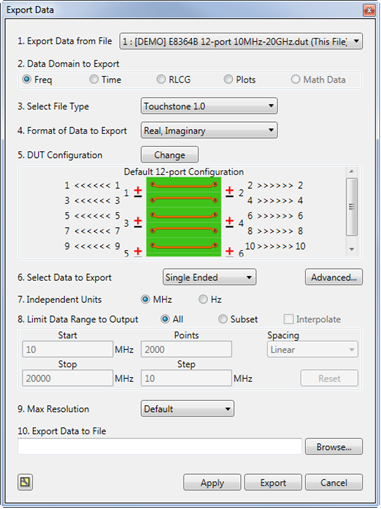
Note: Complete this dialog box in numeric sequence from top to bottom. This is necessary because the selections that are available in each field depends on previous selections. For example, if you select Frequency domain data, then the selections for format are different than if you selected Time domain data.
Export Data from File - Select the file that contains the data to be exported.
- Select Data Domain to Export Click to learn more:
Select File Type - Dependent on #1. Data Domain
Format of Data to Export - Dependent on #1. Data Domain
DUT Configuration View the current DUT configuration or click Change to launch the DUT configuration dialog.
Independent Units - Dependent on #1. Data Domain
All - Export All of the selected data
Subset The following settings define the subset. Some settings may require you to first check Interpolate
Start Lowest frequency or time of the data to export.
Stop Highest frequency or time of the data to export.
Points Number of data points measured from Start to Stop frequency.
Step Frequency or time range between each data point; available ONLY with Linear Spacing.
Spacing Data points are spaced Linear mode (default), Logarithmic, points per Decade (10x), or points per Octave (2x).
Interpolate May be checked automatically by PLTS if a subset setting is made that requires Interpolation. Interpolated data is not as accurate as measured data.
Checked - Subset settings have been changed that require the exported data to be interpolated.
Clear - Exported Data is NOT interpolated. When Linear Spacing is selected, PLTS will change Subset settings that you enter to the closest measured data values which do not require interpolation. When Log, Dec, or Oct Spacing is selected, PLTS may not allow Interpolate to be cleared after changing settings. Click Reset to return to the original values.
Reset Returns the Subset settings to the original values.
Export Data to File - Type a full path and filename or click Browse , then navigate to a folder. The suffix is automatically appended to the filename. To see the suffix, click any other field before clicking OK. When saving more than one file, filenames are automatically generated and saved to the specified folder.
Apply/Export - The Apply button saves the data and leaves the Export Data dialog open. The Export button saves the data and closes the Export Data dialog.
The following is added to the file header when De-embedding or AFR correction is applied:
!Deembedding/AFR applied
Data Domains - Export To...
Frequency Domain (1)
3. Select File Types: CitiFile, Touchstone, TDA MeasureXtracter, Cadence Allegro PCB SI 630, Text (tab delimited), Text (comma delimited).
4. Format of Data to Export (Click the link to learn more about each file type.)
Note: Touchstone, TDA, and Cadence Allegro formats - ALL export sNp files.
CitiFile: Real/Imaginary
Touchstone: Magnitude/angle, dB/ angle, Real/Imaginary
TDA MeasureXtracter: dB/ angle
Cadence Allegro: dB/ angle
Text: Real/Imaginary, Log Magnitude, Linear, Phase, Unwrapped Phase, Group Delay, VSWR, Impedance Real, Impedance Imaginary. Learn more about these formats.
5. DUT Configuration - Same for all data domains.
6. Select Data to Export: Depends on Format of Data
CitiFile and Text Files
Single-ended - ALL single-ended parameters.
Balanced - ALL Balanced parameters.
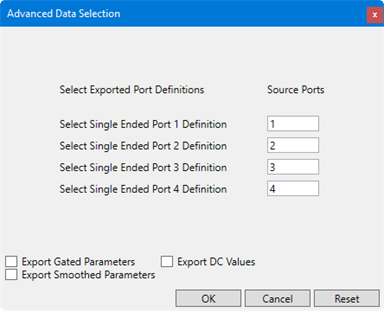
Advanced Click to select specific parameters.
sNp Files
Export selected Single-ended or Balanced parameters to export, or click Advanced to remap ports for the exported data. To limit the amount of port data to export, change the DUT configuration.
7. Independent Units: MHz or GHz
Time Domain (1)
3. Select File Types: Text (tab delimited), Text (comma delimited), Touchstone (snp).
4. Format of Data to Export Step Real, Impulse Real, Step Volts, Impulse Volts, Step Log Mag, Impulse Log Mag; Step Impedance.
5. DUT Configuration - Same for all data domains.
6. Select Data to Export: Any number of single-ended or balanced parameters.
Advanced Click to select specific parameters and choose one ore more files.
7. Independent Units: ns (tme in nanoseconds), cm ( NOT available in this release)
RLCG (1)
File Type (2) |
Format (3) |
Data to Export (5) |
W-Element |
4 Port Fitted |
|
W-Element Tabular |
4 Port Extracted 4 Port Smoothed |
|
MDIF |
4 Port Extracted 4 Port Smoothed Differential Common |
|
ML2CTL Model |
4 Port Fitted |
Learn more about Differential and Common data.
7. Independent Units: MHz or GHz (available ONLY with Extracted or Smoothed selections).
8. Limit Data Range to Output: Subset - (available ONLY with Extracted or Smoothed selections).
Plots(1)
Exports an image - not the data - of the active window.
3. Select File Types:
Clipboard Same as
 on Toolbar. Copies the
image to the Windows clipboard. The contents of the clipboard
can then be pasted into other Windows programs. This is the
same as on the Toolbar.
on Toolbar. Copies the
image to the Windows clipboard. The contents of the clipboard
can then be pasted into other Windows programs. This is the
same as on the Toolbar..BMP, .JPG, or .TGA (Targa) Same as
 on
the Toolbar.Saves the image file.
on
the Toolbar.Saves the image file.
4. Format of Data to Export: Choose from several resolution choices. The default is 1920 x 1080.
Math Data (1)
Exports a math trace to the selected file type. Only available when a math formula is saved. Learn more about Math.
3. Select File Types: Text (tab delimited), Text (comma delimited)
4. Format of Data to Export: Dependent on domain used in math formula (Frequency or Time).
5. DUT Configuration - Same for all data domains.
6. Select Math to Export: Lists the math formulas that are currently in PLTS memory.
Text Files
Import into spreadsheet or other text applications.
Import directly into most Keysight ADS applications.
Tab delimited or comma delimited.
Save some or all parameters.
Click Advanced to choose one file per parameter or all parameters to a single file.
The following is an example of text file header information:
Header Information |
Description |
! NAME Keysight Technologies |
|
! DATA Time(ns), TDD11 |
Data domain and parameters |
! RESPONSE STEP VOLTS |
Format of data |
! XDATA UNIT ns |
X-axis units |
! YDATA UNIT Real |
Y-axis units (real or complex) |
BEGIN |
|
% time(real) TDD11(real) |
Type of data (real or complex) Currently only real is offered. |
-4.0583 0.4001 |
Data |
-4.0447 0.4001 |
|