External Source Configuration
Once configured, an external source appears in VNA dialogs as though it were an internal source. This capability requires FOM Option S93080A.
In this topic:
How to Configure an External Source
VNA Applications have additional methods of launching this dialog. |
|
|
Using Hardkey/SoftTab/Softkey |
Using a mouse |
|
|
|
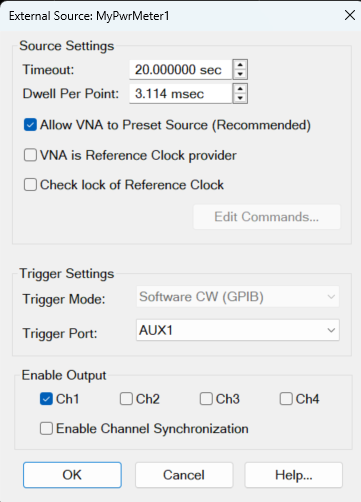
This dialog box is used to make external source settings.
Source SettingsTimeout (sec) Sets the VISA timeout and will stop processing additional SCPI commands on the first error and will put the measurement into hold. Dwell per point (ms) Applies a dwell in Hardware List triggering ONLY. Set the time (in milliseconds) the external source will wait before data acquisition. Enable Modulation Control - Enables modulation of an external modulation source to be controlled from a source dialog. Allow VNA to Preset Source (Recommended) - Enabled by default. If enabled, when the VNA connects to the source it will preset the source to ensure that the source state is known by the VNA. If disabled, the VNA is not allowed to preset the source. VNA is Reference Clock provider - Checking this box uses the VNA as the reference clock for the specified external source. Check Lock of Reference Clock IN - (SA and Modulation Distortion source drivers) Checks for the VNA's reference clock at the external source. The reference clock is checked at external source driver startup. If the clock is not available, an error message is displayed. If a dual hardware source is used (for example, M8190+PSG), the reference clock inputs of both sources are tested. In the case of the USB chassis (P9336A), the reference clock is tested at the rear 10 MHz chassis input if the P9336A 10 MHz chassis reference is selected. Edit Commands Provides a method to send SCPI commands to AGGeneric (not listed) sources. Trigger Settings and Physical Connection diagramsNote: The VNA controls ALL external source trigger settings automatically (except for those on this dialog). All settings in the External Trigger dialog are ignored. Trigger Mode Software CW (GPIB) Slowest method.
Hardware List (BNC) Fastest method.
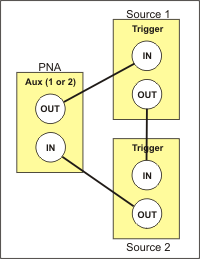
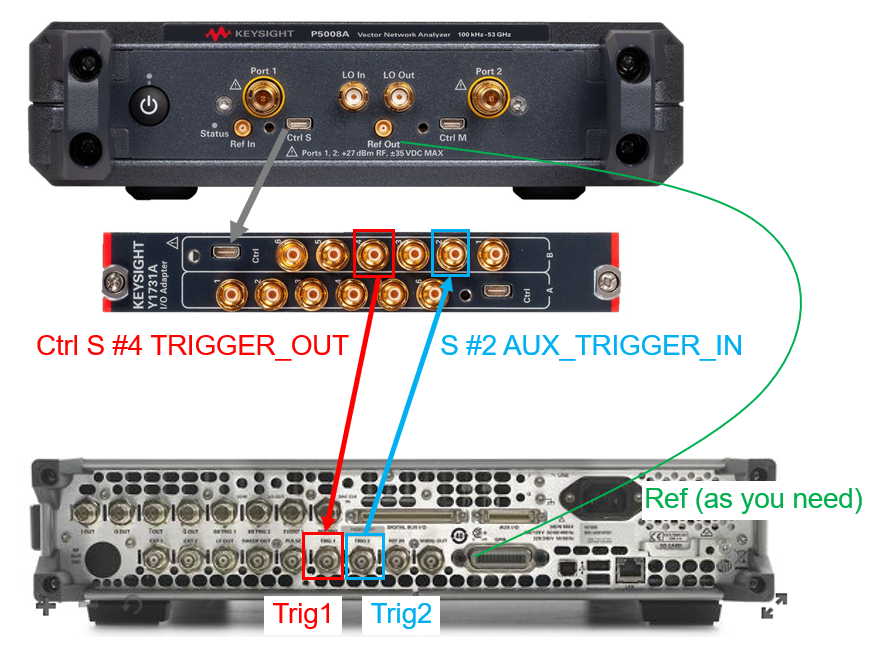
Trigger Port Used ONLY for Hardware List Trigger Mode. Select the VNA rear panel connector to be used for triggering. The sources must be connected as follows:
Notes
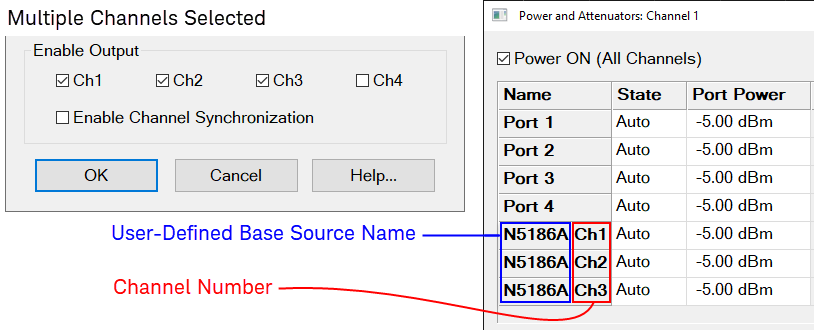
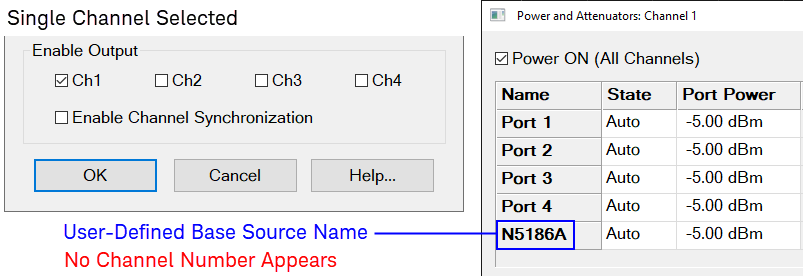
Enable OutputThis feature is available for connected external sources with one or more channels. Some measurements, such as wideband active load pull (WALP), require a source with multiple channels. A set of check boxes (Ch1, Ch2, Ch3, and Ch4) are provided for enabling these channels on the VNA. Each directly correspond to the RF output connectors of the source. For example, when an N5186A MXG is the external source, Ch1 controls the "1 RF Out" port. The dialog always displays four check boxes, even if the connected source has less than four RF outputs. In all cases, Ch1 is checkmarked by default. The channels you select appear in other related VNA dialogs, such as Power and Attenuators, Offsets and Limits, and Frequency Offset. In these cases, when there is more than one channel selected, the user-defined channel names are decorated, using “<Base Source Name> Ch <Chan Number>,” as shown below. Enable Channel Synchronization - Click this checkbox if your external source supports channel-phase synchronization. Note: If you are using Arbitrary Load Control (ALC) software with a VXG signal generator as the external source, channel-phase synchronization works for channels 1 and 2 only.
When only a single channel is selected, the user-defined channel name is not decorated, as shown below.
External Source Dialog box for MP9336+M9810A
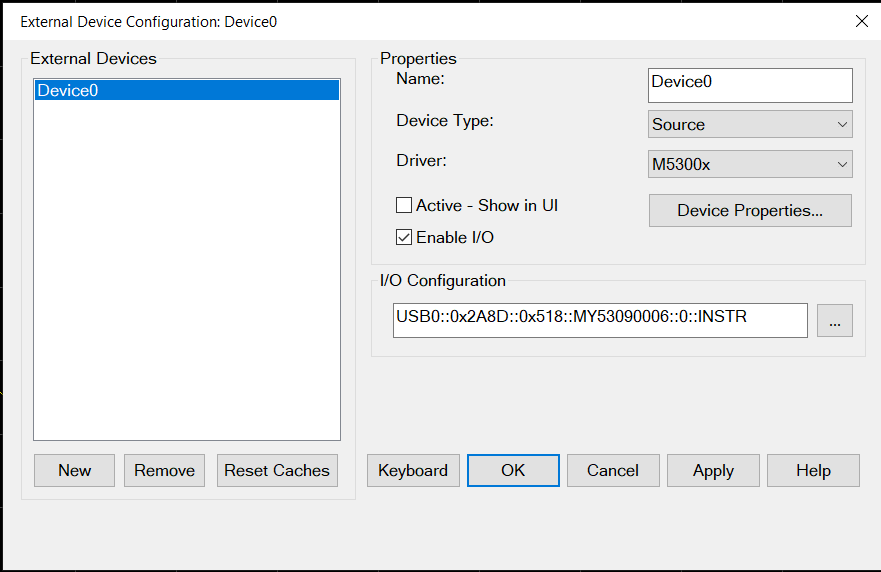
External Source Dialog box for M5300x PXIe Source Driver
The Driver name is M5300x.
M5300x Device PropertiesIn the dialog above, click on the Device Properties... button to access the following dialog:
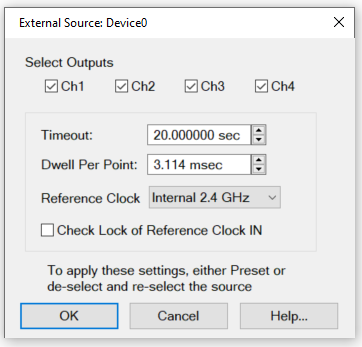
Select Outputs A single M5300x has four outputs, so it may be used to define up to four sources. Multi-channels can be selected at the same time. Timeout (sec) Sets the VISA timeout and will stop processing additional SCPI commands on the first error and will put the measurement into hold. Dwell Per Point (msec) Applies a dwell in Hardware List triggering ONLY. Set the time (in milliseconds) the external source will wait before data acquisition. Reference Clock There are two choices: Internal 2.4 GHz and External 2.4 GHz. Internal locks to the PXI_CLK100 backplane reference and generates 2.4GHz. External locks to the signal input on the "2.4GHz in" front panel connector. Default is "Internal 2.4GHz" Check Lock of Reference Clock IN (SA and Modulation Distortion source drivers) Checks for the VNA's reference clock at the external source. The reference clock is checked at external source driver startup. If the clock is not available, an error message is displayed.
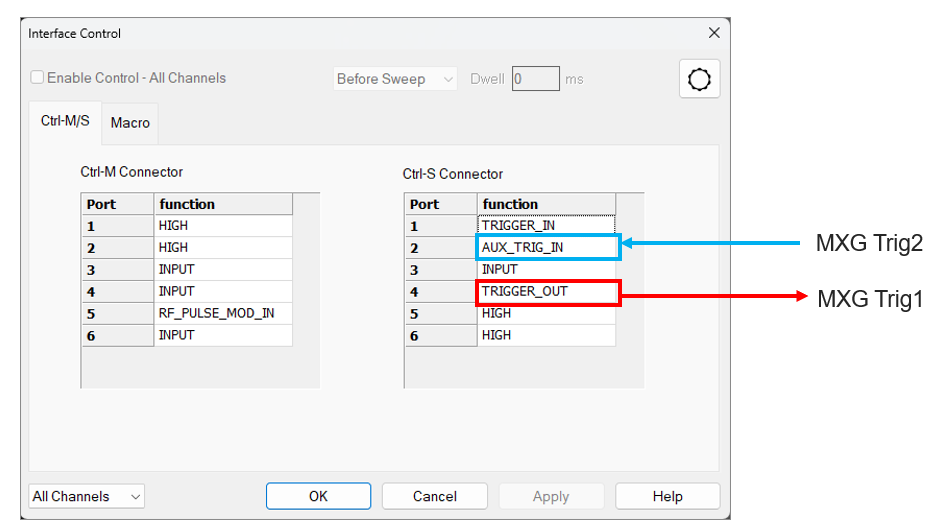
Streamline USB VNA + MSG HW List SweepHardware Connection
Connection Setup
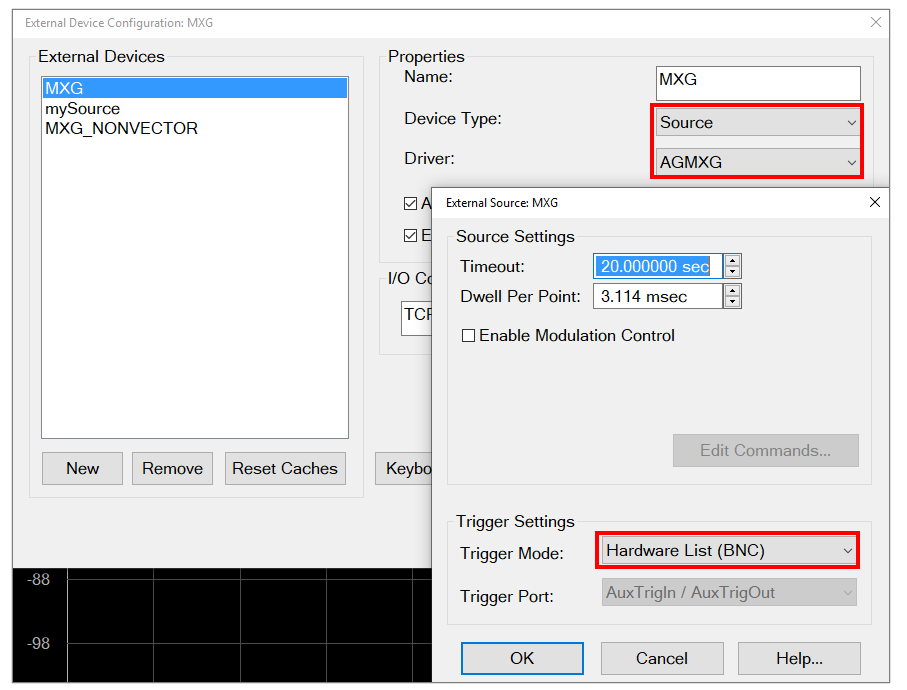
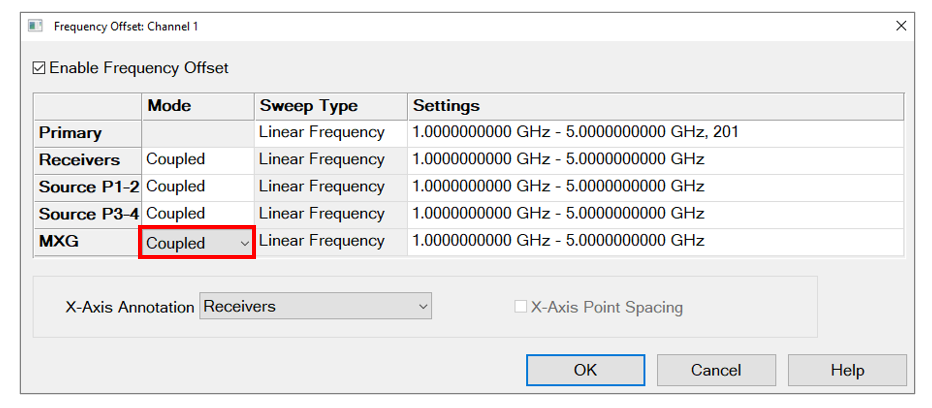
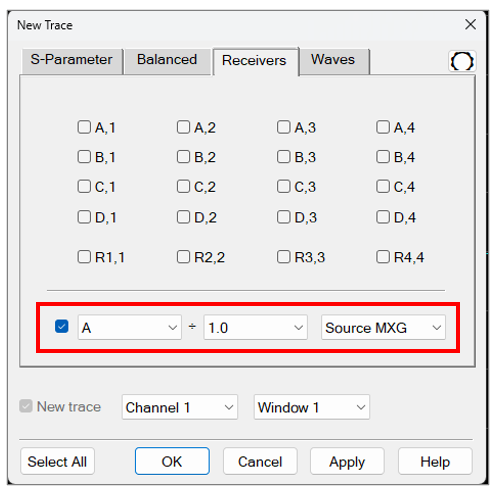
1. Follow Interface Control settings as below (Setup > Internal Hardware > Interface Control) 2. For Trigger, all default settings. The hardware list (BNC) will override the settings. 3. Go to External Device Configuration, choose Source under Device Type and for the Driver, choose AGMXG (Not AGGeneric or MXG Vector). Then click on the Device Properties.. to open External Source Dialog. Select Hardware List (BNC) as the Trigger Mode. 4. Enable FOM, Go to Sweep > Source Control > Frequency Offset... 5. Add trace "A, MXG" (for example). |
|
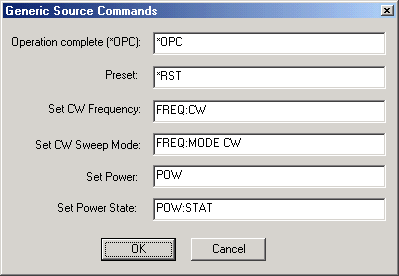
Enter the SCPI commands that control the following functions on your AGGeneric (not listed) source. A field without a SCPI command entered will be ignored and that function will not be set. To launch this dialog, click Edit Commands on the External Source Properties dialog. Operation Complete (*OPC) . Preset Presets the source Set CW Frequency Sets CW Frequency Set CW Sweep Mode Sets source sweep mode Set Power Sets source power Set Power State Turns power ON or OFF |