How Do I Make a Phase Discontinuity Measurement?
Last updated: January 15, 2009
- Measuring Non-HSDPA Phase Discontinuity
- Measuring 3GPP TS 34.121 v7.5.0 5.13.1AA Error Vector Magnitude (EVM) and Phase Discontinuity with HS-DPCCH ( lab application or feature-licensed test application only )
Before performing these procedures, ensure that you have specified the proper Amplitude Offset for your test setup, and that the test set has been properly calibrated (see Calibrating the Test Set ).
Measuring Non-HSDPA Phase Discontinuity
-
Establish a non-HSDPA
RB Test Modeconnection between the UE and test set (see How Do I Set Up a Call and Make a Connection? ). -
Set
UL CL Power Control Mode
to
Active Bits(this is the default setting). -
Set
UE Target Power
to the UE's maximum output power (for example,
21 dBm). - Press the Measurement selection key.
-
Select the
Phase Discontinuitymeasurement. -
Select
Phase Discont. Setup( F1 ) - Press the START SINGLE key to begin the measurement.
-
Select
Graph Control( F2 ). -
Select
Axis Control( F1 ) to set the axis control parameters as needed:-
Start( F1 ) determines the first slot result displayed. -
Span( F2 ) determines the number of timeslots for which results are displayed. -
Phase Reference( F3 onAxis Control 1 of 2). -
Phase Range( F4 onAxis Control 1 of 2). -
Power Ref( F3 onAxis Control 2 of 2). -
Power Range( F4 onAxis Control 2 of 2).
-
-
Select
Trace Show/Hide( F4 ) to choose which of the 3 available traces to display (Phase Discontinuity,PhaseandPower). SelectClose Menu( F6 ). -
Select
Marker( F2 ) to turn on the marker on the graphical display and move the highlighted bar in the numerical results display area. Scroll through the numerical data and locate the orange values indicating worst case phase discontinuity and worst case EVM to determine whether the UE has met specifications for this portion of the test. -
Select
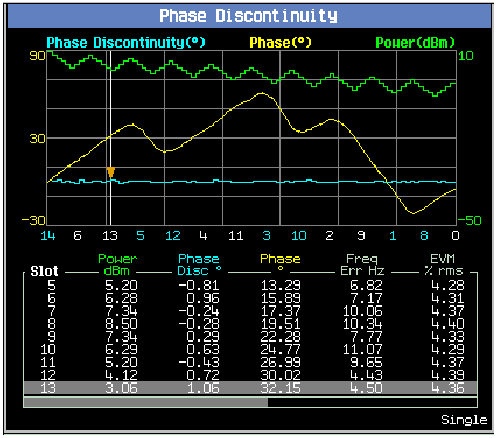
Table( F3 ) to scroll through the 9 columns of numerical results available, as needed.A typical result is pictured below:

-
Select
Return( F6 ). -
Repeat steps 7-12 until the UE reaches its minimum output power (for example, -49 dBm). You can easily determine the UE's output power level by noting the UE Target Power level ( F7 on the
Call Parms 3 of 3menu), because at the completion of the measurement, the test set setsMS Target Powerto the UE's output power in the final measured slot).You may choose to overlap the test subsequences by starting at an
MS Target Powerthat is offset from the ending power level, see Key 3GPP Tests Performed Using the Phase Discontinuity Measurement for more information. -
Select
Phase Discont. Setup( F1 ) - Repeat steps 7-12 until the UE reaches its maximum output power.
Measuring 3GPP TS 34.121 v7.5.0 5.13.1AA Error Vector Magnitude (EVM) and Phase Discontinuity with HS-DPCCH
This section is applicable to the lab application or feature-licensed test application only.
This test is applicable to Release 6 and later HSDPA UEs. For Release 5 HSDPA UEs, see Measuring 3GPP TS 34.121 v7.5.0 s5.13.1A Error Vector Magnitude (EVM) with HS-DPCCH .
Overview:
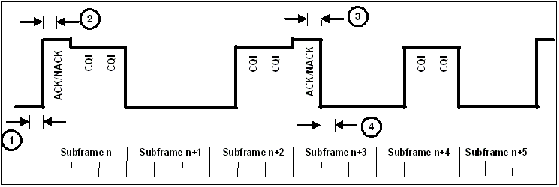
3GPP TS 34.121 5.13.1AA measures EVM and phase discontinuity at four locations on a defined 12 ms UE power pattern:

The test is performed such that the 12 ms UE power pattern maximum corresponds to the UE's maximum output power as defined in 34.121 Table 5.2A.2. The test is also performed such that the 12 ms UE power pattern maximum corresponds to -18 dBm.
Procedure:
-
Set parameters that can only be set in cell off operating mode (and other parameters that are set from the same menu):
-
Set
Operating Mode( F1 ) toCell Off. -
Select
34.121 Preset Call Configurations( F11 onCall Parms 1 of 3) and select5.2C, 5.7A, 5.13.1A, 5.13.1AA, 5.13.2A with QPSK. You may then skip any steps marked with [34.121 Call Config] in this procedure. -
Select
Channel (UARFCN) Parms( F12 onCall Parms 1 of 3). SetDL Channel( F7 ) andUplink Channel( F8 ) to the appropriate "low range" frequencies for your UE's operating band, as specified by 3GPP TS 34.108 5.1.1 (for example, for operating band II, setDL Channel=9663). -
[34.121 Call Config]
Select
Uplink Parameters( F4 onCall Control 2 of 5).-
[34.121 Call Config]
Set
Uplink DPCH Bc/Bd ControltoManual. -
[34.121 Call Config]
Set
Manual Uplink DPCH Bcto15(for 34.121 v7.2.0 Table C.10.1.4 sub-test 3). -
[34.121 Call Config]
Set
Manual Uplink DPCH Bdto8(for 34.121 v7.2.0 Table C.10.1.4 sub-test 3). -
[34.121 Call Config]
Set
Maximum Uplink Transmit Power Levelto+21 dBm.
-
[34.121 Call Config]
Set
-
Set
Operating ModetoActive Cell(pressing the CALL SETUP key quickly brings you back to the top levelCall Controlmenu).
-
Set
-
[34.121 Call Config]
Set
Channel Type( F8 ) to12.2k RMC + HSDPA. -
Select
HSDPA Parameters(HSPA Parameters( F10 ), F10 ).-
Select
HSDPA RB Test Mode Setup( F8 ).-
[34.121 Call Config]
Set
HS-DSCH Configuration TypetoFRC(this is the default value). -
[34.121 Call Config]
Set
FRC TypetoH-Set 1 QPSK(this is the default value). -
Set
CN Domainas needed (by default it is set toPS Domain). Note, before you can establish a connection in the PS domain, the UE must attach to the test set. To enable this, thePS Domain Informationparameter (underCell Parameters, F12 onCall Control 2 of 5) must be set toPresentwhen the UE registers (attaches) with the test set.
-
[34.121 Call Config]
Set
-
[34.121 Call Config]
Select
HSDPA Uplink Parameters( F11 ).-
[34.121 Call Config]
Set
DeltaACKandDeltaNACKto8. -
[34.121 Call Config]
Set
DeltaCQIto7. -
[34.121 Call Config]
Set
Ack-Nack Repetition Factorto1(this is the default value). -
[34.121 Call Config]
Set
CQI Feedback Cycle (k)to4 ms. -
[34.121 Call Config]
Set
CQI Repetition Factorto1(this is the default value).
-
[34.121 Call Config]
Set
-
Select
-
Test Application: Select
Cell Parameters( F2 ).
Lab Application: SelectCell Info ( F2 ), thenCell Parameters( F2 ).
(from theCall Control 2 of 5menu)-
[34.121 Call Config]
Set
Default DPCH Offset (DOFF)to3 x 512 chips. -
Set
PS Domain InformationtoPresent(this is the default value in the lab application) if you plan to establish the HSDPA connection in the PS domain (i.e. if you've setCN DomaintoPS DomainorCS/PS Domainin step 3 above). -
Qqualmin and Qrxlevmin are fixed to -24 dB and -115 dBm, respectively, in the test application. In the lab application these are the default values for these parameters. They are accessible from
Cell Info,Reselection Parameters( F3 ).
-
[34.121 Call Config]
Set
-
[34.121 Call Config]
Select
Generator Info( F3 onCall Control 2 of 5), selectConnected DL Channel Levels( F4 ), then selectHSDPA Conn DL Channel Levels( F4 ).-
[34.121 Call Config]
Set
Cell 1 Connected HSDPA CPICH Levelto-10 dB(this is the default value). -
[34.121 Call Config]
Set
Cell 1 Connected HSDPA P-CCPCH/SCH Levelto-12 dB(this is the default value). -
[34.121 Call Config]
Set
Cell 1 Connected HSDPA PICH Levelto-15 dB(this is the default value). -
[34.121 Call Config]
Set
Cell 1 Connected HSDPA DPCH Levelto-9 dB. -
[34.121 Call Config]
Set
Cell 1 Sum of Active Conn HS-PDSCH Levelsto-3 dB(this is the default value). -
[34.121 Call Config]
Set
Cell 1 Connected HS-SCCH 1 Levelto-8 dB.
-
[34.121 Call Config]
Set
- Set any other parameters needed to establish a connection with your UE, then power on the UE and wait for it to register (attach). See Establishing an HSDPA Connection .
-
Select
Originate Call( F3 onCall Control 1 of 5). -
Set
Cell Power( F7 onCall Parms 1 of 3) to-86 dBm/3.84 MHz. -
Select
UL CL Power Ctrl Parameters( F8 onCall Parms 3 of 3). -
To perform the test such that the 12 ms UE power pattern maximum corresponds to the UE's maximum output power as defined in 34.121 Table 5.2A.1, set
UE Target Power( F7 onCall Parms 3 of 3) to the appropriate value for your UE's power class.Required UE Target Power Setting to Achieve Table 34.121 Table 5.2A.2 Maximum Power UE Power Class 34.121 v7.5.0 Table C.10.1.4 Sub-Test UE Target Power setting 3 3 16.9 dBm 4 3 13.9 dBm For example, for a power class 3 UE, set
UE Target Powerto16.9 dBm(the test set rounds this value to 17 dBm). The test set drives the UE's DPCCH+DPDCH level to 17 dBm, which places the UE's DPCCH+DPDCH+HS-DPCCH level at 23.1 dBm, while also appropriately ranging the test set's measurement receiver. -
Select
UL CL Power Ctrl Parameters( F8 onCall Parms 3 of 3). SetUL CL Power Ctrl ModetoAlternating bits. - Press the Measurement selection key.
-
Select
Phase Discontinuity. -
Set up the phase discontinuity measurement:
-
Select
Phase Discont Setup( F1 ). -
Set
Trigger SourcetoHS-DPCCH. -
Set
HS-DPCCH Trigger Subframe Alignmenttosubframe 0(this is the default value). -
Set
HS-DPCCH Trigger Slot AlignmenttoAckNack (this is the default value). -
Set
HS-DPCCH Trigger Subslot Alignmentto0.0 slot (this is the default value). -
Set HS-DPCCH Measurement Step Interval to
0.5 slot (this is the default value). -
Set
HS-DPCCH Measurement Step Countto21 (this is the default value). -
Select
Close Menu( F6 ).
-
Select
- Press the START SINGLE key to begin the measurement.
-
Select
Graph Control( F2 ) and adjustAxis Control( F1 ) as needed. Note that thePower RefandPower Rangecan be adjusted by pressing the More (1 of 2) key. SelectReturn( F6 ).
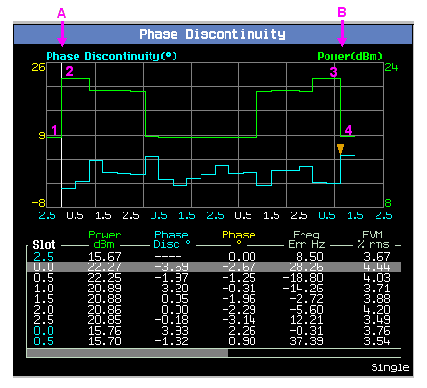
Note the following example usesTrace Show/Hide( F4 ) to hide thePhasetrace. -
Use the
Marker( F2 ) to verify that the measured EVM is less than 17.5% for test points 1, 2, 3 and 4 (marker indices 0, 1, 20 and 21), and that the phase discontinuity across points A and B (marker indices 1 and 21) is less than 36 degrees.
-
To perform the test such that the 12 ms UE power pattern maximum corresponds to -18 dBm:
-
Select
UL CL Power Ctrl Parameters( F8 onCall Parms 3 of 3). SetUL CL Power Ctrl ModetoActive bits. -
Set
UE Target Power( F7 onCall Parms 3 of 3) to-24.1 dBm(for 34.121 v7.2.0 Table C.10.1.4 sub-test 3). The test set drives the UE's DPCCH+DPDCH level to -24 dBm, which places the UE's DPCCH+DPDCH+HS-DPCCH level at approximately -18 dBm, while also appropriately ranging the test set's measurement receiver. -
Select
UL CL Power Ctrl Parameters( F8 onCall Parms 3 of 3). SetUL CL Power Ctrl ModetoAlternating bits. - Repeat steps 15-17.
-
Select
-
To perform the test for "mid range" and "high range" frequencies:
- Perform a Physical Channel Reconfiguration (Inter-frequency Hard Handover) to the appropriate UARFCNs.
- Repeat steps 9-18.
Related Topics
Phase Discontinuity Measurement Description
Phase Discontinuity Troubleshooting
Programming the Phase Discontinuity Measurement
Measuring 3GPP TS 34.121 v7.5.0 s5.13.1A Error Vector Magnitude (EVM) with HS-DPCCH (using the Waveform Quality measurement)