Example 3. Save Dependent Measurement Data
This example shows you the names of dependent measurements that are passed into your user measurement script. The following two files are created in the C:/users/<user name>/Documents folder:
- dependent_meas_names.txt
- dependent_MeasData_dict.txt
The dependent_meas_names.txt file includes the name of each measurement passed into the user-measurement script (inputVars['MeasData']) which includes:
- Measurements named in the XML file's <Dependent> element as a dependent measurement, and
- All measurements listed in FlexDCA's Results panel.
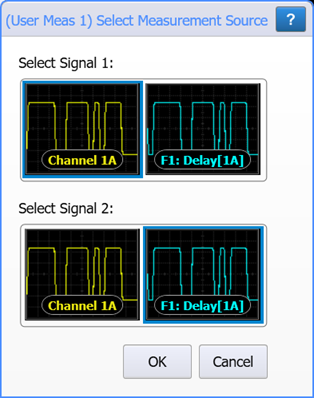
When the script starts, the Select Measurement Source dialog is displayed as shown here. Select Channel 1A as Signal 1 and select F1:Delay[1A] as Signal 2.
In this example, notice that the Rise Time measurement is listed in the XML file, but not started by the setup script or listed in FlexDCA's Results panel. This shows that even if a measurement is not shown in the Results panel but is named in the XML file, it's measurement results will included in the variables that are passed to the user-measurement script.
The measurement names are identical to the names that is shown on FlexDCA's Results panel. This is important, since a measurement's exact name, which in the case of Δ Time can vary due to its setup, is used as a dictionary key in the list of dictionaries in the MeasData variable passed into your script.
Because this script does not use the source waveform input variable, which is a NumPy array, NumPy does not need to be imported into the script.
Notice that the user measurement script declares a global variable firstpass. This variable is required because we are creating output files, and the script runs once for every waveform acquisition cycle. The time required to write the files awkwardly delays the script. This variable ensures that the files are only created on the first acquisition pass.
This script does not perform a user measurement but does return a fictitious measurement (2.4) as required by FlexDCA. After you've been successful with this example, try Example 4. Identify Measurement Dictionary.
Example of dependent_meas_names.txt file
Rise Time
Phase[-]
Time[+2,20.000 mV]
ΔT[+1Up,-1Up]
ΔT[+1Mid,-1Mid]
Fall Time
Ampl[700.00 ps]
Example of dependent_MeasData_dict.txt
Name: Rise Time, Status: Correct, Source1: Channel 1A, Result: 2.5999999999999997e-11, Units: Second
Name: Phase[-], Status: Correct, Source1: Channel 1A, Source2: Function 1, Result: 53.7, Units: Degree
Name: Time[+2,20.000 mV], Status: Correct, Source1: Channel 1A, Result: 1.3126999999999998e-09, Units: Second
Name: ΔT[+1Up,-1Up], Status: Correct, Source1: Channel 1A, Source2: Function 1, Result: -1.366e-10, Units: Second
Name: ΔT[+1Mid,-1Mid], Status: Correct, Source1: Channel 1A, Source2: Function 1, Result: -1.117e-10, Units: Second
Name: Fall Time, Status: Correct, Source1: Channel 1A, Result: 2.5399999999999998e-11, Units: Second
Name: Ampl[700.00 ps], Status: Correct, Source1: Channel 1A, Result: -0.0450005, Units: Volt
Required Files
SaveDependentsScope-setup.py
This script configures FlexDCA to required state for the example script. The script installs a simulated module, selects the proper FlexDCA mode, and turns on multiple measurements.
SaveDependentsScope-Setup.py
import pyvisa as visa # import VISA library
visa_address = 'TCPIP0::localhost::hislip0,4880::INSTR'
CHANNEL = '1A'
TIMEOUT = 10000
def open_flexdca_connection(address):
""" Opens visa connection to FlexFlexDCA. """
print('Connecting to Flexdca ...')
try:
rm = visa.ResourceManager()
connection = rm.open_resource(address)
connection.timeout = TIMEOUT # Set connection timeout to 20s
connection.read_termination = '\n'
connection.write_termination = '\n'
inst_id = connection.query('*IDN?')
print('\nFlexDCA connection established to:\n' + inst_id, flush=True)
connection.write(':SYSTem:DEFault')
connection.query('*OPC?')
except (visa.VisaIOError, visa.InvalidSession):
print('\nVISA ERROR: Cannot open instrument address.\n', flush=True)
return None
except Exception as other:
print('\nVISA ERROR: Cannot connect to instrument:', other, flush=True)
print('\n')
return None
return connection
def all_channels_off(FlexDCA):
""" Turns all available channels off. """
for slot in '12345678':
for letter in 'ABCD':
channel = slot + letter
FlexDCA.write(':CHANnel' + channel + ':DISPlay OFF')
def install_simulated_module(FlexDCA, channel, model, signal='NRZ'):
""" Simplified installation of a simulated FlexDCA module.
model
Type of simulated module. "DEM" is a dual-electrical module.
"QEM" is a quad-electrical module. "DOM" is a dual-optical
module. "QEM" is a electrical-optical module.
signal
Format of signal. NRZ or PAM4.
"""
slot = channel[0]
FlexDCA.write(':EMODules:SLOT' + slot + ':SELection ' + model)
if signal in 'NRZ':
FlexDCA.write(':SOURce' + channel + ':FORMat NRZ')
else:
FlexDCA.write(':SOURce' + channel + ':FORMat PAM4')
FlexDCA.write(':SOURce' + channel + ':DRATe 9.95328E+9')
FlexDCA.write(':SOURce' + channel + ':WTYPe DATA')
FlexDCA.write(':SOURce' + channel + ':PLENgth 127')
FlexDCA.write(':SOURce' + channel + ':AMPLitude 90E-3')
FlexDCA.write(':SOURce' + channel + ':NOISe:RN 3.0E-6')
FlexDCA.write(':SOURce' + channel + ':JITTer:RJ 4.0E-12')
FlexDCA.write(':CHANnel' + channel + ':DISPlay ON')
def return_scalar(FlexDCA, query):
""" Returns a FlexDCA scalar measurement result. """
import time
class ScalarMeasQuestionableException(Exception):
""" A scalar measurement result is questionable. """
pass
class ScalarMeasTimeOutException(Exception):
""" A scalar measurement has timed out. """
pass
timeout = FlexDCA.timeout / 1000 # convert ms to s
query = query.strip('?')
start_time = time.time() # time in seconds
while(True):
time.sleep(0.2)
status = FlexDCA.query(query + ':STATus?')
if 'CORR' in status: # valid measurement result
return FlexDCA.query(query + '?') # get measurement
elif 'QUES' in status: # questionable results
s = query + '\nReason: ' + FlexDCA.query(query + ':STATus:REASon?')
raise ScalarMeasQuestionableException(s)
elif (int(time.time() - start_time)) > timeout: # IO timout
s = query + '\nReason: ' + FlexDCA.query(query + ':STATus:REASon?')
raise ScalarMeasTimeOutException(s)
flexdca = open_flexdca_connection(visa_address)
flexdca.query(':SYSTem:DEFault;*OPC?')
all_channels_off(flexdca)
install_simulated_module(flexdca, CHANNEL, 'DEM')
flexdca.write(':ACQuire:RUN')
flexdca.query(':SYSTem:MODE OSCilloscope;*OPC?') # Switch to Scope mode
flexdca.query(':TRIGger:PLOCk ON;*OPC?')
flexdca.query(':SYSTEM:AUToscale;*OPC?')
flexdca.write(':ACQuire:SMOothing AVERage')
flexdca.write(':TIMebase:SCALe 200.00E-12')
flexdca.write(':FUNCtion1:FOPerator DELay')
flexdca.write(':SPRocess1:DELay:TIMe 90.0E-12')
flexdca.write(':FUNCtion1:COLor TCOLor2')
flexdca.write(':FUNCtion1:DISPlay ON')
flexdca.write(':MEASure:OSCilloscope:VTIMe:TIMe 700.0E-12')
flexdca.write(':MEASure:OSCilloscope:VTIMe:SOURce1 CHAN1A')
flexdca.write(':MEASure:OSCilloscope:VTIMe')
flexdca.write(':MEASure:OSCilloscope:FALLtime')
flexdca.write(':MEASure:OSCilloscope:DELTatime:SOURce1 CHAN1A')
flexdca.write(':MEASure:OSCilloscope:DELTatime:SOURce2 FUNCtion1')
flexdca.write(':MEASure:OSCilloscope:DELTatime:ENUMber2 1')
flexdca.write(':MEASure:OSCilloscope:DELTatime:ENUMber1 1')
flexdca.write(':MEASure:OSCilloscope:DELTatime:EDIRection1 RISing')
flexdca.write(':MEASure:OSCilloscope:DELTatime:EDIRection2 FALLing')
flexdca.write(':MEASure:OSCilloscope:DELTatime:ETHReshold1 MIDDle')
flexdca.write(':MEASure:OSCilloscope:DELTatime:ETHReshold2 MIDDle')
flexdca.write(':MEASure:OSCilloscope:DELTatime')
flexdca.write(':MEASure:OSCilloscope:DELTatime:SOURce1 CHAN1A')
flexdca.write(':MEASure:OSCilloscope:DELTatime:SOURce2 FUNCtion1')
flexdca.write(':MEASure:OSCilloscope:DELTatime:ENUMber1 1')
flexdca.write(':MEASure:OSCilloscope:DELTatime:ENUMber2 1')
flexdca.write(':MEASure:OSCilloscope:DELTatime:EDIRection1 RISing')
flexdca.write(':MEASure:OSCilloscope:DELTatime:EDIRection2 FALLing')
flexdca.write(':MEASure:OSCilloscope:DELTatime:ETHReshold1 UPPer')
flexdca.write(':MEASure:OSCilloscope:DELTatime:ETHReshold2 UPPer')
flexdca.write(':MEASure:OSCilloscope:DELTatime')
flexdca.write(':MEASure:OSCilloscope:TVOLt:SOURce1 CHAN1A')
flexdca.write(':MEASure:OSCilloscope:TVOLt:YVALue 2.0000E-2')
flexdca.write(':MEASure:OSCilloscope:TVOLt:ENUMber 2')
flexdca.write(':MEASure:OSCilloscope:TVOLt:EDIRection RISing')
flexdca.write(':MEASure:OSCilloscope:TVOLt')
flexdca.write(':MEASure:OSCilloscope:PHASe:SOURce1 CHAN1A')
flexdca.write(':MEASure:OSCilloscope:PHASe:SOURce2 FUNCtion1')
flexdca.write(':MEASure:OSCilloscope:PHASe:EDIRection FALLing')
flexdca.write(':MEASure:OSCilloscope:PHASe')
flexdca.write(':SYSTem:GTLocal')
flexdca.close()
SaveDependentsScope.xml
Installs user measurement.
SaveDependentsScope.xml
<?xml version="1.0" encoding="utf-8"?>
<Measurement>
<Name>Save Dependents</Name>
<Abbreviation>Depend</Abbreviation>
<Comments>Writes dependent measurement data to C:\Users\user name\Documents folder files.
</Comments>
<Script>SaveDependentsScope.py</Script>
<MeasurementType>2 Source</MeasurementType>
<ValidMode>Scope</ValidMode>
<Dependent Name = "Rise Time">
<SourceIndex>1</SourceIndex>
</Dependent>
</Measurement>
SaveDependentsScope.py
User measurement script. Notice that this script includes a handy print_to_show_window() function that increases the reliability of writing to the Show Output window. This function replaces Unicode characters, which cause an error, with the equivalent XML character entity. For example, the Δ symbol in the name of the "Δ Time" measurement is replaced with the entity string.
SaveDependentsScope.py
""" Python 3.9 FlexDCA User Measurement. Discovers data of current dependent measurements
in FlexDCA's passed to the user measurement and writes the values to 2 text files in
C:/users/<user name>/Documents folder:
dependent_MeasData_dict.txt
dependent_meas_names.txt
Run the "SaveDependentsScope-setup.py" to setup FlexDCA for this script.
These names in "dependent_meas_names.txt" can be used to test for measurement names in your
user measurement scripts. These names are identical to the names on FlexDCA's Result's panel
and include any unicode symbol characters. FlexDCA Results table must show all measurements
correct.
"""
firstpass = True
def algorithm(inputVars):
import time
global firstpass
MeasData = inputVars['MeasData'] # A dictionary of dependent measurement results
# build strings of measurement dictionary contents any names
meas_info = ''
meas_names = ''
for meas in MeasData:
meas_info += 'Name: ' + meas['Name'] + ', '
meas_names += meas['Name'] + '\n'
meas_info += 'Status: ' + meas['Status'] + ', '
if meas['Source1']:
meas_info += 'Source1: ' + meas['Source1'] + ', '
if meas['Source2']:
meas_info += 'Source2: ' + meas['Source2'] + ', '
meas_info += 'Result: ' + str(meas['Result']) + ', '
meas_info += 'Units: ' + meas['Units'] + '\n'
print_to_show_window(meas_names)
if firstpass == True:
save_meas_data_to_file(meas_info)
save_meas_names_to_file(meas_names)
time.sleep(0.5)
firstpass = False
return {'Result': 2.4,
'Status':'Correct',
'ErrorMsg':''
}
def save_meas_data_to_file(meas_info):
""" Prints dependent measurement data to a file. """
import os
documents_folder = os.path.expanduser("~\\Documents")
file_path = os.path.join(documents_folder, 'dependent_MeasData_dict.txt')
fout = open(file_path, 'wt', encoding='utf-8')
fout.write(meas_info)
fout.close()
def save_meas_names_to_file(meas_names):
""" Prints dependent measurement names to a file so unicode symbols can be seen. """
import os
documents_folder = os.path.expanduser("~\\Documents")
file_path = os.path.join(documents_folder, 'dependent_meas_names.txt')
fout = open(file_path, 'wt', encoding='utf-8')
fout.write(meas_names)
fout.close()
def print_to_show_window(message):
""" FlexDCA's Show Output window for user measurements and operators
causes a error if a Unicode character is in the printed string.
Removes all Unicode characters. It also removes any '\n' and '\t'
characters.
"""
message = message.replace('\n', '1banana')
message = message.replace('\t', '2squirrels')
asciiString = message.encode('ascii', 'xmlcharrefreplace')
cleanMessage = asciiString.decode('utf-8')
cleanMessage = cleanMessage.replace('1banana', '\n')
cleanMessage = cleanMessage.replace('2squirrels', '\t')
print(cleanMessage)