16Indoor and Outdoor Mapping – Option 352 (Requires Spectrum Analyzer Mode (Option 233), and GPS Receiver (Option 307))
IMPORTANT! B Model FieldFoxes measurements require VDI and OML heada. Refer to https://vadiodes.com/portable-spectrum-analyzer-extenders-psax/ and https://www.omlinc.com/. |
a.Requires external mixer to down convert millimeter wave frequency to intermediate frequency (IF). Refer Configuration Guide at https://www.keysight.com/us/en/assets/3125-1447/configuration-guides/FieldFox-Handheld-Analyzers-D-models.pdf for recommended VDI head.
Option 352 maps signals that were measured using the SA RF Input Port 2 connector.
The FieldFox requires Option 352 for outdoor mapping and GPS (Option 307) installed. And, one of the following, an Over–the–air (OTA) mode (LTE FDD Option 370, or 5G NR / 5G NR EVM Conducted / 5G TF Option 378), or Channel Scanner mode (Option 312). Also, requires browser that supports HTML5 (i.e., web browsers not supported: IE6, IE7, and IE8).
Recommended, but not required, preamplifier (Option 235) to improve receiver sensitivity.
Keysight's FieldFox handheld analyzer (with Option 352) combined with a USB triaxial antenna (p/o EMF Measurements – Option 358) provides a unique, portable solution for indoor and outdoor mappings in the field. Option 352 adds indoor and outdoor mapping capability to FieldFox analyzers, so that FieldFox can import maps from OpenStreetMap (OSM) for data collection and data plotting to the map directly on the FieldFox instrument display. The FieldFox Map Explorer resides at the System level and enables you to download, import/export, and view outdoor maps. All of the other data logging, record/playback, plotting data on indoor/outdoor maps can be enabled within the following modes:
—Channel Scanner (Option 312)
—Over-the-Air (OTA) LTE FDD (Option 370)
—Over-the-Air (OTA) LTE TDD (Option 372)
—Over-the-Air (OTA) 5G NR / 5G TF (Option 378)
Using a direct wired LAN connection with access to a network and the internet, FieldFox will automatically access OSM once location coordinates (latitude and longitude) and zoom levels are entered the Map Explorer menu. If using the FieldFox Map Support Tool, OSM map files can be downloaded to a *.zip file and imported to FieldFox internal memory. If the FieldFox GPS receiver is enabled and OSM maps have been previously saved to FieldFox with those GPS coordinates, FieldFox will automatically load the corresponding map to match the GPS coordinates.
With Indoor Mapping:
Using the FieldFox:
— Import floor plans or site maps from picture files (PNG, JPG, BMP)
—Interactive Walk Test data collection with location pointer.
—Save Indoor Map files (kDAT)
—Indoor Map file Viewer with results presentation options
With RF Coverage Mapping:
Using the FieldFox:
— Begin with Data Logging recorded data results
—Overlay GPS-stamped located measured results onto maps on FieldFox
—LAN connection optional. GPS is required.
—Built-in Longitude, Latitude map search
—Save KML or CSV files
—Built-in Map Viewer with results presentation options
Using Google Earth or other software:
—View KML files
See Also
Other Features Available: —Alignments (SA chapter) – “Alignments” on page 219 —External Gain (SA chapter) – “External Gain” on page 166 —Scale Settings (Data Analysis chapter) – “All about Scale Settings” on page 852 |
Chapter 31, “System Settings.” (Changing display colors) |
Option 352 enables you to do the following:
Figure 16-1 Maps (Outdoor) With Line Feature Enabled
Figure 16-2 Maps With Current Position Marker Displayed - (OpenStreetMaps)
Figure 16-3 Using Mapping (Option 352) - Satellite View for Indoor Mapping 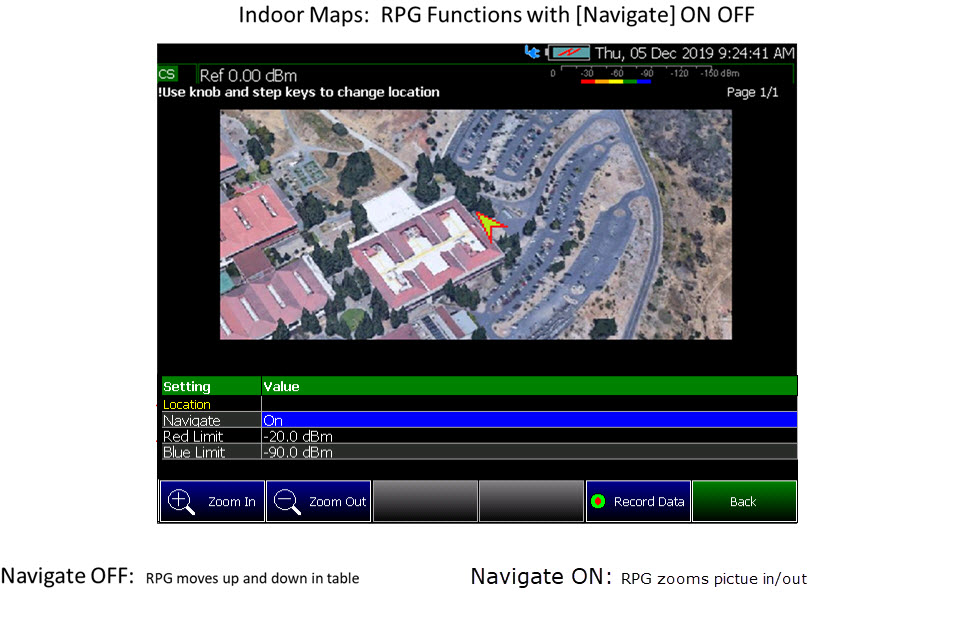
How to Install Node.js and Running the FieldFox Mapping Software IMPORTANT! If your FieldFox is connected directly to the LAN, you can skip the section on downloading Node.js and go to “How to Set Up Mapping When the FieldFox Is On The LAN” on page 513.
This section contains the procedure to download Node.js to access OpenStreetMap files and to process and save those files using the FieldFox mapping software. For details on how to use these files once they are downloaded to the FieldFox, refer to “How to Set Up Mapping Settings” on page 512.
1.Open an HTML5 compatible browser and download Node.js to a PC (e.g., Google Chrome, Mozilla Firefox, Safari, or Microsoft Edge): https://nodejs.org/en/download IMPORTANT! Do not change the default name of the directory path for downloading the Node.js program, because FieldFox uses the default program path name to run the Mapping feature. Refer to Figure 16-4. Examples of Web Browsers that not supported are Internet Explorer 6, 7, and 8.
2.Run the Node.JS installation file, by accepting the wizard’s defaults (i.e., including leaving the "Automatically install the necessary tools. Note that..." checkbox empty (unchecked)). Refer to Figure 16-4 and Figure 16-5 on page 503.
Figure 16-4 Downloading the Node.js Installer to a PC
Figure 16-5 Default Download Path for Node.js Installer to a PC
Downloading and Using the FieldFox Map Support Tool
1.Download the FieldFox Mapping software (“FFMapSupportInstall.msi”) to a PC’s Downloads folder. Refer to www.keysight.com/find/fieldfoxsupport and then download the FieldFoxMapping.zip.
Refer to Figure 16-7.
2.Run the FieldFox Map Support Tool software’s, installation software by going to the folder where the FieldFox Tool software is installed and double-click Run.bat.
Refer to Figure 16-6 on page 504.
3.Paste and Enter the address into a HTML5 compatible browser. Refer to Figure 16-7 (The Mapping software is not compatible with Internet Explorer).
Figure 16-6 Command Window Opens With Address Copied to Clipboard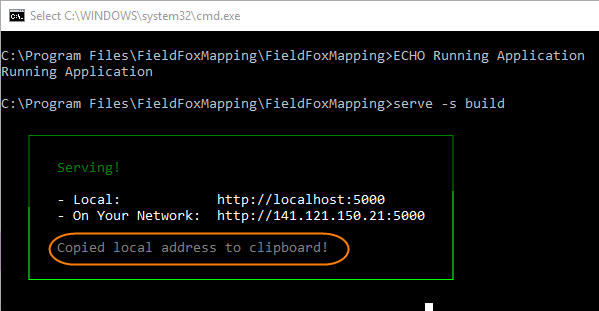
Figure 16-7 FieldFox Mapping Opens in HTML5 Compatible Browser (Overview)
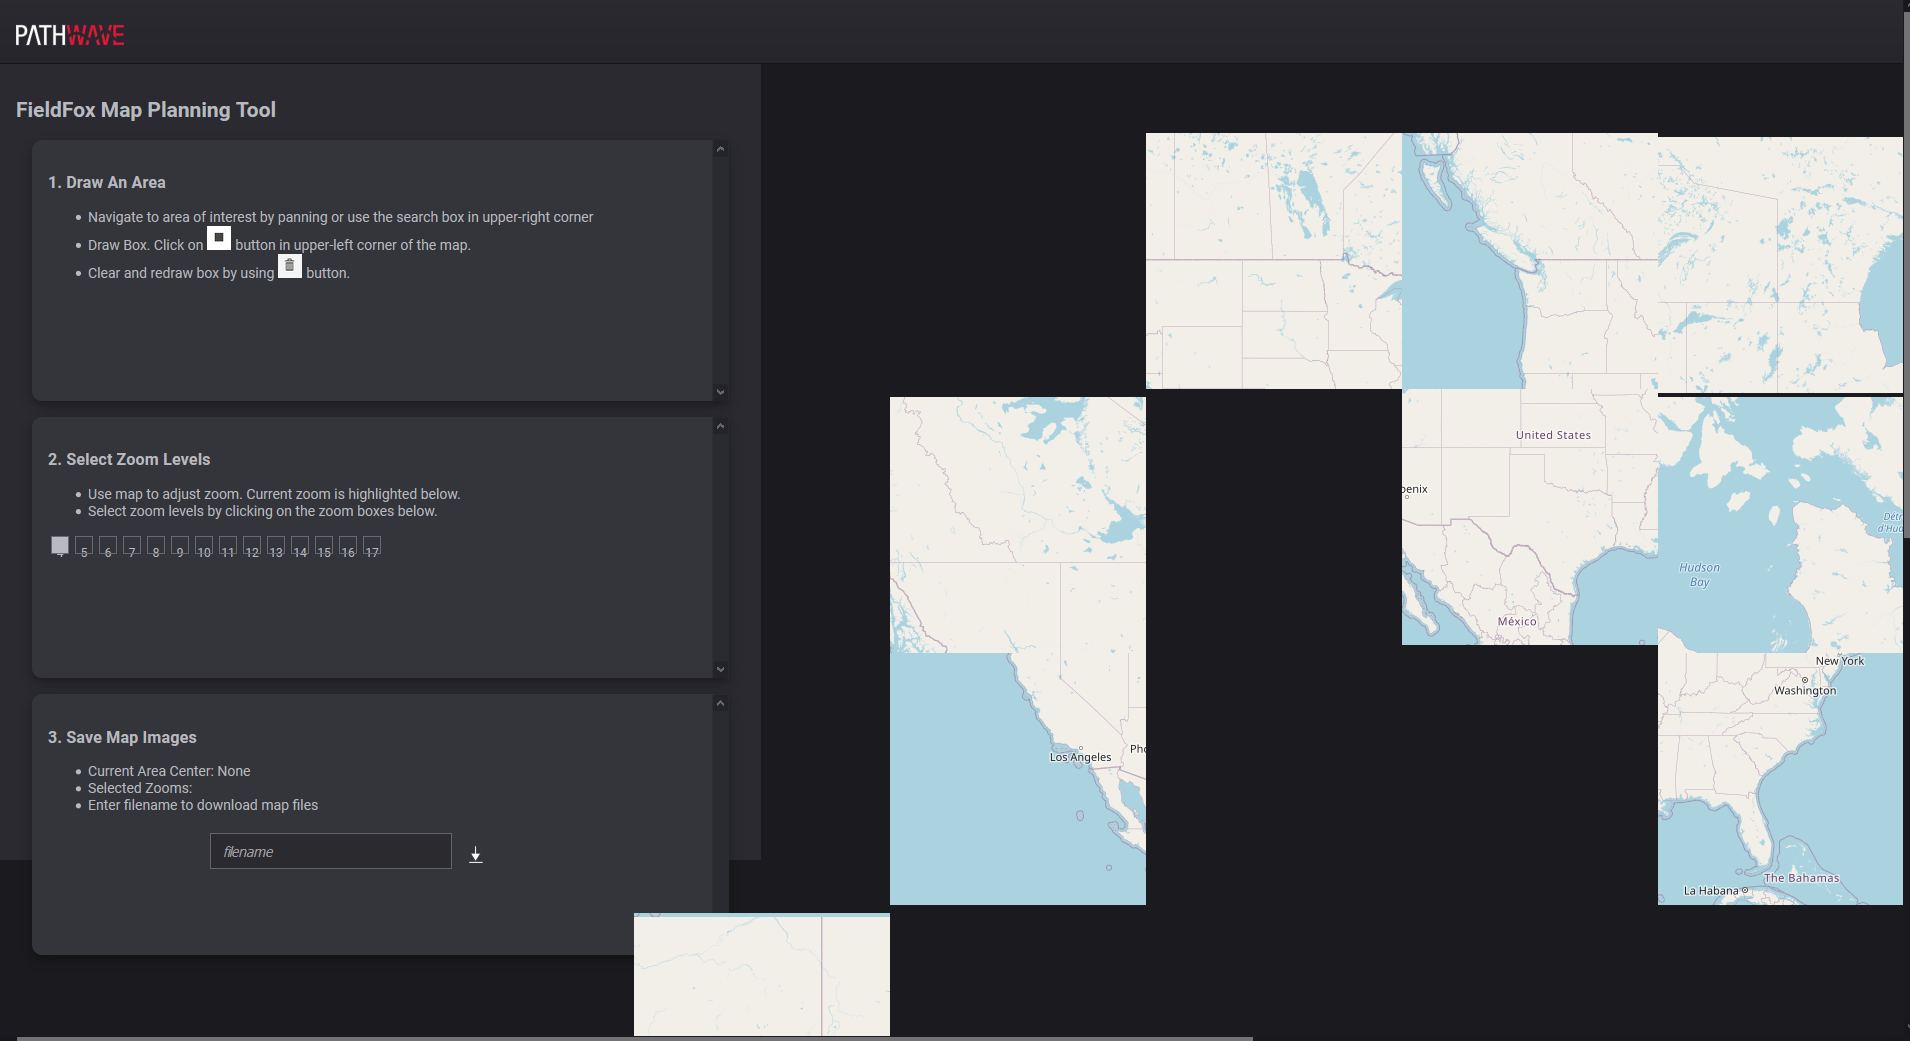
4.If the FieldFox is connected directly to the LAN, begin here: Select Draw An Area to map and download the selected area:
For this step and sub-steps, refer to Figure 16-8 on page 507.
| IMPORTANT! The more Zoom boxes that you check, the more data is selected for download. For faster downloads click Zoom boxes. Refer to Figure 16-8 on page 507. |

a.Step 1. Select Draw An Area to map:
—Enter a location in the search area and click on the map and use the Zoom In/Zoom Out buttons () to select the area to map. Also, your mouse scroll wheel can be used for zooming in and out.
Hint: The larger the map area selected for final mapping, the longer it takes for the file download.
—Click on the box button ( ) and click and drag to select the map area.
Hint: To clear and redraw the box choices, click the trashcan button ().
b.Step 2. Select Zoom Levels to Save and Download:
—Select all Zoom levels of the map you wish to save.
Hint:
—To select Zoom levels, click the zoom boxes.
—The more Zoom levels checked, the more map images that have to be saved and it will take longer to download the images.
c.Step 3. Input a filename to store your requested images from OpenStreetMaps. The *.zip file is then stored in your PC’s Downloads folder.
Figure 16-8 FieldFox Mapping Opens in HTML5 Compatible Browser (Zoom)
5.Saving your *.zip file to a storage device and importing your *.zip to the FieldFox:
| For FTP, refer to Refer to “Move (Copy) Files” on page 918 and to the :MMEM SCPI commands in the FieldFox Programming Help here: https://rfmw.em.keysight.com/wireless/helpfiles/FFProgrammingHelpWebHelp/Home.htm on www.keysight.com. |
a.Insert an SD card or USB storage device into your PC.
b.Open the PC’s Downloads folder and find your *.zip file. (e.g., MapsZIP_Example_1). Refer to Figure 16-9 on page 508.
c.Copy the *.zip file to your SD card or USB storage device.
d.Remove the SD card/USB storage device from your PC.
e.Insert the SD card/USB storage device into the FieldFox.
| IMPORTANT! In the folder that contains your unzipped files, do not change any of the Map file folders or filenames. Doing so will prevent the FieldFox from being able to recognize the map files. New downloaded Map folders, for the same map locations and zoom levels, will overwrite any existing folders on the FieldFox. |
Figure 16-9 New Maps Zip File – MapExample_1
Importing a .zip File to the FieldFox For FTP, refer to Refer to “Move (Copy) Files” on page 918 and to the :MMEM SCPI commands in the FieldFox Programming Help https://rfmw.em.keysight.com/wireless/helpfiles/FFProgrammingHelpWebHelp/Home.htm on www.keysight.com. See also, “How to Set Up Mapping When the FieldFox Is On The LAN” on page 513.
On the FieldFox:
Press System 7 > Utilities > Mapping > Map Explorer (Get Maps)
1.Press Import Maps
2.Verify your SD card/USB Source Device is selected.
If not then:
Press Source Device [Internal] > SD Card | USB
3.Press Import Maps (ZIP)
4.In the "Select .zip file to import" window that opens, if there is more than one .zip file listed, select the .zip file you want to load by using the  arrows, or the rotary knob and then press Recall File.
Refer to Figure 16-11 on page 511 and Figure 16-11 on page 511.
5.Press Back to return to the previous menu.
Figure 16-10 Example of a Maps *.zip Being Recalled From a USB Storage Device
Figure 16-11 Example of Maps Folder Containing Imported Maps *.zip Files to the FieldFox’s InternalSD\UserData\Maps Folder 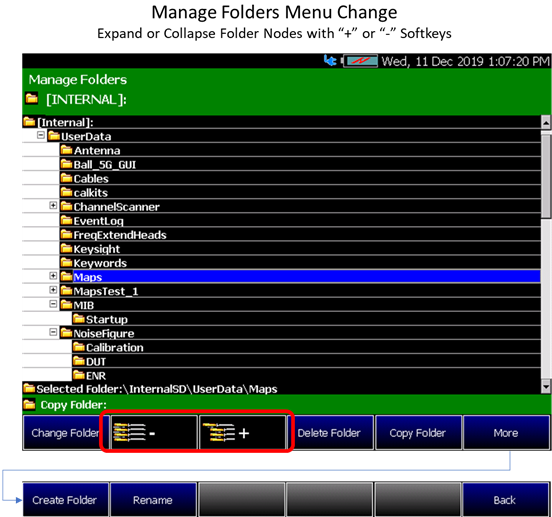
How to Set Up Mapping Settings
IMPORTANT! See also, “Alignments” on page 219, in SA mode. |
This section reviews the steps in setting up an Option 352 Mapping measurement.
This section consists of:
—“How to Set Up Mapping When the FieldFox Is On The LAN”
—“Option 352 Indoor Maps Setup Procedure”
Figure 16-12 Overview – Setting Up Option 352 (Indoor Mapping) Using Other Modes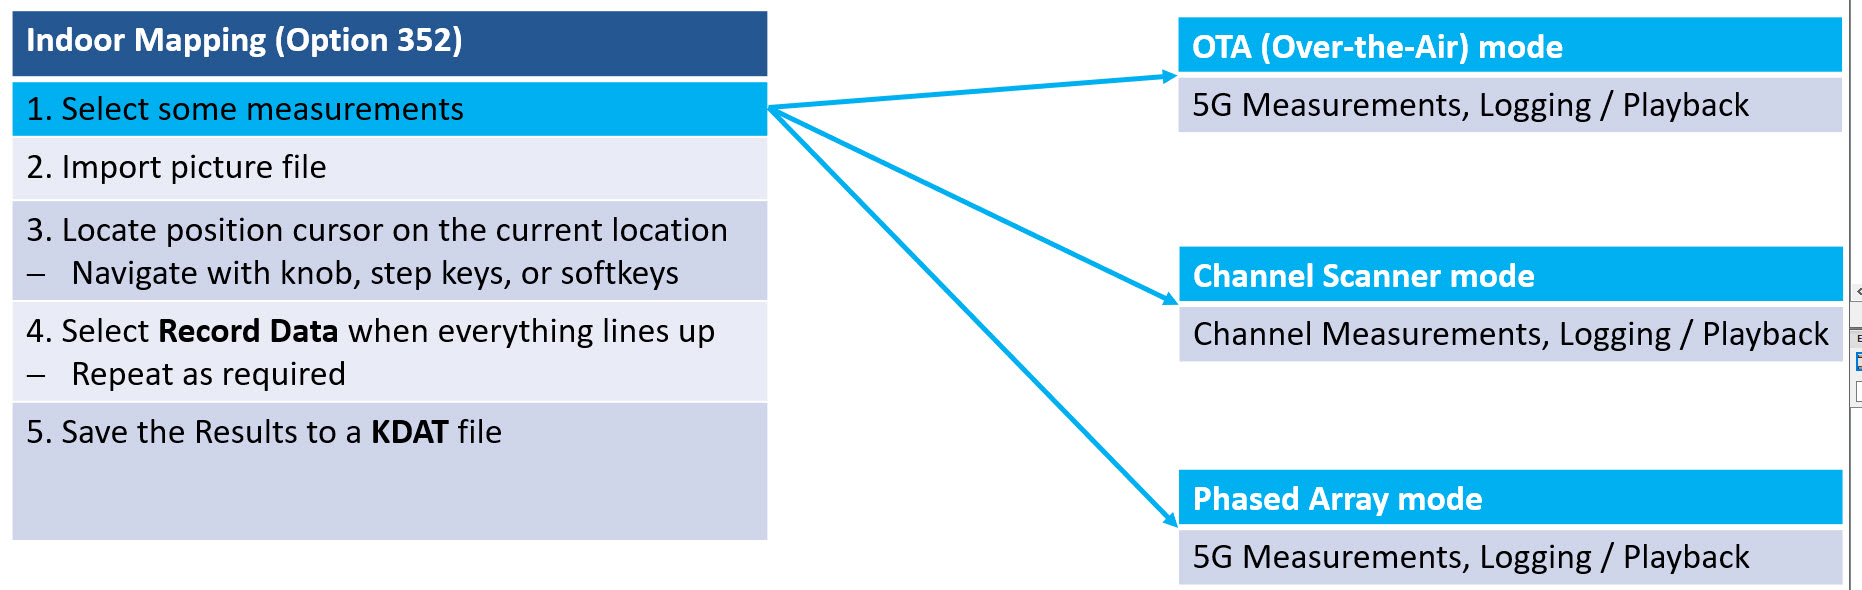
—“Option 352 Outdoor Maps Setup Procedure” (Requires GPS Option 307)
Figure 16-13 Overview – Setting Up Option 352 (Outdoor Mapping) Using Other Modes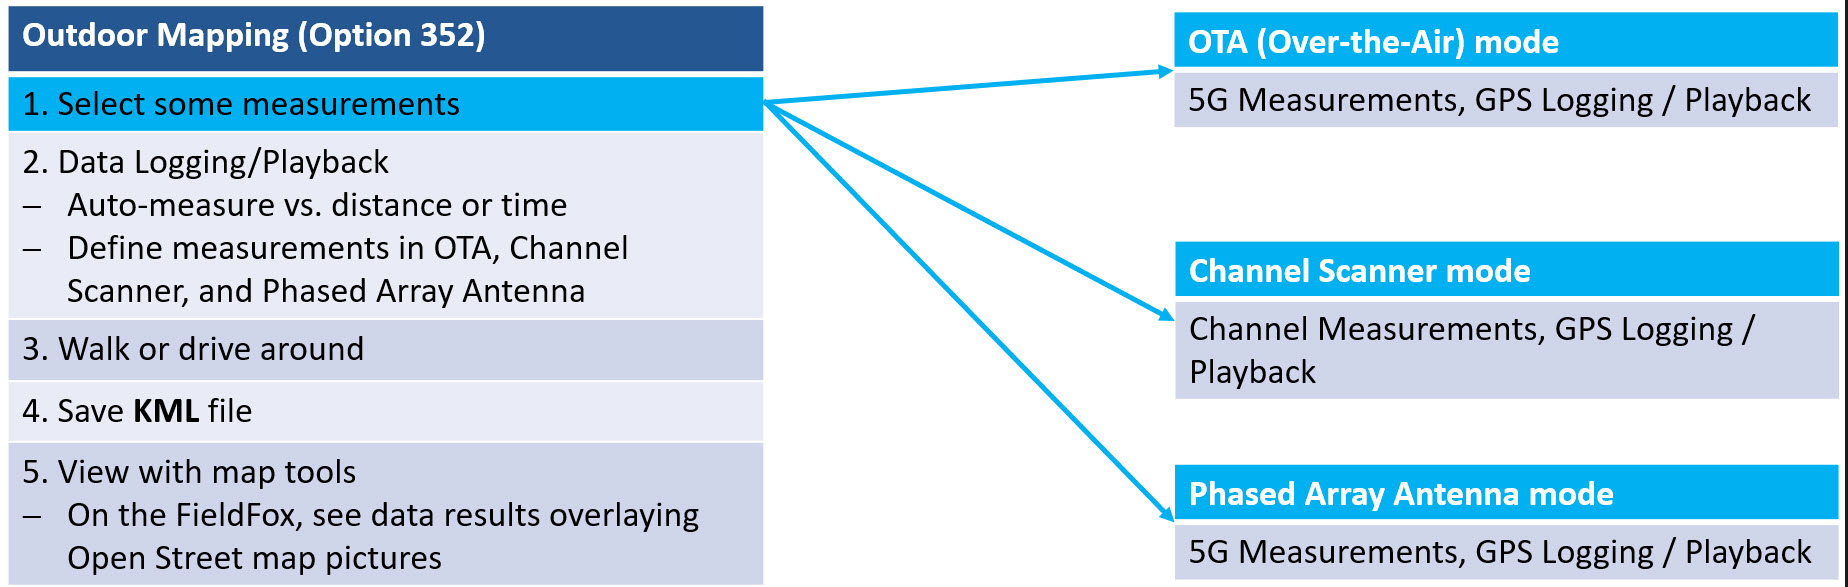
How to Set Up Mapping When the FieldFox Is On The LAN
If your FieldFox is connected directly to the LAN, you can view your maps by using OpenStreetMaps directly (i.e., no need to use the FieldFox Map Support Tool to download the maps as a *.zip file). But, you will need a valid GPS signal (Option 307 required). Refer to “Display a Map File” on page 513.
1.Press System 7 > Utilities > Mapping > Map Explorer (Get Maps)
2.Then choose from the following:
—Press Edit
—Enter a Zoom by using the RPG or the arrow keys to highlight Zoom and then enter a value between 4 and 17.
—Press Go to GPS Location – sets the current displayed map to the current GPS location.
If a "Warning: GPS data invalid - GPS data must be valid to show current GPS location" is displayed, verify your GPS signal is connected and working properly. |
—Press Zoom – opens a menu of Zoom In and Zoom Out softkeys
—Press Pan – Opens a menu of softkeys to move East, West, North, and South on the current displayed map area
—Save Image (PNG) – To save the current map as a PNG file. When selected, the "Save Map picture file" feature opens to the current storage location (default = [INTERNAL]:) where you can name and save your current displayed map area.
3.Enter a Zoom by using the RPG or the arrow keys to highlight Zoom and then enter a value between 4 and 17.
4. If you do not see your Map on the FieldFox display:
—Use the RPG or the arrow keys to highlight Latitude and Longitude and then enter a value for latitude and longitude that corresponds closely to the “Current Area Center” value displayed in the FieldFox Mapping software.
—Use the Go to GPS Location softkey.
Refer to Figure 16-14.
Optional: If you want to stop the "Reading map..." process, press Esc to stop map search.
5. Repeat step 4 for Longitude.
Figure 16-14 Example of Current Area Center Latitude and Longitude Values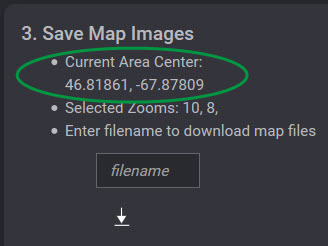
Option 352 Indoor Maps Setup Procedure IMPORTANT! 85571A-028 (28 GHz 5G Phased Array Antenna) accessories not suitable for use in wet locations.
1. Set up your measurements in Channel Scanner, OTA, or Phased Array Antenna. See also, Chapter 13, “Over–the–Air Measurements (OTA) – LTE FDD Option 370, LTE TDD Option 371, 5G NR / 5G NR EVM Conducted / 5G TF Option 378,” and Chapter 28, “Channel Scanner (Option 312).”
One or more are required:
—For setting up a USB antenna, refer to Chapter 15, “USB Antennas – Full Capability Requires EMF Option 358, and either SA mode (Option 233 Mixed Analyzers) or OTA—LTE FDD (Option 370), LTE TDD (Option 371), 5G NR / 5G NR EVM Conducted / 5G TF (Option 378).”
Optional:
—For setting up GPS Option 307, refer to Chapter 31, “System Settings,” and then “GNSS (GPS+) and GPS” on page 886.
2.
Import your floor plan, before the locations are going to be measured. |
a.Save mapping pictures to the FieldFox using USB storage device, SD card, or connect to LAN with internet and download.
b.Import floor plans or site maps to the FieldFox from pictures (PNG, JPG, and BMP).
Press System 7 > Utilities > Mapping > Map Explorer (Get Maps) > Import Maps > Import Maps (ZIP)
Optional:
—Press Source Device [Internal] – Internal (default), SD Card, USB, or CD Drive
—Press Destination Device [Internal] – Internal (default), SD Card, USB, or CD Drive
c.Recommended: Do an interactive Walk Test data collection using the location pointer.
3.If you are using an antenna with your measurements, then Connect your equipment similar to Figure 15-1 on page 484 in Chapter 15, “USB Antennas – Full Capability Requires EMF Option 358, and either SA mode (Option 233 Mixed Analyzers) or OTA—LTE FDD (Option 370), LTE TDD (Option 371), 5G NR / 5G NR EVM Conducted / 5G TF (Option 378)”.
4.Then press Esc > Back > Measure 1 or Trace 6 > More (required for OTA only) > Data Logging to view the Data Logging softkeys and set the Record Settings, Record Save/Recall, and More > Indoor Map Data Logging or Signal Locate.
—For Outdoor Mapping: Record Save/Recall > File Folder Default System
—Default – Sets the default User Folder path:
——List files (*.csv and *.kml) are save-recalled to: "[CurrentDevice]:\RecordPlayback\CS\"
——Record-Play files are save-recalled to: "[CurrentDevice]:\RecordPlayback\CS\"
Or
—System – Sets the User Folder to the user defined system folder path/name:
——List files are save to-from "CurrentDevice\<UserSelectedFolder>\"
——Record-Play files are save-recalled to: "CurrentDevice\<UserSelectedFolder>\"
Refer to “File Management” on page 913.
—Then File Type
— KML (default) or
—CSV
—Then Save Log File.
or
—Then Recall Log File.
—Optional Auto Save ON (default = OFF). To avoid loss of data, if power loss occurs.
—Then Back
5.Set up indoor mapping press More > Indoor Map Data Logging then choose
—Press Record Indoor Data – opens a menu of previously stored PNG files to select to record a new data log.
a.Scroll to indoor floor plan *.png file.
b.Press Recall File - enables you to recall previously stored *.kdat file that you can view or modify.
c.Move the position cursor to current location:
—Then press Pan to open a menu of softkey to enable you to move the position cursor to current location and mark data points, using East, West, North, and South softkeys.
—Or you can use the arrows, the rotary knob, or numeric keypad locate the position cursor to current location.
d. Then press Record Data when pointer is in desired position to enter a new data point.
If a "Error: This data point not ready..." is displayed, verify the measurement setup, including the antenna setup, if applicable, and ensure the measurement is successful. |
e. Repeat step c and d for all other required position locations.
Else, continue to next step.
f. When done, press Back (If you used the Pan softkey menu) > More > Save Map to save results to a *.KDAT file.
A KDAT file is the file FieldFox uses to recall an indoor mapping/data logging session (“Recall Indoor Log File”). It's an archive file that contains information about the original image file, the location of the recorded data on the image and the actual recorded data. KDAT files can only be opened with FieldFox itself. KDAT files cannot be opened via Data Link. An auxiliary CSV data file is generated automatically, each time a KDAT file is saved during an indoor mapping session. The CSV contains the recorded data, without the image, location of the recorded data, etcetera. |
Figure 16-15 Example of an Indoor Building Map with Single Icon and Bore Sight Pointer
Option 352 Outdoor Maps Setup Procedure
Outdoor mapping requires GPS Option 307. IMPORTANT! 85571A-028 (28 GHz 5G Phased Array Antenna) accessories not suitable for use in wet locations. Saving and importing maps can be done now or after the outdoor map locations have been measured. Before you can save and import maps via the internet, your PC requires the FieldFoxMapping software. Refer to “How to Install Node.js and Running the FieldFox Mapping Software” on page 502.
1.Set up your measurements in Channel Scanner, OTA, or Phased Array Antenna. See also, Chapter 13, “Over–the–Air Measurements (OTA) – LTE FDD Option 370, LTE TDD Option 371, 5G NR / 5G NR EVM Conducted / 5G TF Option 378,” and Chapter 28, “Channel Scanner (Option 312).”
One or more are required:
—For setting up GPS Option 307, refer to Chapter 31, “System Settings,” and then “GNSS (GPS+) and GPS” on page 886.
—For setting up a USB antenna, refer to Chapter 15, “USB Antennas – Full Capability Requires EMF Option 358, and either SA mode (Option 233 Mixed Analyzers) or OTA—LTE FDD (Option 370), LTE TDD (Option 371), 5G NR / 5G NR EVM Conducted / 5G TF (Option 378).”
2.Plan the area you want to map with GPS Option 307 enabled.
Saving and importing maps can be done now or after the outdoor map locations have been measured. Refer to “How to Install Node.js and Running the FieldFox Mapping Software” on page 502. |
a.Optional (Can be done later): Save mapping pictures to the FieldFox using USB storage device, SD card, or connect to LAN with internet and download. Refer to “How to Install Node.js and Running the FieldFox Mapping Software” on page 502. For FTP, refer to :MMEM SCPI in the FieldFox Programming Help https://www.keysight.com/us/en/lib/resources/service-manuals/keysight-fieldfox-library-help-and-manuals-2153870.html (via Keysight FieldFox Library, Help and Manuals (near bottom of page).
b.Optional (Can be done later):
—Set up the Record Settings (Outdoor Mapping only): Press Trace 6 > More (OTA mode) > Data Logging > Record Settings > Meas Interval ON > Interval Type Time Distance (select one of these) then Back, to exit the Record Settings menu.
—To enable Auto Save to avoid loss of data, if loss of power occurs: Press Record Save/Recall > Auto Save OFF ON > ON
c.Walk or drive around the area you want to map.
d.Optional: If you know your route, and have already downloaded a zip file of your mapping location or are connected to the LAN, then press System 7 > Utilities > Mapping > Map Explorer (Get Maps) then:
—Move the position cursor to current location:
—Then use the arrows, the rotary knob, or numeric keypad locate the position cursor to current location.
—Then Edit to change the value of:
—Zoom – If a zoom value is not found, the FieldFox ignores the entered value and returns to the previously displayed Zoom setting (i.e., values must be between 4 and 17).
—Latitude – If a latitude value is not found the FieldFox displays a gray grid.
—Longitude – If a longitude value is not found the FieldFox displays a gray grid.
—Easting – Enter an eastern measured distance
(i.e, x Cartesian coordinate).
—Northing – Enter an northward-measured distance (i.e., y Cartesian coordinate).
—Grid Reference – Valid in UK only.
—Red Limit – Determines the dBm value of the red limit (default = –20 dBm).
—Blue Limit – Determines the dBm value of the blue limit (default = –90 dBm).
When done entering each setting, press Enter.
Figure 16-16 Example of England Displayed Text
e.Else, to import a *zip file (i.e., you can come back and do this later after the mapping route is defined).
i.Press System 7 > Utilities > Mapping
ii.Then to import map pictures, press Map Explorer (Get Maps) > Import Maps
iii.Press Import Maps (ZIP) > Recall File and change latitude and longitude values to view site maps from pictures (KML).
3.If not done, connect your equipment similar to Chapter 15, “USB Antennas – Full Capability Requires EMF Option 358, and either SA mode (Option 233 Mixed Analyzers) or OTA—LTE FDD (Option 370), LTE TDD (Option 371), 5G NR / 5G NR EVM Conducted / 5G TF (Option 378)”, and to Figure 15-1 on page 484
See also,
—For setting up GPS Option 307, refer to Chapter 31, “System Settings,” and then “GNSS (GPS+) and GPS” on page 886.
—For setting up a USB antenna, refer to Chapter 15, “USB Antennas – Full Capability Requires EMF Option 358, and either SA mode (Option 233 Mixed Analyzers) or OTA—LTE FDD (Option 370), LTE TDD (Option 371), 5G NR / 5G NR EVM Conducted / 5G TF (Option 378).”
4.Install street maps into the FieldFox. Refer to “How to Install Node.js and Running the FieldFox Mapping Software” on page 502.
Downloading map options:
—Store the maps *.zip file onto USB or SD card and the FieldFox can load from USB, SD card, or internal drive (if the maps are saved to the FieldFox).
—Connect the FieldFox to the LAN with internet access and use the FieldFox Mapping software to download a maps image *.zip file.
—If necessary, you can download the maps at later time.
5.Using Discrete Colors softkey Menu, set the red (maximum) and blue (minimum) values. For setting color coded bar scale preferences, refer to Chapter 31, “System Settings,” and “Using the Discrete Colors Softkey Menu” on page 884.
a.Press System 7 > Utilities > Mapping > Map Explorer (Get Maps)
b.Optional: Select the Red or Blue Limits to edit by using the arrows, the rotary knob, or numeric keypad to position the trace for optimum viewing on the FieldFox display.
Then Edit (the color coded bar scale Red or Blue limits are at the top of the FieldFox display).
Figure 16-17 Using Maps Explorer to Set the Red and Blue Power Limits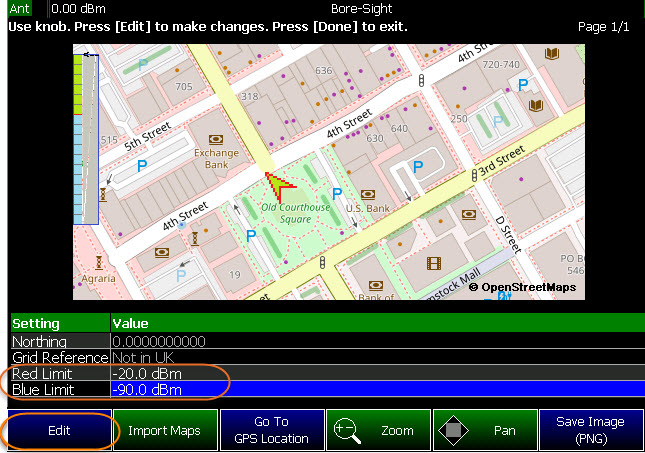
c.Optional: Then Preferences > Discrete Colors > Discrete Colors > Discrete Colors and change value as desired (Maximum = 6).
Figure 16-18 Display Example: Color Coded Bar Scale Before Selecting x6 Colors
Figure 16-19 Display Example: Color Coded Bar Scale After Selecting x6 Colors
6.Verify you have enabled GPS. Refer to your measurements procedure and to “GNSS (GPS+) and GPS” on page 886.
7.Then press Esc > Back > Trace 6 > More (required for OTA only) > Data Logging > Record Save/Recall
—Then File Folder Default System
—Default – Sets the default User Folder path:
——List files (*.csv and *.kml) are save-recalled to: "[CurrentDevice]:\RecordPlayback\CS\"
——Record-Play files are save-recalled to: "[CurrentDevice]:\RecordPlayback\CS\"
Or
—System – Sets the User Folder to the user defined system folder path/name:
——List files are save to-from "CurrentDevice\<UserSelectedFolder>\"
——Record-Play files are save-recalled to: "CurrentDevice\<UserSelectedFolder>\"
Refer to “File Management” on page 913.
—Then File Type
— KML or
—CSV (default)
—Then Save Log File.
or
—Then Recall Log File.
—Optional Auto Save ON (default = OFF). To avoid loss of data, if power loss occurs.
—Then Back
8.Set up the outdoor mapping:
a.Press Trace 6 > Data Logging
b.Then press Record
c.When done, Stop
d.Save results to KML file.
9.View KML with map tools.
—On the FieldFox, see the data results overlaying OpenStreetMaps’ pictures.
Or use Google Maps or similar to view your maps on your PC. Refer to “Import and Play back KML Files into 3rd Party Software (Example: Google Earth with Animation Tool)” on page 525.
Figure 16-20 FieldFox Display with View Map ON and OFF Displayed
Import and Play back KML Files into 3rd Party Software (Example: Google Earth with Animation Tool)
Features
Use the Playback Slider to replay measurement results. See also Google Maps and or Google Earth’s help. Refer to Figure 16-21 on page 526.
—Open the FieldFox *.KML file in Google Earth. The time slider appears in upper left of the map.
—Manual Mode – Move the time slider cursor to see color-coded icons pop-up according to the timestamp.
—Loop mode has a Fast-Slow Replay Option.
—Click on each color coded balloon to see the table of measurement results for that location.
Figure 16-21 Importing a KML File Into Google Earth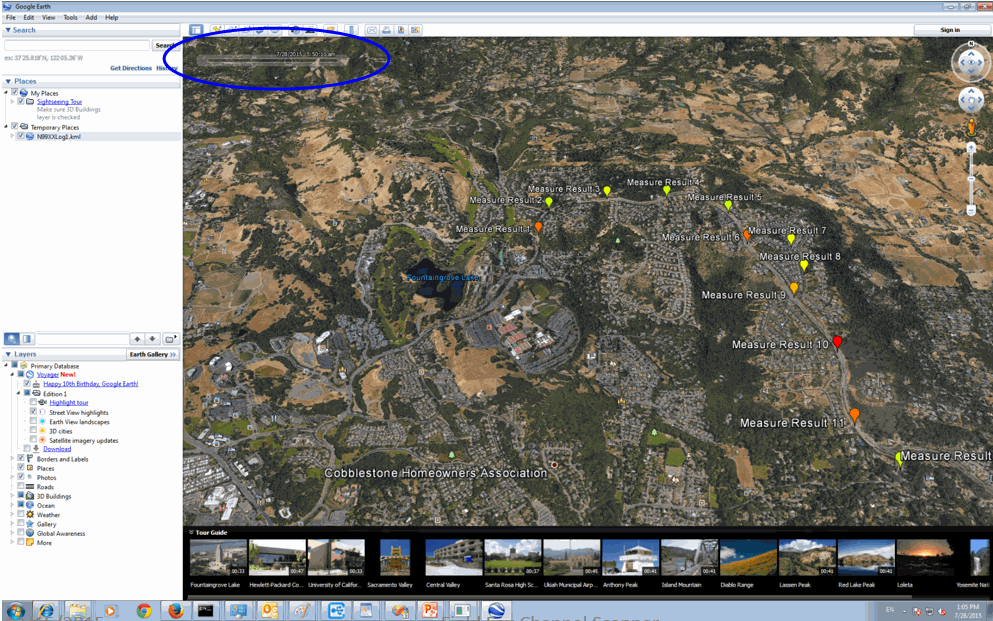
There are two types of data logging:
“Enabling Outdoor Map Logging” on page 527 and
“Enabling and Setting Up Indoor Map Logging” on page 530
See also, “Option 352 Indoor Maps Setup Procedure” on page 515 and “Option 352 Outdoor Maps Setup Procedure” on page 519.
Opening the Data Logging settings:
—Press Mode (Channel Scanner (Option 312) only) > More (Depending on the number of options installed, may not be necessary) > Channel Scanner
—Press Measure 1 (Channel Scanner (Option 312) only) or Trace 6 > Data Logging
If you have already setup your outdoor or indoor map logging:
—Then Record to being logging data or
—Then Play If this softkey is active, you are currently recording or you have recalled a previously stored data logging file
When Play is pressed, then choose:
—Cursor Position use this softkey to move the data log play cursor in the current data log being played (i.e., Cursor Position is active only when playback is paused).
This softkey is only available in Channel Scanner and Phased Array Antenna modes (i.e., The Cursor Position softkey is not available for OTA mode).
—Maps – to open a softkey menu enable map view and related features (e.g., Data Selection, Red/Blue Limits, Zoom, and Labels & Icons). Learn more, refer to step 3.
or
—Then View (available in Channel Scanner mode and with Outdoor Mapping only)
Then choose:
—Exit to leave the current View softkey menu and return to the previous menu.
—Zoom use this softkey zoom in/out.
This softkey is only available in Channel Scanner and Phased Array Antenna modes (i.e., The Cursor Position softkey is not available for OTA mode).
—Red Limit to edit the red maximum power limit dBm value.
—Blue Limit to edit the blue minimum power limit dBm value.
Setting up Outdoor Mapping
1.Press Record Settings — then choose:
—Meas Interval OFF ON Enable to make the measurement interval softkeys active (default = OFF).
—Interval Type choose Time or Distance.
—Time Interval Enter time in seconds (1s to 3.6 ks) or
—Distance Interval Enter time in miters (10m to 10 km)
2.Press Record Save/Recall Opens a softkey menu to manage your data logging filenames and file folder locations
—Save Log File or
—Recall Log File (if you have previously stored data)
—File Folder Default System (Default = Default) or
—File Type (Default = CSV) or KML
—Auto Save OFF ON To enable/disable auto save to protect your data, if power is lost (Default = OFF)
—Then Back
3.Then choose from the following:
—Press Record to begin a new data log recording.
—Press Pause Resume (only displayed after Record has been pressed) Temporarily halts recording until pressed again. The incoming trace continues to sweep. Press again to continue recording.
—Press Play If this softkey is active, you are doing a new recording or you have recalled a previously stored data logging file.
—Press Stop Immediately
—The Save the log file menu opens. Edit the filename and press Done to exit menu. See Settings below and “To change Data Logging Configuration settings:” on page 541.
—To change your file settings or measurement interval. Learn more, refer to “To change Data Logging Configuration settings:” on page 541.
—Press Maps – to open a softkey menu enable map view and related features (e.g., Data Selection, Red/Blue Limits, Labels & Icons, Zoom).
Then choose from the following:
——View Map OFF ON To enable/disable the current map view (default = latitude/longitude = 0.00/00. Need GPS to view current location (default = OFF).
——Data Selection Opens a softkey menu to set the active data channel, sort type, and sort order.
Then Choose:
Channel 1 | Sets the data channel being recorded. Available channels will vary within each mode. |
Sort | Sets the type of measurement displayed (Power or Frequency). |
Sort Order | Sets the sort order to ascending (Up) greater power/frequencies displayed first or descending (Down) lowest power or frequency values displayed first. |
Back | Returns to previous softkey menu. |
——Red/Blue Limits Opens a softkey menu to assign power values to the red (high power limits) and blue (low power limits) heat map display limits (defaults: Red Limit = –20 dBm, Blue limit = –90 dBm).
——Zoom Zoom in/out on the map displayed.
——Labels & Icons Opens a softkey menu to enable/disable map data point labels and icon types.
Then choose from the following:
Labels | Enables/Disables map data point labels. When enabled, a label is displayed for every map data point (e.g., “Data 1”). When disabled, labels are not displayed for the map data points. |
Icons | Sets the type of icon that is used to display a map’s data points. |
—— Save Image (PNG) Saves the current displayed map to a *.png file (default filename is “MapImageFile”). This softkey is available (active) when View Maps = ON.
Record-Play files are saved to: —If File Folder is set to Default then Record-Play files are save-recalled to: "[CurrentDevice]\RecordPlayback\[Current mode]\" —If File Folders are set to System, then Record-Play files are save-recalled to: "CurrentDevice\<UserSelectedFolder>\ |
Learn more about file settings, refer to Chapter 33, “File Management.” |
Enabling and Setting Up Indoor Map Logging
1.Press Measure 1 > Data Logging > More
2.Press Indoor Map Data Logging — then choose:
—Record Indoor Data – Use this option to load a new floor–plan image to plot data points and lines of bearing to emitter signals.
—Recall Indoor Log File – (if you have previously stored data (*.kdat)). You can recall a log file and add/delete directional finding lines of bearing and map data to previously saved files. Re-save them and resume data collection at a later time.
After a *.png is opened for a new recording or a *.kdat file is recalled for editing and displayed on the FieldFox, then choose from the following:
IMPORTANT! When you recall a *.kdat file, you are able to add mapping points, but you will only be able to save the changes as a *.png. file. Optionally, if you save a file as a *.png file and then recall the file, you can add data points and save the changes as a *.kdat file. |
A KDAT file is the file FieldFox uses to recall an indoor mapping/data logging session (“Recall Indoor Log File”). It's an archive file that contains information about the original image file, the location of the recorded data on the image and the actual recorded data. KDAT files can only be opened with FieldFox itself. KDAT files cannot be opened via Data Link. An auxiliary CSV data file is generated automatically, each time a KDAT file is saved during an indoor mapping session. The CSV contains the recorded data, without the image, location of the recorded data, etcetera. |
—Navigate OFF ON To enable/disable map location changes using arrow keys and the RPG (when ON). When OFF the arrow keys and RPG enable you to highlight and Edit the Navigate, Red Limit, and Blue Limits in the Setting table. (Default = OFF)
—Pan Navigate map East, West, North, South using arrow keys).
—Zoom Zoom in/out on the map displayed.
—Bearing Line This similar to the outdoor direction finding feature. It allows a “Bearing line” to be on or off, the angle of Bearing Line to be setup, and its length to be set. All very similar to the outdoor direction finding procedure. From this Bearing Line menu, you can also select a point to edit/change.
Before you can set a Bearing Line value, you first must “Record” a point, before you can turn its bearing line on or off, change its length, and angle. See also, “How to Add Directional Finding (DF) Bearing” on page 537. |
Bearing Line OFF ON | Enables and disables the Bearing Line between two points. |
Angle | Sets the angle of the Bearing Line (default = 0°, 0 to 360°). |
Line Length | Sets the length of the Bearing Line to connect two points (default = 100). |
Select Point | Sets the point to be edited. |
Back | Takes you back to the previous softkey menu. |
—Record Data To record a data point in the specified intervals using currently selected labels and icons.
To enable the Record Data softkey, move the cursor using the arrow hardkeys or the RPG to highlight the Location: Value cell in the table. Begin walking with an antenna and press Record Data as required to map a location.
—More Opens a menu of softkeys to Undo, set Labels & Icons, RPG actions, Save Image, and Back.
Labels & Icons | Opens a softkey menu where you can enable/disable and select map icons: ——Labels OFF ON - Enables/Disables map data point labels. When enabled, a label is displayed for every map data point (e.g., “Data 1”). When disabled, labels are not displayed for the map data points. ——Icons Flag Point Line - Sets the type of icon that is used to display a map’s data points. ——Pointer OFF ON- Enables/disables the bore sight pointer. |
Undo | To undo last indoor map setting change |
RPG [Zoom] | Opens a menu to set the RPG’s functionality for mapping. Choose from: ——Zoom - (default) Zooms in/out. ——<––> - RPG knob moves the map East or West. ——^|v - RPG knob moves the map north or south. |
Data Selection | Opens a softkey menu to set the active data channel, sort type, and sort order. ——Channel 1 - Sets the data channel being recorded. Available channels will vary within each mode. ——Sort Power Freq - Sets the type of measurement displayed (Power or Frequency). ——Sort Order Up Down - Sets the sort order to ascending (Up) greater power/frequencies displayed first or descending (Down) lowest power or frequency values displayed first. |
Save | Opens a softkey menu to enable you to save your map (.kdat) or your image (.png). ——Save Map - Opens “Save the log file” where you can name and save your map file (kDAT). Softkey is only visible when data is recorded on a *.png file using Labels & Icons feature and the Record softkey. ——Save Image (PNG) - Saves the current displayed map to a *.png file (default filename is “MapImageFile”). This softkey is on active when View Maps = O. |
Back | Returns to previous softkey menu. |
A KDAT file is the file FieldFox uses to recall an indoor mapping/data logging session (“Recall Indoor Log File”). It's an archive file that contains information about the original image file, the location of the recorded data on the image and the actual recorded data. KDAT files can only be opened with FieldFox itself. KDAT files cannot be opened via Data Link. An auxiliary CSV data file is generated automatically, each time a KDAT file is saved during an indoor mapping session. The CSV contains the recorded data, without the image, location of the recorded data, etcetera. |
3.Press Record Save/Recall Opens a softkey menu to manage your data logging filenames and file folder locations
—Save Log File or
—Recall Log File (if you have previously stored data)
—File Folder Default System (Default = Default) or
—File Type (Default = CSV) or KML
—Auto Save OFF ON To enable/disable auto save to protect your data, if power is lost (Default = OFF)
—Then Back
Record-Play files are saved to: —If File Folder is set to Default then Record-Play files are save-recalled to: "[CurrentDevice]\RecordPlayback\[Current mode]\" —If File Folders are set to System, then Record-Play files are save-recalled to: "CurrentDevice\<UserSelectedFolder>\ |
Learn more about file settings, refer to Chapter 33, “File Management.” |
Outdoor Mapping Only: Export KML File Into 3rd Party Mapping Software
— Export KML file into 3rd party mapping software (i.e., Google Map or Google Earth). Refer to “Import and Play back KML Files into 3rd Party Software (Example: Google Earth with Animation Tool)” on page 525.
How to Use Data Logging (Option 352)
| Data Log-Play files are saved to: —If File Folder is set to Default then Record-Play files are save-recalled to: "[CurrentDevice]\RecordPlayback\[Current mode]\" —If File Folders are set to System, then Record-Play files are save-recalled to: "CurrentDevice\<UserSelectedFolder>\" |
Data Logging enables you to use GPS mapping data and play them back at a later time. Use this feature to overlay Maps pointers on your indoor or outdoor files.
Data logs can be saved to the FieldFox Internal memory, an SD Card, or a USB flash drive.
This section assumes you have already completed the initial setup and have a measurement setup in the FieldFox.
This section contains the following sections:
— “Screen Annotation” on page 535
— “How to Add Directional Finding (DF) Bearing” on page 537
— “How to Record a Data Log (Outdoor Logging Only)” on page 540
— “To change Data Logging Configuration settings:” on page 541
— “How to Play a Data Log” on page 541
Screen Annotation
During a record or playback session, the following is displayed in the top-center area of the screen:
— Rec: 55/55 2018-12-31 03:26:11 PM
where:
—55/55 is the current and total trace number: currently trace is 55 of 55 total scans.
—2018-12-3103:26:11 PM is the date and time of recording.
—The name of a recording can be changed using Manage Sessions. Learn more in “To change Data Logging Configuration settings:” on page 541.
See also, the FieldFox User’s Guide’s Settings” chapter.
When GPS is enabled , GPS R is indicated at the bottom of the FieldFox display. Learn more, see the FieldFox User’s Guide’s “System Settings” chapter.
The Mapping mode can display and be data logging can be recorded/played back when the units are changed:
—Press Scale /Amptd > More > Unit then choose:
—dBmV, dBuV, W, V, A, dBmA, or dbuA (Default Units: dBm)
Figure 16-22 Field Strength Annotation that can be Recorded and Played Back
If Data Logging or playback is not occurring when you think it should, check the following: —Is the sweep in HOLD? (upper-left annotation), or check the Sweep menu for Continuous set to OFF. —Is Recording or Playback Paused? (mid-left annotation) —Is the Data Logging measurement Interval set too long? (Configuration settings.) |
How to Add Directional Finding (DF) Bearing IMPORTANT! You must be in Channel Scanner Mode to use this feature.
DF Bearing adds the ability add points to the map at your current location indicating a signal emitter's strength and direction relative to your position. Refer to Figure 16-23 on page 539 and Figure 16-24 on page 540.
See also, “Downloading and Using the FieldFox Map Support Tool” on page 504.
—Press Mode > More (Depending on installed options, may not be necessary.) > Channel Scanner
—Press Measure 1 > Data Logging > More
—Optional (Ignore for Outdoor Mapping): Press Indoor Map Data Logging then choose:
—Press Record Indoor Data – Use this softkey to load a new floor-plan image (*.png) to plot data points and lines of bearing to emitter signals or
—Press Recall Indoor Log File– (if you have previously stored data (*.kdat)). You can recall a log file and add/delete directional finding lines of bearing and map data to previously saved files. Re-save them and resume data collection at a later time. IMPORTANT! When you recall a *.kdat file, you are able to add mapping points, but you will only be able to save the changes as a *.png. file. Optionally, if you save a file as a *.png file and then recall the file, you can add data points and save the changes as a *.kdat file.
Indoor and Outdoor Data Logging
—Then Signal Locate
—Then Add Point – adds a new bearing location then:
—Press Direction Line OFF ON – Enables/disables the line of bearing (default = OFF).
—Press Adjust Angle – Enters the angle of the current point’s line. Rotate the line about the current point (your current location) to point towards the highest signal strength seen by your directional antenna. You can rotate the knob to rotate the line, or you can type an angle into the active entry directly.
—Press Line Length – Enters a value for the line’s length. Adjusts the length of the line of bearing to extend it far enough to allow other points to cross, indicating a possible emitter location.
—Press Accept Point or Back – verifies the new point is to be added and returns to the previous menu.
—Then Edit Points – Opens up menu of bearing point editing softkeys. Choose from:
—Press Select Point – Enter the point you want to edit. Then you can directly enter a new angle or line length or use the arrows, or the rotary knob to edit these values.
—Press Direction Line OFF ON – Enables/disables the direction line (default = OFF).
—Press Adjust Angle – Enters the angle of the current point’s line. Rotate the line about the current point (your current location) to point towards the highest signal strength seen by your directional antenna. You can rotate the knob to rotate the line, or you can type an angle into the active entry directly.
—Press Adjust Angle – Enters a value for the line’s length. Adjusts the length of the line of bearing to extend it far enough to allow other points to cross, indicating a possible emitter location.
—Delete Point – deletes the currently selected point.
—Then Clear Points – Deletes all of the displayed bearing points and lines.
Figure 16-23 Directional Finding (DF) Bearing – Outdoor Map Data Logging Example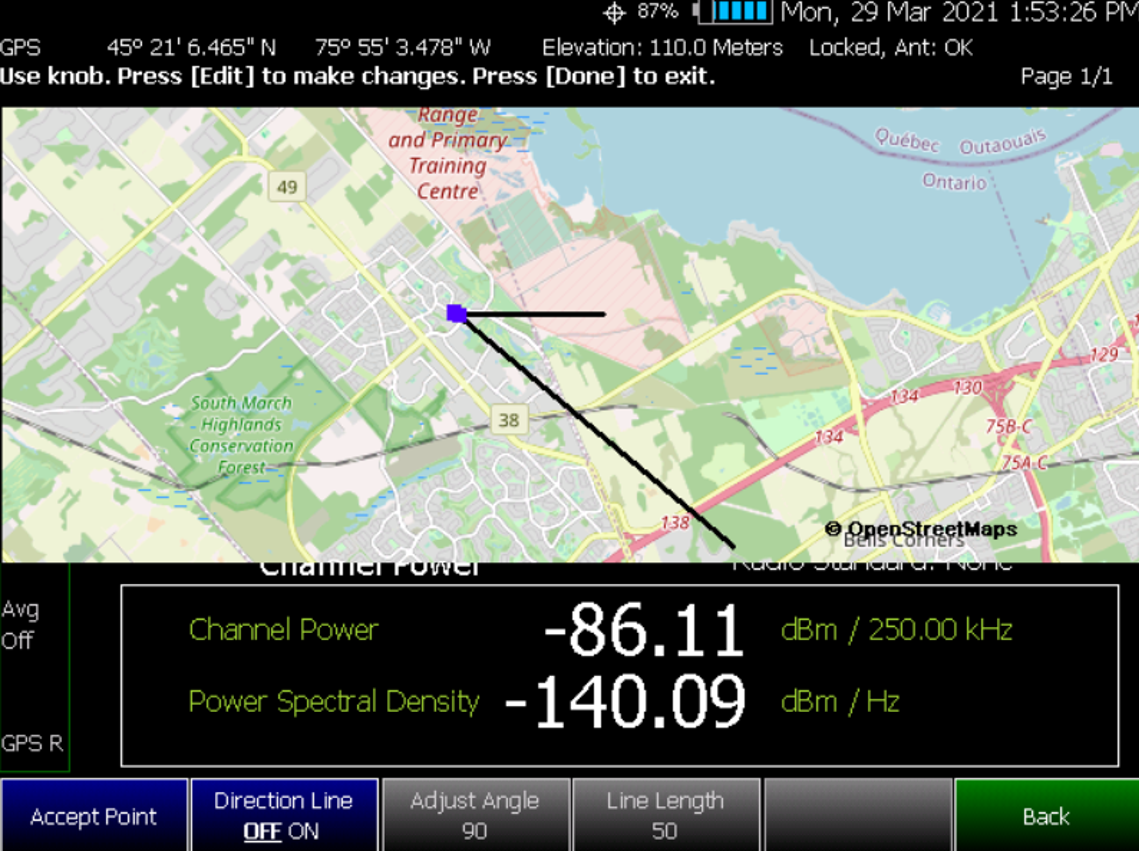
Figure 16-24 Directional Finding (DF) Bearing – Indoor Map Data Logging Example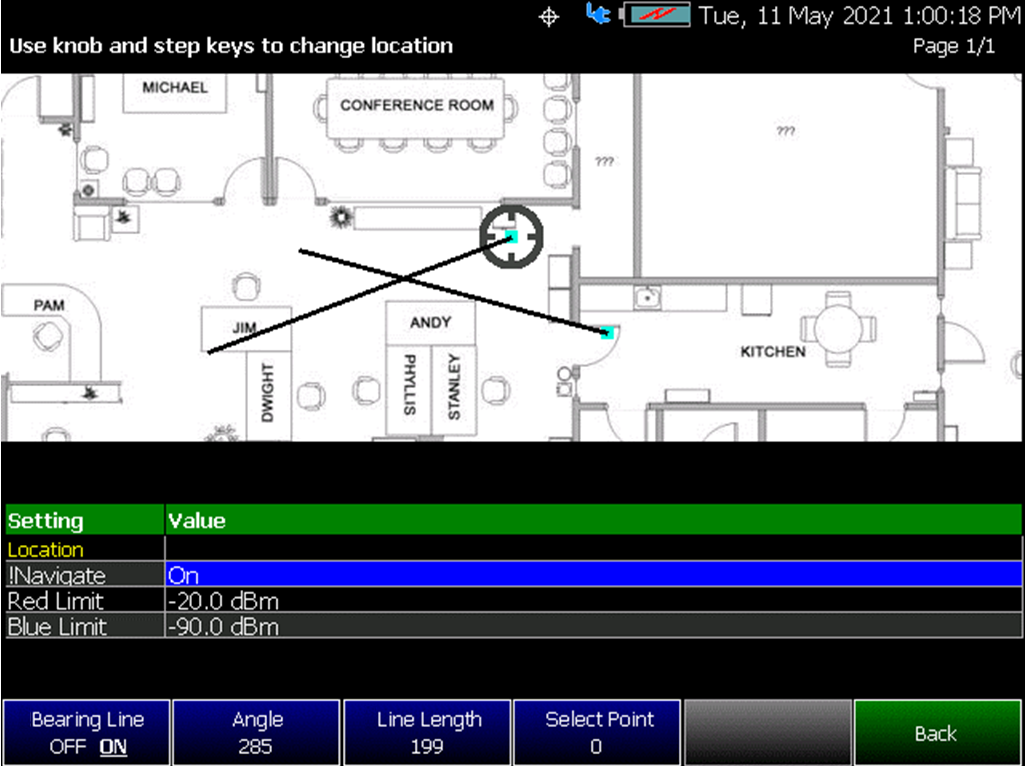
How to Record a Data Log (Outdoor Logging Only)
For Indoor Logging, refer to “Enabling and Setting Up Indoor Map Logging” on page 530. Data Log-Play files are saved to: —If File Folder is set to Default then Data Log-Play files are save-recalled to: "[CurrentDevice]\RecordPlayback\[Current mode]\" —If File Folders are set to System, then Data Log-Play files are save-recalled to: "CurrentDevice\<UserSelectedFolder>\ 
—Press Trace 6
—Then Data Logging
—Then Record (Outdoor Logging Only)
is displayed in the left of screen graticules.
During recording, choose from the following:
—Pause Resume Temporarily halts recording until pressed again. The incoming trace continues to sweep. Press again to continue recording.
—Stop Immediately stops recording. Then choose from the following:
—Then Record Save/Recall To save a log file, recall a log file, or change your file settings. Learn more, refer to “To change Data Logging Configuration settings:” on page 541.
——Press Save Log File to save the current Table data (i.e., default save device is Internal).
—Then Record Settings (Outdoor Mapping only) To change your measurement interval settings. Learn more, refer to “To change Data Logging Configuration settings:” on page 541.
To change Data Logging Configuration settings:
—Press Trace 6
—Then Data Logging then choose:
—Then Record Settings (Outdoor Mapping only)
—Optional: Then Meas Interval > ON
——Then Interval Type > choose Time or Distance.
——Then, if applicable Time Interval enter time interval in seconds.
Or
——Then, if applicable Distance Interval enter distance interval in miters.
—Then Record Save/Recall
—Then Device (Internal (default), SD Card, or USB)
—Then File Type (CSV (default), or KML)
Learn more, refer to the Chapter 33, “File Management”.
—Press Trace 6
—If the session is already open, skip the following step. Otherwise:
—Then Data Logging > Record Save/Recall
| If these are large recordings on a device, it could take several seconds for the FieldFox to display the list. |
—Then Recall Log File use the Use the RPG or the arrow keys to highlight the file to be played.
——Then Recall File
——Then Back
—Then Play to playback your Table data.
 is displayed in the left of screen graticules during playback. When the end of the recording is reached, playback begins at the start of scan and continues to loop indefinitely.
During playback, choose from the following:
—Pause Resume Temporarily halts playback. Then choose from the following:
—Pause Resume Press to continue playing.
—Stop Immediately stops playback. Then choose from the following:
—Play Start playback from start of scan.
—Recall Log File Opens a list of stored data files.
Select a file to playback.
—Recall File
—Back
—Cursor Position use this softkey to move the data log play cursor in the current data log being played (i.e., Cursor Position is active only when playback is paused).
This softkey is only available in Channel Scanner and Phased Array Antenna modes (i.e., The Cursor Position softkey is not available for OTA mode).
—Red Limit to edit the red limit dBm value.
—Blue Limit to edit the blue limit dBm value.
Troubleshooting
This section contains the following:
—“Port 5000 in Use Error” on page 544
—“Miscellaneous Mapping Errors” on page 547 IMPORTANT! Do not change the default name of the directory path for downloading the Node.js program, because FieldFox uses the default program path name to run the Mapping feature. Refer to Figure 16-4. Examples of Web Browsers that not supported are Internet Explorer 6, 7, and 8.
If your Mapping setup is not behaving as expected:
—Verify setup is correct by referring to “How to Set Up Mapping Settings” on page 512.
—Attenuator set to 0 dB
—Preamplifier set to ON
—Correct Band, Channel, and Center Frequency entered
—GNSS set to Internal
—Frequency Ref set to GPS
—ADC errors: Use Scale/Amptd > Range to adjust the absolute power level (dBm).
For some data views, you need to press More to view the Range softkey.
—No data displayed: Press Meas Setup 4 then
——Verify the correct Antenna Settings have been entered.
—The FieldFox’s displayed annotation indicates "Check LAN connection. Check IP address." during pinging.
Verify:
——The LAN address for first 3 fields matches the Static IP address of FieldFox. For example, if the Ball Antenna IP address is 192.168.1.10, set FieldFox Static IP address to 192.168.1.xx. “xx” must be different number than shown in the last field of the for Ball Antenna.
—If the cmd.exe window displays a "This port was picked because 5000 is in use." error, then:
a. Type Ctrl + c in the command window
b.Press Enter
c.The command window should display text “Terminate batch job? (Y/N)”:
Type Y and then press Enter
The command window should display message confirming the termination of the batch job and close.
Refer to Figure 16-25.
Figure 16-25 Example of “This port...because 5000 is in use.” Error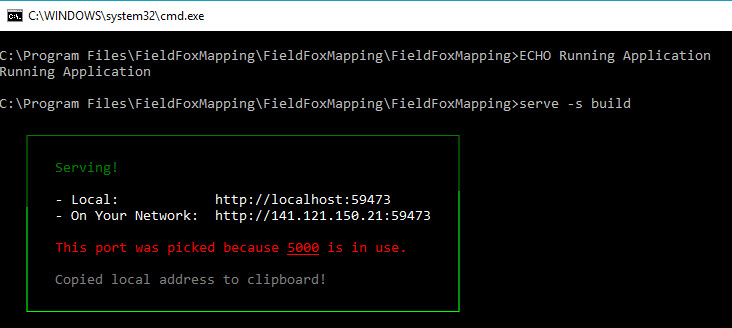
If the Map Support Tool displays the error shown in Figure 16-26, it means the selected map area is outside the current viewable area.
—You can either:
——Move the map area by clicking the left mouse to the area you have selected or
——Click the “Red X” to cancel the download
Figure 16-26 Example of “This port...because 5000 is in use.” Error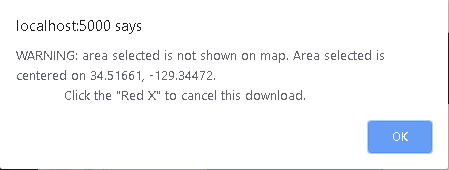
—If you see this message after opening and running the Run.bat file, ignore it and follow the procedure listed in,“Downloading and Using the FieldFox Map Support Tool” on page 504.
If you are unsuccessful in opening and running the FieldFox Map Support Tool when using the Run.bat then refer to, “Contacting Keysight” on page 5.
Refer to Figure 16-27.
Figure 16-27 Example of “UPDATE AVAILABLE” Message
When you are you are on step 3. Save Map Images, you may see a “fetch” error or a ’checkerboard’ map displayed. Refer to Figure 16-28 and Figure 16-29 on page 547.
If you see a “fetch”, ’checkerboard’, or other map errors:
1.Close your current browser window with OpenStreetMaps.org.
2.Open a different browser.
3.If necessary, re-run the FieldFox mapping script (run.bat) to re-copy the “localhost:5000” address into your clipboard.
4.Paste the “localhost:5000” address into a different browser and use OpenStreeMaps.org to save your Map image zip file.
Figure 16-28 Example of “This site says... Got error: Failed to fetch” Error