:LTESt:MEASure:MLIMit:SOURce:LOCation
Command Syntax
:LTESt:MEASure:MLIMit{1:16}:SOURce:LOCation <index>,<index>,<index>,…
Where {1:16} identifies one of sixteen limit tests.
Where <index> is a panel's row number for a measurement. For Jitter Mode's Ouput Jitter panel, <index> is a two-number index consisting of <row number>, <column number>.
Query Syntax
:LTESt:MEASure:MLIMit:SOURce:LOCation?
Description
For the specified measurement limit test (1 through 16), selects the actual measurements on which to perform the limit test. To specify the measurement results panel on which the measurements result is displayed, use the :LTESt:MEASure:MLIMit:SOURce:TYPE command.
For most of FlexDCA's results panels, the measurement index is a single integer. For example when selecting the Fall Time measurement on Eye mode's Results panel, the index might be:
:LTESt:MEASure:MLIMit2:SOURce:TYPE EYE
:LTESt:MEASure:MLIMit2:SOURce:LOCation 3
However, for Jitter Mode's Output Jitter panel, the measurement index consists of a <row number>,<column number> combination. For example when selecting the Output Jitter panel's J4u (R23) measurement, the index might be:
:LTESt:MEASure:MLIMit2:SOURce:TYPE IEEE
:LTESt:MEASure:MLIMit2:SOURce:LOCation 3,4
Discovering an Index Programmatically
Programnatically, the easiest and most sure technique to get a measurement's location is to use the :LOCation? child query. This query is found for each measurement command in the :MEASure subsytem. For example, to query the location of a Rise Time measurement in Eye mode, use this command:
:MEASure:EYE:RISetime:LOCation?
Then, you can simply pass (or append) this index as an argument to the :LTESt:MEASure:MLIMit:SOURce:LOCation command. Also, sending the command to start a measurement, even if that measurement is alread turned on, places the measurement at the top of the results table with location index 1. As a result, you don't need to query the index. Simply use index 1 the select the measurement for limit testing.
Discovering an Index from the GUI
- Click Tools > SCPI Programming Tools > SCPI Recorder.
- In the SCPI Recorder dialog, start recording.
- In the measurement results panel, click the measurement for whitch you want the index.
- The SCPI Recorder shows a command for selecting the measurements. The correct index is shown at the end of this command.
Requires FlexDCA revision A.03.00 and above.
Interpreting Index Values
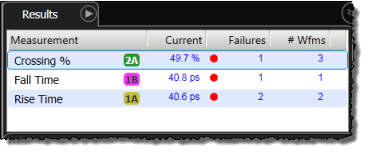
For row number only indexes, the first (top most) measurement is identified as 1, the second measurement from the top is identified as 2, and so forth. Since new measurements are added to the to the top of a panel, the index is numbered in the reverse order in which the measurement were turned on. For example, the last and 3rd measurement added to the following picture was Crossing % and it has a location index of 1.
- Crossing % (index 1)
- Fall Time (index 2)
- Rise Time (index 3)
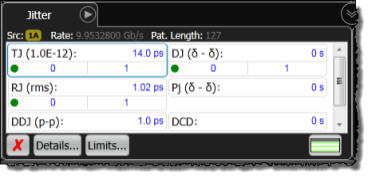
Measurements can be listed in columns, as shown by the following figure. In this case, the location index generally increases row-by-row from left to right. As a result, the first (top most) measurement in the following figure is identified as 1. It is the TJ measurement. The second measurement, identified as 2, is DJ. The third measurement, identified as 3, is RJ, and so forth.
For measurements on Eye Mode's mask regions, use the following figure and table to identify the index, which can range from 1 to 64. Query the location index using the :MEASure subsytem's :LOCation queries listed in the following table.
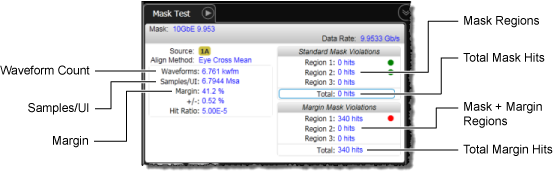
| Mask Limit Measurements | :MEASure Subsystem Query for Location Index |
|---|---|
| Mask Region (1 to 16) | :MEASure:MTESt:HREGion{1:16}:LOCation? |
| Mask + Margin Region (1 to 16) | :MEASure:MTESt:MHRegion{1:16}:LOCation? |
| Total Mask Hits | :MEASure:MTESt:HITS:LOCation? |
| Total Margin Hits | :MEASure:MTESt:MHITs:LOCation? |
| Waveform Count | :MEASure:MTESt:NWAVforms:LOCation? |
| Samples/UI | :MEASure:MTESt:NSAMples:LOCation? |
| Margin | :MEASure:MTESt:MARGin:LOCation? |
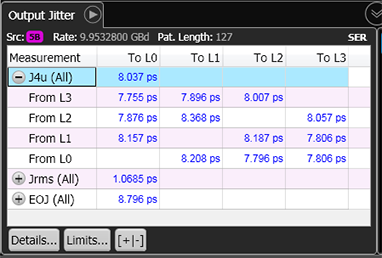
Jitter Mode's Output Jitter Panel
The index for each measurement in this panel is a two-value index in the form of '<row index>,<column index>'. In this picture, the index for a J4u measurement on the rising level 1-to-2 edge transition (R12) has a location index of "4,3". To return the location index, use :MEASure subsystem commands as shown by these two lines of code:
FlexDCA.write(':MEASure:JITTer:OJITter:J4U:ECATegory R12') # Select waveform edge.
index = FlexDCA.query(':MEASure:JITTer:OJITter:J4U:LOCation?') # Return its index.
To return a valid location index, the measurement must be displayed in the panel. If the measuremenet is not displayed in the table, the index "–1,–1" is returned.
Example Command Sequence
This example returns the location of the risetime measurement in Eye/Mask mode, which in this example is "3". Then, later in the program, this location index is used to enable limit testing on the risetime measurement.
:MEASure:EYE:RISetime:LOCation?  //  Discover risetime location in table.……
:LTESt:MEASure:MLIMit2:SOURce:TYPE EYE  //  Select an Eye Mode test.
:LTESt:MEASure:MLIMit2:SOURce:LOCation 3  //  Select the risetime measurement.
:LTESt:MEASure:MLIMit2:STATe ON  //  turn on risetime limit test 2