:LTESt Measurement Commands
Creating a Measurement Limit Test
You can create up to 16 separate measurement limit tests, one for each measurement. The test sets the number of failures required to stop testing on one of the following sources:
- Eye diagram measurement in Eye/Mask mode
- Amplitude measurement limit test in Jitter/Noise mode
- JSA TJ (rms), DJ (rms), or RJ (rms) measurement
- Jitter measurement limit test in Jitter/Noise mode
- Mask measurement limit test in Eye/Mask mode
- Oscilloscope measurement limit test in Oscilloscope mode
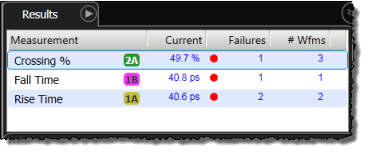
When defining a measurement limit test, first select the type of measurement results table (for example, eye measurements) and then identify the measurement using an index. The index identifies the measurement in the active measurement list, which is shown in the displayed results table. Results tables can list up to 32 measurements, so the index can range from 1 to 32. The active measurement list is indexed starting at 1. As a result, the first (top most) measurement in the list is identified as 1, the second measurement from the top is identified as 2, and so forth. Since new measurements are added to the list's top, the index is numbered in the reverse order in which the measurement were turned on. For example, the last and 3rd measurement added to the following picture was Crossing % and it has a location index of 1.
- Crossing % (index 1)
- Fall Time (index 2)
- Rise Time (index 3)
After defining one or more limit tests, if you start an additional measurement, the location index for all measurements change. You must anticipate this change if you plan to make any further changes to your measurement limit tests.
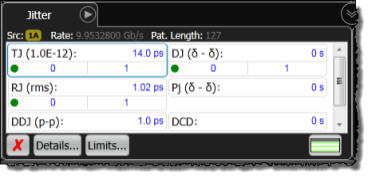
Measurements can be listed in columns, as shown by the following figure. In this case, the location index increases row-by-row from left to right. As a result, the first (top most) measurement in the following figure is identified as 1. It is the TJ measurement. The second measurement, identified as 2, is DJ. The third measurement, identified as 3, is RJ, and so forth.
For measurements on Eye Mode's mask regions, use the following figure and table to identify the index, which can range from 1 to 64. Query the location index using the :MEASure subsytem's :LOCation queries listed in the following table.
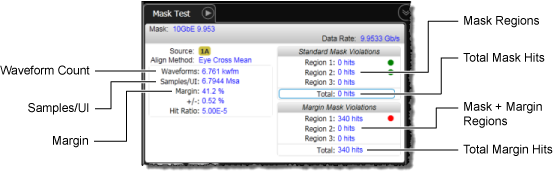
| Mask Limit Measurements | :MEASure Subsystem Query for Location Index |
|---|---|
| Mask Region (1 to 16) | :MEASure:MTESt:HREGion{1:16}:LOCation? |
| Mask + Margin Region (1 to 16) | :MEASure:MTESt:MHRegion{1:16}:LOCation? |
| Total Mask Hits | :MEASure:MTESt:HITS:LOCation? |
| Total Margin Hits | :MEASure:MTESt:MHITs:LOCation? |
| Waveform Count | :MEASure:MTESt:NWAVforms:LOCation? |
| Samples/UI | :MEASure:MTESt:NSAMples:LOCation? |
| Margin | :MEASure:MTESt:MARGin:LOCation? |
The following example creates three Eye Mode measurement limit tests for the Crossing %, Fall Time, and Rise Time measurements shown in this picture. Notice that the reporting action commands for saving waveform, summary, and a screen capture apply to all active measurement limit tests. The first limit test to complete stops all tests and report actions are taken.
				:ACQuire:SINGle  //  Stop waveform acquisition.//  CREATE MEASUREMENT LIMIT TEST 4.
				:LTESt:MEASure:MLIMit4:SOURce:LOCation 1  //  Create test 4 for Crossing % measurement.
				:LTESt:MEASure:MLIMit4:LLIMit 23E-12  //  23 ps lower limit.
				:LTESt:MEASure:MLIMit4:ULIMit 24E-12  //  24 ps upper limit.
				:LTESt:MEASure:MLIMit4:FREGion OUTSide  //  Fail counted if outside of limit.
				:LTESt:MEASure:MLIMit4:FAILures 10  //  Fail test after 10 failures.
				:LTESt:MEASure:MLIMit4:UPACtion FAIL  //  If unable to perform test, fail.
				:LTESt:MEASure:MLIMit4:STATe ON  //  Turn Crossing % test on.//  CREATE MEASUREMENT LIMIT TEST 5.
				:LTESt:MEASure:MLIMit5:SOURce:LOCation 2  //  Create test 5 for Fall Time measurement.
				:LTESt:MEASure:MLIMit5:LLIMit 23E-12  //  23 ps lower limit.
				:LTESt:MEASure:MLIMit5:ULIMit 24E-12  //  24 ps upper limit.
				:LTESt:MEASure:MLIMit5:FREGion OUTSide  //  Fail counted if outside of limit.
				:LTESt:MEASure:MLIMit5:FAILures 10  //  Fail test after 10 failures.
				:LTESt:MEASure:MLIMit5:UPACtion FAIL  //  If unable to perform test, fail.
				:LTESt:MEASure:MLIMit5:STATe ON  //  Turn Fall Time test on.//  CREATE MEASUREMENT LIMIT TEST 6.
				:LTESt:MEASure:MLIMit6:SOURce:LOCation 3  //  Create test 6 for Rise Time measurement.
				:LTESt:MEASure:MLIMit6:LLIMit 23E-12  //  23 ps lower limit.
				:LTESt:MEASure:MLIMit6:ULIMit 24E-12  //  24 ps upper limit.
				:LTESt:MEASure:MLIMit6:FREGion OUTSide  //  Fail counted if outside of limit.
				:LTESt:MEASure:MLIMit6:FAILures 10  //  Fail test after 10 failures.
				:LTESt:MEASure:MLIMit6:UPACtion FAIL  //  If unable to perform test, fail.
				:LTESt:MEASure:MLIMit6:STATe ON  //  Turn Rise Time test on.//  CONFIGURE REPORTING FOR ALL 3 TESTS.
				:LTESt:MEASure:SWAVeform:CHAN2A:STATe DISK  //  Save channel 2A data to file.
				:LTESt:MEASure:SWAVeform:CHAN2A:WMEMory WMEMory3  //  Select memory 3.
				:LTESt:MEASure:SSUMmary:STATe ON  //  Save summary file.
				:LTESt:MEASure:SIMage:STATe ON  //  Save screen image file.//  START TESTING.
				:ACQuire:RUN  //  Start waveform acquisition.
			*OPC?  //  Wait for completion of tests.