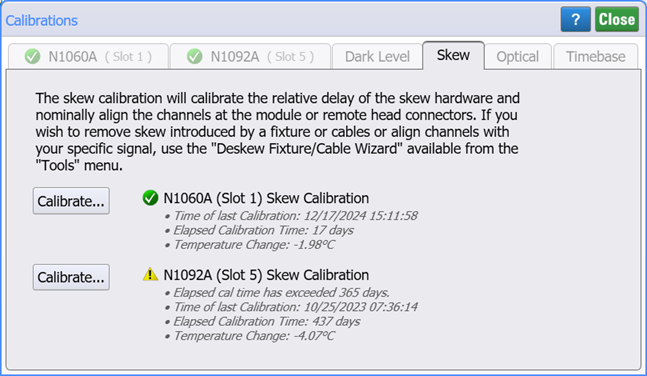
Skew Calibration
Use the Skew tab of the Calibration dialog to remove any difference in the electrical lengths between a module's two remote sampling head cables. Click Tools > Calibrations to open this dialog.
The Skew tab is only shown if an N1000-series plug-in modules (for example, N1060A or N1045A) and a DCA-M module (for example, N1094A/B).
| Icon | Description |
|---|---|
|
|
Calibration is selected |
|
|
Calibration is unselected |
|
|
Calibrations are partially selected |
|
|
Calibration is current |
|
|
Calibration is recommended |
|
|
Calibration has never been performed |
To run the calibration
- Connect a 1.0 GHz sine wave to one of the input channels.
- Connect a synchronous trigger to the DCA-X's front-panel Trigger input. The amplitude of the signal must be between 200 mV (-10.0 dBm) and 710 mV (1.0 dBm).
- Click Calibrate to start the calibration and to display instructions for the first step.
During the calibration, always use same cables and connectors to connect the source to each of the module's channels.
Do not remove a module from the DCA-X during a calibration.
The input circuits can be damaged by electrostatic discharge (ESD). Therefore, avoid applying static discharges to the front-panel input connectors. Prior to connecting any coaxial cable to the connectors, momentarily short the center and outer conductors of the cable together. Avoid touching the front-panel input connectors without first touching the frame of the instrument. Be sure that the instrument is properly earth-grounded to prevent buildup of static charge. An anti-static mat and wristband are strongly recommended.
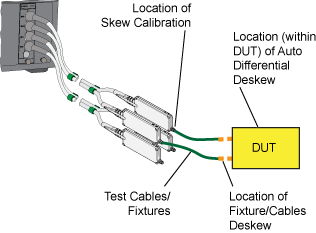
Other Types of Deskew
Other Types of Deskew are available that apply to N1000-series plug-in modules (for example, N1060A or N1045A) and DCA-M modules (for example, N1094A/B):
- Auto Deskew removes all skew between a differential pair of channels, regardless of the source of the skew. The skew could be introduced by fixtures, the device-unter-test, or the transmitter. Use this feature if you want to remove the skew and you are not interested in measuring the skew. Auto Deskew is located in the Advanced dialog of a Differential Electrical Channel dialog. To manually apply hardware skew to the individual channels, open an individual channel's Channel Setup dialog and click Advanced. You can also use Auto Deskew to apply simulated hardware skew to simulated channels.
- Deskew Fixture/Cables Wizard to deskew any number of channels using a guided procedure that applies the same signal to each input in multiple steps. Skew contributed by the fixture is removed from the measurement with any remaining skew due to the DUT and transmitter. It does not include any skew that is internal to the device-under-test. The skew is calibrated to the measurement reference plane. To run the wizard, click Tools > Deskew Fixture/Cable Wizard.
Location of the Different Types of Skew