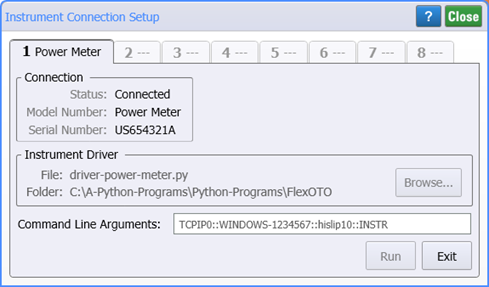
Instrument Connection Setup
Use the Instrument Connection Setup dialog to allow FlexOTO to use a generic instrument to perform measurements that are not available within FlexOTO. This requires that you first write an instrument driver. Using your driver, FlexOTO will be able to command the instrument to perform a measurement, return the results, and document the result along side with FlexOTO's measurements. You can create up to eight Instrument blocks in FlexOTO. Each Instrument block requires its own instrument driver.
To write a instrument driver, refer to how to write a instrument driver that is located in the FlexOTO Programmer's Help.
FlexOTO performs instrument measurements by remotely controlling the instrument. Instrument measurements cannot be performed using the FlexOTO's GUI.
Click Setup > Instrument Connection Setup to open this dialog.

To install your instrument driver:
- Browse to select your instrument driver file.
- In the Command Line Arguments field, enter the COM port or VISA address for the instrument.
- Click Run to install the driver.
- Drag the Instrument block to your Hardware Diagram.
Place Instrument blocks to the right side of the Switch block in the Hardware Diagram.
Dialog Buttons
Click Browse to load the name of the instrument driver file.
Click Run to connect (install) the currently selected instrument driver, populate the dialog with the Instrument's name and serial number, and list the driver in the User Instruments palette.
Click Exit to uninstall the currently selected Instrument driver and remove the driver from being listed in the User Instruments palette. If the Instrument Block is present on the Hardware Diagram, the block will be removed.
Click Close to close the dialog with the current dialog settings.
If you hold the shift key down while dragging the Instrument block to the Hardware Diagram,the block will automatically connect to the switch inputs.