You can save and recall files to and from an internal or external storage device in a variety of file formats.
About Instrument State and Calibration Data ( .csa, .cst, .sta, .cal)
About Measurement Data Files (.prn, .snp, .cti, .csv, .mdf)
How to Save Instrument State and Calibration Files |
|
Using Hardkey/SoftTab/Softkey |
|
|
Save State Softtab help |
|
Learn all about VNA Instrument State files. Save State - Immediately saves the VNA state, possibly calibration data and link to the selected filename by depends on the Save Type. The selected filename is automatically generate in the storage when you performed a save. Auto Save - Saves state, calibration data and link to the storage. Saves state and calibration data to the internal storage in the D: folder. A filename is generated automatically using the syntax "atxxx"; where xxx is a number that is increment by one when a new file is Auto Saved. The filename is depends on the Save Type to save it in ".sta", ".csa" or ".cst". Save State As... - Starts the Save As dialog box. (Not available on M948xA and E5080A.) Save Register - Immediately saves the specified register (Register 1 to 8) to the selected filename by depends on the Save Type. The selected filename is automatically generate in the storage when you performed a save on selected register. State - Save VNA state in .sta filename. State + Cal Data - Save VNA state and calibration data in .csa filename. State + Cal Link - Save VNA state and calibration link in .cst filename. |
|
Save Calset... & Save Screen... - Starts the Save As dialog box. Save Data... - Starts the Save Data As dialog box. Save User Preset... - Start the User Preset dialog box. |
|
Save Allows you to navigate to the directory where you want to save the file. File name Displays the filename that you either typed in or clicked on in the directory contents box. Note: Filenames (not including the path name) MUST be limited to 64 characters. Save as type The following file types save Instrument states and Calibration data. You can save, and later recall, instrument settings and calibration data for all channels currently in use on the analyzer. These file types are only recognized by Keysight VNA analyzers. Learn more about these file types.
Note: To save the screen as .bmp, .jpg, or .png graphics file types, click File / Print to File. Learn more. Save Saves the file to the specified file name and directory. |
How to Save Measurement Data |
|
Using Hardkey/SoftTab/Softkey |
|
|
Save Data As Saves the current trace(s) to the specified type of file. |
Note: Before saving measurement data, always trigger a single measurement, and then allow the channel to go into Hold. This ensures that the entire measurement trace is saved.
Note: Memory traces can only be saved in select file types (CTI, CSV, MDF) when the “Scope” data setting is set to “Displayed Traces”.
Save in Allows you to navigate to the directory where you want to save the file.
File name Displays the filename that you either typed in or clicked on in the directory contents box.
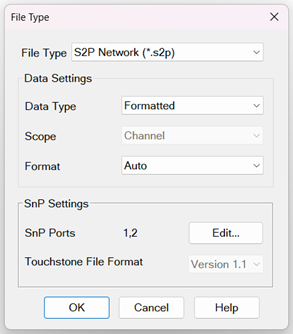
To select a file type and change data settings, press File Type… to launch the File Type dialog:
File Type Choose from: (click each to learn more about each file type): *.prn, *.SNP, *.SNPX. *.cti (citifile), *.csv, *.mdf.
FCA, GCA, Swept IMD, and Swept IMDx data can be saved to a special csv format. Learn how (FCA, GCA - Swept IMD)
S2P Noise Parameters (*.s2p) Trace and Noise Parameters (*.snp) - Save the noise figure parameters and S-parameters. Learn more.
To save the screen as .bmp, .jpg, or .png graphics file types, click File / Print / Print to File. Learn more.
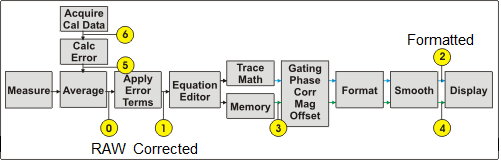
This selection refers to the data processing stage of the data flow diagram:
|
Description |
|
|
Corrected |
PRN, CSV, CTI, MDF Files: Saves data from Tap 1 after error correction and fixturing, if applicable. Does not include post-processing1 steps. SnP Network Files:
|
|
Formatted
|
PRN, CSV, CTI, MDF Files: If user has chosen to save Format="Auto" then the format of the first parameter saved to the file will be used as the format for all parameters. Saves data from Tap 2 (aka FDATA). Includes correction, fixturing, and post-processing1 steps, if applicable. SnP Network Files: Saves the S-parameters from the active channel in this order:
Unlike Revision 2023, this data type selection applies post-processing (e.g. gating) on a per-trace basis. For example, if gating is enabled for S11 but not for the other S-parameters, the saved file will only include gating for S11. |
|
Revision 2023 (for SnP only) |
This reproduces legacy operation from code shipping in 2023 for customers requiring backwards compatibility. Retains legacy gating issue2. To circumvent this issue, make sure all S-parameters to be saved are displayed or use Data Type=”Formatted” instead. Saves data from Tap 2.
Parameter Save Order for the channel:
|
Post-processing: Includes equation editor, trace math, gating, phase correction, magnitude offset, and smoothing. Smoothing is not included when saving with Format="Real/Imaginary". Traces with equation editor and/or trace math are considered "non-S-Parameters" and are ignored when saving SnP files.
Legacy gating issue: When saving SnP files with correction enabled and with gated S-Parameters, but not all S-Parameters are displayed on the channel, the gating applied to the saved S-Parameters may be unpredictable.
|
Scope |
Description |
|
Auto |
|
|
Single Trace |
Saves the active trace. |
|
Displayed Traces |
Saves all displayed traces for all channels. |
|
Channel |
Saves all displayed traces for current active channel. |
|
Format |
Description |
|
Auto |
Data is saved in LogMag/Angle (dB/deg) or LinMag/Angle (unit/deg) if one of these LogMag or LinMag is the current displayed format, respectively. If format is other than these, then data is saved in Real/Imag. If the save involves multiple traces, then the format of the first saved trace will be used as the format for all other traces regardless of their displayed format. |
|
LogMag/Angle (dB/deg) LinMag/Angle (unit/deg) |
The phase portion for all LogMag and LinMag data is saved in degrees (dB/deg).
|
|
Real/Imaginary |
Real/Imaginary data is never smoothed. |
|
Displayed Format |
Data is saved in the format of the displayed trace. Saved data can be a single-valued or dual-valued response depending on the displayed format. |
Note: The user may independently select the format of the data saved, so the data may not match the format of the displayed trace.
How to Recall (open) a file |
|
|
Using Hardkey/SoftTab/Softkey |
Using a mouse |
|
|
|
Save Recall > Recall Softtab Help |
|
Recall State - Recall the specified filename. Recall State - Select from a list of files shown on softkeys. The list can be sorted by 'most recently used' or alphabetically depending on a preference. The preference setting appears at the bottom of the second page of softkeys listing files to be recalled or on the Preference dialog. Recall State... - Starts the Recall dialog box. Recall Register - Recall the register (Register 1 to 8) which is saved in the D:\ drive (Only the saved register will enable to recall). Recall Calset... - Starts the Recall dialog box. Recall Data... - Starts the Recall dialog box. Recall Order - A list of files for recall can arrange according to NAME or RECENT files. |
|
Look in Allows you to select the directory that contains the file that you want to recall. Filename Displays the filename that you either typed in or clicked on in the directory contents box. Files of type Allows you view and select files that are listed in categories of a file type. The following types of files can be recalled into the analyzer: All State files, Citi files, SNP files. Recalling instrument state filesWhen an Instrument State file is recalled, the current state of the instrument is overwritten with the recalled state. A *.cal file does not contain an instrument state, but only calibration data. Learn more about Instrument States. See also Power ON and OFF during Save / Recall, User Preset, and Preset. Recalling Data filesCiti files and SNP files can be recalled and viewed in the analyzer.
Note: Citi files that were saved in CW Time sweep can NOT be recalled into the VNA. Note: Filenames (not including the path name) that are longer than 64 characters will NOT be recalled. Recalled data is ALWAYS displayed using LogMag format, regardless of how the file was stored. The channel is placed in Trigger Hold. If triggering is resumed, the data will be overwritten. SNP files are recalled as traces into a single window and channel, beginning at the highest available channel number allowed on the analyzer. For multi-port SNP files (greater than 4 ports), if the number of S parameters in the file is beyond the maximum number of traces in a window, then new windows will be created. When SNP files are recalled, an idealized N-port correction is applied to ensure basic operations on the data behave as expected. An ideal Cal Set is essentially a "dummy" Cal Set, where all correction coefficients are set to 1 or 0. It’s particularly useful for debugging or for quickly testing automation software prototypes and allows features such as the fixture simulator to function properly. Note that this correction is only applied on recall of single-ended SNP files, not the recall of balanced SNP files. Citi files are recalled into the same window and channel configuration as when they were saved. However, the new recalled channel numbers begin with the highest channel number allowed on the analyzer and decrement for each additional channel. For example, when a citi file is saved, two traces are in window 1, channel 1 and two additional traces are in window 2, channel 2. When recalled into a factory preset condition (1 trace in window 1, channel 1), the first two recalled traces appear in window 2, highest channel number, and the second two traces appear in window 3, (highest channel number -1). See also Traces, Channels, and Windows. Recall Recalls the file displayed in the file name box. |
Instrument State / Calibration Files
You can save, and later recall, instrument settings and calibration data for all channels currently in use on the analyzer.
An Instrument State contains almost every analyzer setting. The following settings are NOT saved and recalled with Instrument State:
GPIB address
RF power ON/OFF (depends on current setting)
The following file types are used to save and recall instrument states and Cal Set information:
|
Information that is stored for each channel |
|
.csa |
.cst |
|
.sta |
|
Instrument State Information |
|
|---|---|---|---|---|---|---|
|
|
|
Channels/Traces |
Averaging |
|||
|
|
|
Windows |
Markers |
|||
|
|
|
Triggering |
Math/memory |
|||
|
|
|
Format |
Limits |
|||
|
|
|
Scale |
More... |
|||
|
|
|
Stimulus Information: |
||||
|
|
|
Frequency range |
Alternate sweep |
|||
|
|
|
Number of points |
Port powers |
|||
|
|
|
IF bandwidth |
Source attenuators |
|||
|
|
|
Sweep type |
Receiver attenuators |
|||
|
|
|
Sweep mode |
Test Set port map |
|||
|
.cal |
|
|
Cal Set Information |
|||
|
|
|
GUID (Globally Unique Identifier) |
||||
|
|
|
|
Name, Description, Modify date |
|||
|
|
|
|
Stimulus Information: |
|||
|
|
|
|
Frequency range |
Alternate sweep |
||
|
|
|
|
Number of points |
Port powers |
||
|
|
|
|
IF bandwidth |
Source attenuators |
||
|
|
|
|
Sweep type |
Receiver attenuators |
||
|
|
|
|
Sweep mode |
Test Set port map |
||
|
|
|
|
Error Terms: Directivity, Crosstalk, Source match, Load match, Reflection tracking, Transmission tracking |
|||
The following describes each file type, and what occurs when the file type is recalled.
Instrument states can have the following suffixes: .sta, .cst, and .csa.
Common to all of the instrument state files is the state of the instrument including the quantity and content of channels, traces, windows, markers, limit lines, etc.
What is different about the instrument state files is the way they handle the calset - a calset is the set of data that results from having executed a calibration on a channel.
There is no compatibility among the VNA family products. For example, ENA cannot recall the state file which is saved by PNA and PXI/USB VNAs.
PXI/USB VNA models compatibility are shown below
Files between M980xA and P50xxA are compatible.
Files between M937xA and P937xA are compatible.
Files between M937xA and P937x/38B are NOT compatible.
M937xA/P937xA cannot recall the state file which is saved by M980xA/P50xxA
P50xxB can recall the state file which is saved by P50xxA/M980xA.
Basically, P50xxA can recall the state file which is saved by P50xxB but it is not guaranteed.
The analyzers cannot recall file saved by that with the smaller number of port. For example, 2 port VNAs cannot recall the files saved by 4 port VNAs.
When the installed option is different, recalling the file may fail.
Files that are saved with later firmware revisions may not be recalled by prior firmware revisions.
*.sta files
Contain ONLY instrument state information - NOT Cal data.
When recalled, they always replace the current instrument state immediately.
This instrument state file is saved without any calset data. You might choose to use this type of save file if you are concerned about disk space or specifically do not want to store calibration data that tends to have a shelf life. That is, calibrations become less accurate as cables move and temperature changes. Perhaps you want to force a new calibration when the instrument state is used.
*.cst files
Contain BOTH instrument state and a LINK to the Cal Sets. Learn more about Cal Sets.
The quickest and most flexible method of saving and recalling a calibrated instrument state.
Channels need not have cal data to save as .cst file.
When recalled, the state information is loaded first. Then the analyzer attempts to apply a Cal Set as you would do manually. If the stimulus settings are different between the instrument state and the linked Cal Set, the usual choice is presented (see Cal Sets). If the linked Cal Set has been deleted, a message is displayed, but the state information remains in place.
Because only a link to the Cal Set is saved, the Cal Set can be shared with other measurements.
If you perform a calibration and save the result to a calset called “MyCalSet”, then save a .cst file (for example, MyState.cst), then that file will have a reference to the name of the calset (“MyCalSet”).
If you redo the calibration and store the data again in MyCalset, then the next time you recall MyState.cst, your instrument state will use the new calibration data.
If you subsequently delete MyCalset, and then recall the MyState.cst, the resulting instrument state will not be calibrated as the calset no longer exists.
Note: Before saving a .cst file, be sure that a User Cal Set (NOT a Cal Register) is being used for the calibration. Cal Registers are overwritten with new data whenever a calibration is performed, and may not be accurate cal data when the .cst file is recalled. Learn more about Cal Sets.
*.cal files
Contain ONLY Cal Set information.
When recalled, the Cal Set is NOT automatically applied. Apply the calibration data to a channel as you would apply any Cal Set.
*.csa files
Contain ALL instrument state and the actual Cal Set; not a link to the Cal Set.
The safest method of saving and recalling a calibrated instrument state. However, the file size is larger than a *cst file, and the save and recall times are longer.
Channels need not be calibrated to save as .cst file.
The Cal Set that is saved could be a Cal Register or a User Cal Set.
A .csa file is an instrument state and a collection of calset data. Every channel that has an active calibration (that is, has a calset selected and applied to the channel) stores its calibration data into the .csa file. For example, let's say you have a calset called “mycalset” and you are using that calset on channel 1. You save a .csa file called MyState. If you then perform another calibration and save that calibration to “mycalset”, the data in “mycalset” will not be the same as the calibration data in the MyState file. Consequently, when you recall MyState the old calset called “mycalset” will overwrite the new calset “mycalset”. When this is about to occur, you are given a warning. If this is a problem for you, you might prefer to use a .cst file.
Note: *.pcs files are the internal file format used for storing cal sets. These files should never be accessed or copied by the user.
Measurement data is saved as ASCII file types for use in a spreadsheet or CAE programs.
Note: Before saving measurement data, always trigger a single measurement, and then allow the channel to go into Hold. This ensures that the entire measurement trace is saved.
Note: Memory traces can only be saved in select file types (CTI, CSV, MDF) when the “Scope” data setting is set to “Displayed Traces”.
The following file types can be saved by the analyzer:
Prn files have the following attributes:
Comma-separated data which can be read into rows and columns by spreadsheet software, such as Microsoft Excel. To avoid the "delimiting" dialog boxes, change the filename extension from .prn to .csv. Then open directly into Microsoft Excel.
Contain formatted and corrected stimulus and response data for the current active trace ONLY.
Are Output only - they cannot be read by the analyzer.
Does not save memory traces.
Cal Set Viewer data can be saved to *.prn files
How to Save PRN Trace Data (*.prn) |
|
Using Hardkey/SoftTab/Softkey |
|
Example:
|
"S11 Log Mag" |
|
|
"Frequency (Hz)", |
"dB" |
|
3.000000e+005 , |
-3.528682e+001 , |
|
4.529850e+007 , |
-2.817913e+001 , |
|
9.029700e+007 , |
-3.216808e+001 , |
|
1.352955e+008 , |
-3.101017e+001 , |
How to Save .SNP Format (*.s1p, *.s2p, *.s3p. *.s4p) |
|
Using Hardkey/SoftTab/Softkey |
|
.SNP Format (*.s1p, *.s2p, *.s3p. *.s4p, and so forth)
*.SNP file format, also known as Touchstone format, is specified by IBIS. See the Touchstone specification. The VNA supports Version 1.0 of the Touchstone format.
*.SNP file format is used by CAE programs such as Keysight's Microwave Design System (MDS) and Advanced Design System (ADS).
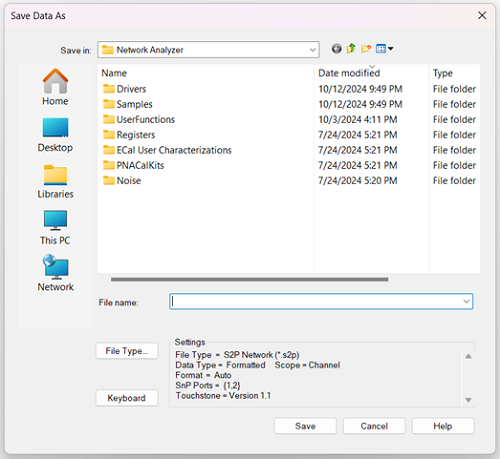
*.SNP data is saved using the File, Save Data As dialog.
Before saving measurement data, always trigger a single measurement, and then allow the channel to go into Hold. This ensures that the entire measurement trace is saved.
.SNP data can be recalled and viewed on the analyzer, or read by the embed/de-embed functions.
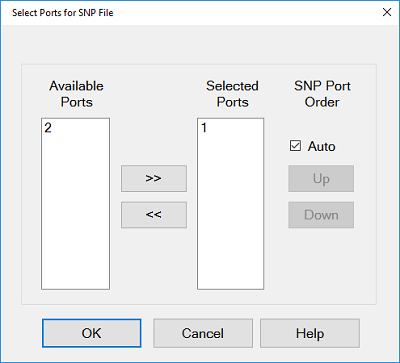
To save SNP data with an external test set enabled, at the File, "Save Data As" dialog, select SnP Network File(*.s*p), then complete the "Select Ports for SnP file" dialog.
When Fixturing is enabled, all of the enabled data transforms (De-embedding, Port Z Conversion, and so forth) are applied to saved SNP files.
When the Data Type = “Formatted” (Learn more about Data Types):
Segmented FCA data is saved to *.S2PX files. Scroll down or click here to learn more.
Learn about FCA parameters that are saved to an S2P file.
Noise Figure parameters and S-parameters can be saved to an *.s2p file. Learn more.
Balanced parameters can be saved to *.SNP files. See the "Select Ports for SnP file" dialog.
Z conversion SnP files still show S as format such as # Hz S dB R 50.
*.SNP data is generally used to gather all S-parameters for a fully corrected measurement.
The analyzer saves the data that is available on the channel of the active measurement.
|
File Type |
# of Ports |
# of S-parameters saved |
|
*.s1p |
1 |
1 S-parameter |
|
*.s2p |
2 |
4 S-parameters |
|
*.s3p |
3 |
9 S-parameters |
|
*.s4p |
4 |
16 S-parameters |
|
... |
... |
... |
|
*.SNP |
N |
N^2 S-parameters |
If correction for a Full N-port cal is applied, then valid data is returned for all corrected s-parameters. Response cals will save uncorrected data.
If correction is NOT applied, the analyzer returns as much applicable raw data as possible using S-parameter measurements on the selected channel. Data that is not available is zero-filled. For example, if correction is NOT applied and the active measurement is S11, and an S21 measurement also exists on the channel, then data is returned for the S11 and S21 measurements. Data for S12 and S22 is not available and therefore returned as zeros in Real/Imaginary format. In Log Mag/Phase format, this appears as -200 dB and 45 degrees. See “Data Type” in Save Data As dialog help.
.SNP files contain header information, stimulus data, a response data pair for EACH S-parameter measurement. The only difference between .s1p, s2p, and so forth, is the number of S-parameters that are saved.
The following is a sample of Header information:
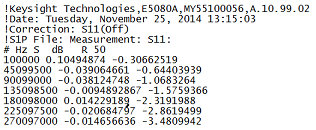
!Keysight Technologies,E8362B,US42340026,Q.03.54
!Keysight E8362B: Q.03.54
!Date: Friday, April 25, 2003 13:46:41
!Correction: S11(Full 2 Port SOLT,1,2) S21(Full 2 Port SOLT,1,2) S12(Full 2 Port SOLT,1,2) S22(Full 2 Port SOLT,1,2)
!S2P File: Measurements:S11,S21,S12,S22:
# Hz S RI R 50
Note: Although the following shows Real / Imag pairs, the format could also be LogMag / Phase or LinMag / Phase
Each record contains 1 stimulus value and 1 S-parameter (total of 3 values)
Stim Real (Sxx) Imag(Sxx)
Example:
Each record contains 1 stimulus value and 4 S-parameters (total of 9 values)
Stim Real (S11) Imag(S11) Real(S21) Imag(S21) Real(S12) Imag(S12) Real(S22) Imag(S22)
Example:
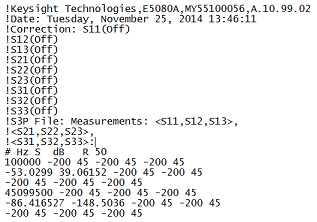
Each record contains 1 stimulus value and 9 S-parameters (total of 19 values)
Stim Real (S11) Imag(S11) Real(S12) Imag(S12) Real(S13) Imag(S13)
Real (S21) Imag(S21) Real(S22) Imag(S22) Real(S23) Imag(S23)
Real (S31) Imag(S31) Real(S32) Imag(S32) Real(S33) Imag(S33)
Example:
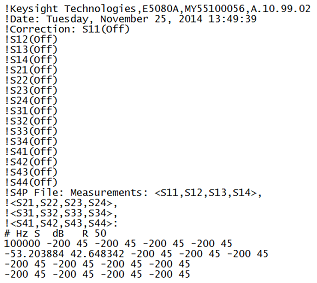
Each record contains 1 stimulus value and 16 S-parameters (total of 33 values)
Stim Real (S11) Imag(S11) Real(S12) Imag(S12) Real(S13) Imag(S13) Real(S14) Imag(S14)
Real (S21) Imag(S21) Real(S22) Imag(S22) Real(S23) Imag(S23) Real(S24) Imag(S24)
Real (S31) Imag(S31) Real(S32) Imag(S32) Real(S33) Imag(S33) Real(S34) Imag(S34)
Real (S41) Imag(S41) Real(S42) Imag(S42) Real(S43) Imag(S43) Real(S44) Imag(S44)
Example:
*.S2PX files are used for Segmented Mixer Data. Learn more.
The following ADDITIONAL columns precede parameter data:
SegIndex,InputFreq,OutputFreq,LO1Freq,InputPower,LO1Power, <parameter data>
|
|
Citifile format is compatible with the Keysight 8510 Network Analyzer and Keysight's Microwave Design System (MDS).
You can do the following using citifiles :
save the active trace, or all traces.
How to Save Citifile Trace (*.cti) |
|
Using Hardkey/SoftTab/Softkey |
|
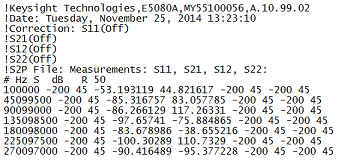
*.cti files contain:
Header information
Stimulus data
Data pairs for EACH S-parameter measurement
|
|
|
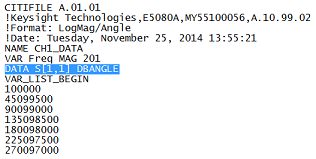
The above image is a Citifile opened in Notepad. There are two traces in separate channels - one is an FCA trace. Each trace has 3 data points. The save settings = Displayed Traces Content, and Auto Format. Format is identified by DBANGLE (log mag), MAGANGLE (Lin Mag), or RI (real, imaginary - NOT shown)
|
CSV files are read by spreadsheet programs such as Microsoft Excel.
How to Save CSV Trace (*.csv) |
|
Using Hardkey/SoftTab/Softkey |
|
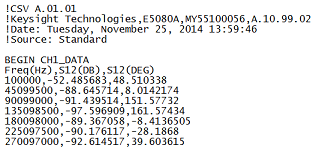
*.csv files contain: header information and the following Comma-Separated Values.
Stimulus data
Data pairs for EACH S-parameter
MDIF files are compatible with Keysight ADS (Advanced Design System). Learn more at the Keysight website.
How to Save MDIF Trace (*.mdif) |
|
Using Hardkey/SoftTab/Softkey |
|
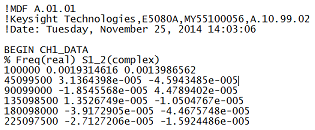
*.mdf files contain: header information and space-separated data:
Stimulus data
Real and Imaginary data pair for EACH S-parameter measurement
|
The Manage Files dialog box is designed to be used from the front panel. It performs the same function as Windows Explorer, but can be used without the use of a mouse or keyboard.
|