Lesson 3. Creating a Butterworth User Operator Script
This Python example creates a Butterworth user operator in the FlexDCA / Python environment. Although not required, it is a good practive to give the XML file and script files the same or similar base filename, but using different filename extensions of course! As the number of your measurements grow, you'll appreciate being able to quckly associate the different XML and script files at a glance.
Color has been added to the following example lines of the XML and script code to make them easier to read.
Procedure
- Complete Lesson 1, if you have not already done so.
- Place FlexDCA into Eye/Mask mode and display an eye diagram.
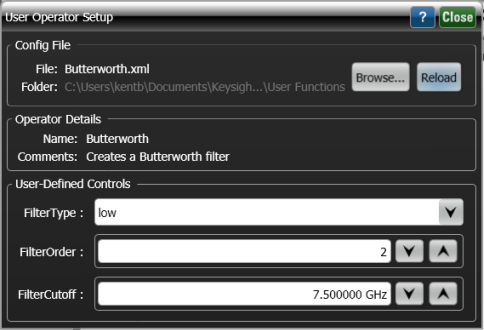
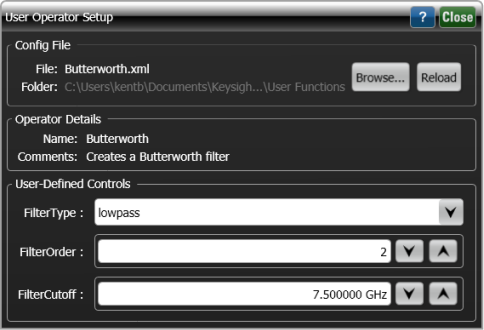
- Copy the following XML listing into a text editor. Save the XML file as Butterworth.xml in FlexDCA's user functions folder (\Documents\Keysight\FlexDCA\User Functions). Later, when this XML file is imported into the User Operator Setup dialog, it identifies the Butterworth.py script, populates the dialog, and creates the user operator as shown in these figures. Notice that the XML file defines three user-defined controls that are shown in the dialog. You can make selections from these controls while your user operator is running.
- <?xml version="1.0" encoding="utf-8"?>
- <Function xmlns:xsd="http://www.w3.org/2001/XMLSchema"
- xmlns:xsi="http://www.w3.org/2001/XMLSchema-instance">
- <Name>Butterworth</Name>
- <Abbreviation>Butter</Abbreviation>
- <Comments>Creates a Butterworth filter</Comments>
- <Script>Butterworth.py</Script>
- <FunctionType>1 Source</FunctionType>
- <Control Name = "FilterType">
- <Enumeration>
- <Default>lowpass</Default>
- <Selection>lowpass</Selection>
- <Selection>highpass</Selection>
- </Enumeration>
- </Control>
- <Control Name = "FilterOrder">
- <Integer>
- <Min>1</Min>
- <Max>4</Max>
- <Units>None</Units>
- <Default>2</Default>
- </Integer>
- </Control>
- <Control Name = "FilterCutoff">
- <Double>
- <Min>10e6</Min>
- <Max>1000e9</Max>
- <Resolution>1000</Resolution>
- <Units>Hertz</Units>
- <Default>7.5e9</Default>
- </Double>
- </Control>
- </Function>
- Copy the following script into Anaconda's Python editor, Spyder. Save the script as Butterworth.py in FlexDCA's user operator folder (\Documents\Keysight\FlexDCA\User Functions). Color in the following script identifies:
- output variables that are initialized.
- Input variables that are assigned to local function variables.
- User-defined control variables that are assigned to local function variables.
- Filtered output waveform that is created.
- On FlexDCA's menu, click Measure > Waveform Signal Processing (Math).
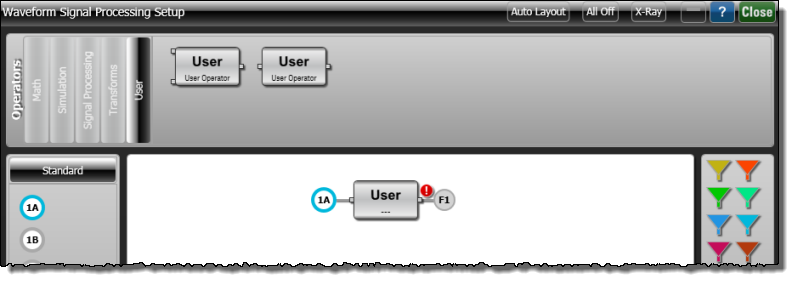
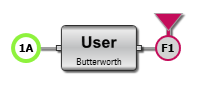
- At the top of the Waveform Signal Processing dialog, select the User tab and drag a single-input User operator icon into the operator construction area as shown in the following picture.
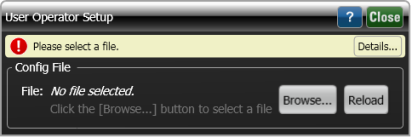
- Click on the user operator to open the User Operator Setup dialog.
- In the dialog, click Browse and select your XML configuration file, Butterworth.xml.
- In the Waveform Signal Processing dialog, drag a Function Color to the User Operator as shown in the following picture.
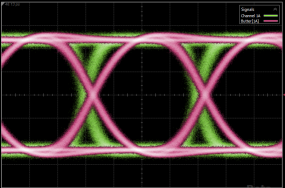
- Click Autoscale and the input and output waveforms should be displayed.
|
|
|
The algorithm function name must be written in title case. Naming the function Algorithm.m or ALGORITHM, for example, will break the script.
import math # Import Python's standard math library. import numpy as np from scipy.fftpack import fft, ifft from scipy.signal import butter, freqz, lfilter # Argument "variables" is a dictionary from# FlexDCA that maps from variable name to value. def algorithm(variables): # Initialize the nine variables that are returned to FlexDCA.FiltData = [] XOrg = 0.0 XInc = 0.0 Gain = 1.0 FilterWidth = 0.0 FilterDelay = 0.0 XUnits = 'Same' YUnits = 'Same' ErrorMsg = '' # Gather system info from variables input dictionary SrcData = variables['SrcData'] # input waveform XOrg = variables['XOrg'] XInc = variables['XInc'] IsPeriodic = variables['IsPeriodic'] # Gather custom controls from variables input dictionary N = variables['FilterOrder'] # filter order Fc = variables['FilterCutoff'] # filter cutoff frequency FType = variables['FilterType'] # filter type FilterDelay = N * 0.112 / Fc FilterWidth = N / Fc # create filter Wn = 2 * XInc * Fc # calculate passband (-3 dB point) b, a = butter(N, Wn, FType) # design Butterworth filter num_points = len(SrcData) if num_points > 0: if IsPeriodic: # Perform filtering circularly using FFTs fft_src_data = fft(SrcData) _unused, H = freqz(b, a, num_points, True) FiltData = ifft(fft_src_data * H).real # Rotate to remove FilterDelay. shift = int(round(FilterDelay / XInc)) FiltData = np.roll(FiltData, -shift) else: # not periodic start_index = int(math.ceil(FilterWidth / XInc)) if start_index >= num_points: ErrorMsg = 'Too few points. Pipeline eats up entire waveform.' else: # Perform filteringFiltData = lfilter(b, a, SrcData) # Remove filter delay and pipelineFiltData = FiltData[start_index:] leading_pipeline = FilterWidth - FilterDelay XOrg = XOrg + leading_pipeline # Return dictionary of results to FlexDCA return { "FiltData" : FiltData, Output waveform "XOrg" : XOrg, # X-axis origin "XInc" : XInc, # X-axis data spacing "Gain" : Gain, # Gain "FilterWidth" : FilterWidth, # Width of the filter "FilterDelay" : FilterDelay, # Delay of the filter "XUnits" : XUnits, # x-axis units "YUnits" : YUnits, # y-axis units "ErrorMsg" : ErrorMsg# Error message string } |