Advanced Eye Toolbar
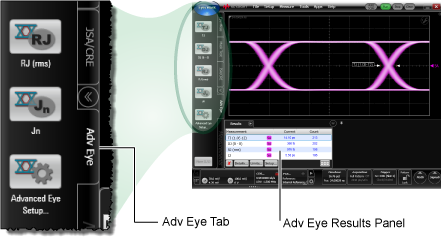
Eye Mode's Advanced Eye measurements provide the ability to make the jitter and interference measurements which are selected on the Adv Eye toolbar shown in the following figure.

Since these measurements are made on an eye diagram, the pattern itself can be of any type or length, such as PRBS31. When performing a jitter measurement, you can specify a fixed value of RJ to use during jitter decomposition. The selected fixed RJ is applied to all advanced-eye jitter measurements: TJ, DJ, RJ, and Jn. When performing a interference measurement, you can specify a fixed value of RN to use during noise decomposition. The selected fixed RN is applied to all advanced-eye noise measurements: TI, DI, and RN.
The Advanced Eye toolbar includes a link to the Advanced Eye Setup dialog and the Add Eye Contour setup.
All Advanced Eye measurements are compatible with both NRZ and PAM4 waveforms.
Advanced Eye Analysis provides the ability to:
- Measure DJ (Deterministic Jitter).
- Measure RJ (Random Jitter).
- Measure TJ (Total Jitter).
- Measure DI (Deterministic Interference).
- Measure RN (Random Noise).
- Measure TI (Total Interference).
- Measure TJ, DJ and RJ on patterns longer than PRBS16, such as PRBS31.
- Perform mask testing based on BER eye contours.
The Advanced Eye Analysis is included in the RND Package license.
Advanced Eye (Adv Eye) Toolbar
Eye Contour Lines
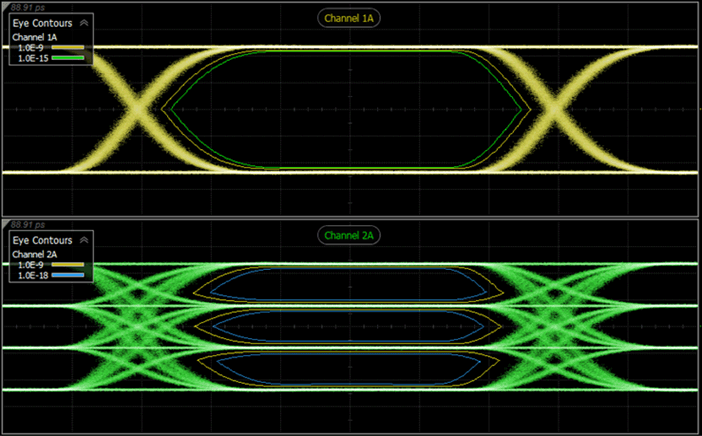
Advanced Eye includes the ability to draw eye contour lines on NRZ and PAM4 eye diagrams as shown in the picture below. Eye contours provide additional insights into the quality of an eye diagram. Contour lines are scaled to BER. They mark the border within an eye where a specific fixed Symbol Error Ratio (BER) occurs. The following picture shows two contour lines on Channel 1A. One line marks the 1.0 x 10⁻⁹ border and one line marks the 1.0 x 10⁻¹⁵ border. On Channel 2A, contour lines are placed on all three eyes of the PAM4 waveform. With eye contours, you can create the following items:
- Up to 16 groups of lines placed on any displayed eye diagram.
- Each group can contain up to eight individual contour lines.
- Multiple eye contour groups can be placed on the same eye.
- When applied to a PAM4 waveform, the group's lines are displayed within each of the three eye openings.
- An Eye Contours legend is displayed next to the waveform and identifies each contour line.

To create a group of eye contour lines
- Click the Add Eye Contour button on the Adv Eye tab to open the Eye Contour Group Setup dialog. Or, click Measure > Eye/Mask > Adv Eye > Add Eye Contour.
- Select the source waveform and contour lines and then close the dialog.
To edit an existing eye contour group or to move it to a different waveform
- Click on the group in the Eye Contour table to select the group.
- Click Setup, which is located beneath the table to open the Eye Contour Group Setup dialog. The dialog is populated with the current settings of the selected group. Make any needed changes, including source waveform, and close the dialog.
To Use a Fixed RJ or Fixed RN Value
Advanced eye leverages the N1000A's ability to measure ultra-low levels of Random Jitter (RJ). This can be used to obtain fixed RJ values. The following steps fix RJ or RN to a value measured using a short pattern, which reduces the time required to make Advanced Eye measurements.
- Configure your test setup for the measurement. Select a pattern that is shorter than the pattern which will be used for the jitter or noise measurements.
- Place the N1000A in Jitter Mode and measure the RJ or RN.
- Place the N1000A in Eye/Mask Mode.
- Configure the pattern that will be used for making the measurements.
- In the Eye Mode's Adv Eye tab, click desired measurement button. For DJ (rms), TJ, RJ, or JN measurements, enter the fixed RJ that you made in step 2 above. For DI, TI, and RN measurements, enter the fixed RN.
- The measurement results are displayed in the measurement table.
You could also measure the RJ using a spectrum analyzer or some other method.
If you want to use a different RJ value for each waveform, separately measure each waveform or use the Advanced Eye Analysis application described in the next section.
Advanced Eye measurements requires FlexDCA revision A.02.50 and above.


