Pattern Lock Setup Tab
Pattern Lock Setup
The Pattern Lock Setup tab of the Trigger dialog settings allows you to manually configure pattern triggering. N1000A-PLK and N109x-series DCA-M PLK instruments can internally generate a pattern trigger off the supplied clock. When Pattern Lock is turned on, the instrument automatically detects symbol rate, pattern length, and trigger divide ratio and generates the pattern trigger. Pattern Lock is automatically turned on whenever Jitter Mode is entered and can be turned on in Eye/Mask and Oscilloscope Modes. To turn Pattern Lock on ![]() and off
and off ![]() , click the Pattern Lock button that is shown along the bottom of the application or on dialog's General Trigger Setup tab. To automatically and immediately detect symbol rate, pattern length, and trigger divide ratio, click Autodetect Parameters Now, which is located on the General Trigger Setup tab.
, click the Pattern Lock button that is shown along the bottom of the application or on dialog's General Trigger Setup tab. To automatically and immediately detect symbol rate, pattern length, and trigger divide ratio, click Autodetect Parameters Now, which is located on the General Trigger Setup tab.
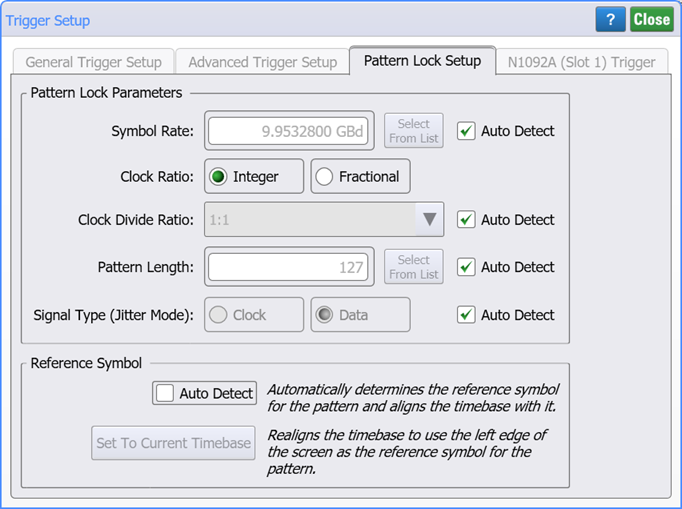
Symbol Rate
Select Auto Detect to have the symbol rate automatically detected whenever Autodetect Parameters Now (General Trigger Setup tab) is clicked or an Auto Scale is performed (in Jitter mode or Pattern Lock turned on). To manually enter the symbol rate, clear the Auto Detect, and enter the symbol rate, which can be any rate between 50 MHz and 160 GBd. For rates greater than 23.2 GBd, you must provide a divided trigger. Click Select From List to select standard optical and digital telecommunications rates. The same symbol rate list appears in Jitter, Eye/Mask, and Oscilloscope Modes and in the Timebase Setup dialog when Units is set to Unit Interval (UI).
| Minimum Value | Maximum Value | |
|---|---|---|
| Symbol Rate | 50 MBd | 160 GBd |
| Pattern Length | 1 symbol | 2 23 symbols |
| Pattern Length (in Jitter Mode) | 1 symbol | 2 16 symbols |
Clock Ratio
The Clock Ratio allows you to specify for pattern lock either an:
- Integer sub rate of the symbol rate, or
- Fractional sub rate of the symbol rate.
When a Fractional Clock Ratio is entered, the resulting Clock Divide Ratio is listed on the dialog but cannot be edited. While using a Fractional Clock Ratio, pattern parameters cannot be autodetected. To ensure a valid waveform acquisition, the symbol rate, clock frequency, and pattern length settings must be properly related, and this criteria is met when using an Arbitrary Waveform Generator (AWG) as the source. For example, an M8199A AWG. The AWG properly relates the symbol rate, clock frequency, and pattern length, because the AWG generates both the clock, and signal using the same sample rate.
If a standard signal generator is used
When using a Fractional Clock Ratio, if you use a signal generator other than an AWG, you must ensure a relationship between pattern length, symbol rate, and clock rate that results in a valid waveform acquisition. For pattern length (N), symbol rate (Fs), and clock rate (Fc):
N periods of Fs = integer number of Fc periods
To calculate valid pattern lengths for a given Fs and Fc, turn the value Fs/Fc into a rational number, and the numerator is the pattern length. Integer multiples of this pattern length will also be valid. For example, you can perform this using MATLAB's rational fraction approximation function (rat) as shown here. This example uses an Fs of 75.6 GBd and an Fc of 1 GHz. This results in a pattern length of 378. Multiples values of 756, 1134, and more would also be valid.
MATLAB Solution (75.6 GBd symbol rate and 1 GHz clock rate)
[patternlength,denominator] = rat(75.6e9 / 1e9)
patternlength =
    378
denominator =
    5
Python Solution (75.6 GBd symbol rate and 1 GHz clock rate)
from fractions import Fraction
symbolrate = '75.6e9'
clockrate = '1e9'

n = float(symbolrate) / float(clockrate)
result = Fraction(n).limit_denominator()
patternlength = result.numerator
print('\nFor a {} symbol rate and {} clock rate,'.format(symbolrate, clockrate))
pt1 = patternlength
pt2 = patternlength * 2
pt3 = patternlength * 3
print('Valid pattern lengths: {}, {}, {} ...\n'.format(pt1, pt2, pt3))
The Fractional setting is supported by N1000A DCA-X and DCA-M modules with regular pattern lock (not Rapid Eye or FlexEye). Fractional clock ratios require either a Manufacturing (N1010200A) or Research and Development (N1010100A) package licenses.
Clock Divide Ratio
Select Auto Detect check box to have the trigger divide ratio automatically detected whenever Autodetect Parameters Now (General Trigger Setup tab) is clicked or an Auto Scale is performed (in Jitter mode or Pattern Lock turned on). You can use the down arrow to select from several common clock divide ratios. In some situations, you may need to enter a trigger divide ratio for a trigger that is a divided rate from the symbol rate. For example, for rates greater then 23.2 GBd, you must provide a divided trigger.
Pattern Length
Select Auto Detect to have the pattern length automatically detected whenever Autodetect Parameters Now (General Trigger Setup tab) is clicked or an Auto Scale is performed (in Jitter mode or Pattern Lock turned on). To manually enter the pattern length, clear the Auto Detect, and enter the length of the test pattern in symbols, which can be any value between 1 and 223. In Jitter Mode, the maximum pattern length is 216.
Pattern Length Selections
Availability of individual patterns depends on installed modules and other conditions.
- 20 - 2˄7-1 PRBS
- 40 - PCIe Compliance
- 62 - PAM4 Clock
- 120 - FC RPAT
- 160 - PAM4 Linearity
- 384 - 802.3ae TWDP segment
- 640 - PCIe Idle
- 1280 - FDDI Jitter
- 2280 - CRPAT
- 2640 - CJPAT
- 3360 - CRPAT (2)
- 3760 - CJPAT (2)
- 3780 - XAUI CRPAT
- 3820 - XAUE CJPAT
- 5280 - GbE Test Frame
- 7641 - XAUI CJPAT
- 9000 - JTPAT
- 18944 - CEI Stress
- 20480 - SPAT
- 20840 - CSPAT
- 21760 - CJTPAT
- 30240 - XAUI CRPAT
- 32762 - CEI SSPR
- 33792 - 10GbE
- 65535 - SSPRQ
- 90000 - FDDI Wander
- 92160 - SATA
- 311040 - SONET CID
- 127 - 2˄7-1 PRBS
- 128 - 2˄7 PRBS
- 511 - 2˄9-1 PRBS
- 512 - 2˄9 PRBS
- 1023 - 2˄10-1 PRBS
- 1024 - 2˄10 PRBS
- 2047 - 2˄11-1 PRBS
- 2048 - 2˄11 PRBS
- 8191 - 2˄13-1 PRBS
- 8192 - 2˄13 PRBS
- 32767 - 2˄15-1 PRBS
- 32768 - 2˄15 PRBS
- 65535 - 2˄16-1 PRBS
- 65536 - 2˄16 PRBS
- 1048575 - 2˄20-1 PRBS
- 1048576 - 2˄20 PRBS
- 8388607 - 2˄23-1 PRBS
- 8388608 - 2˄23 PRBS
Signal Type (Jitter Mode)
Specify the input signal type: Clock or Data. As a default, Auto Detect is selected, and the instrument automatically detects the signal type. The Signal Type setting can also be accessed on the Jitter Measurements tab of the Configure Jitter Mode Measurements dialog. If a poorly-defined signal can not be automatically detected, unselect the Auto Detect feature.
Reference Symbol
The ability to select the pattern reference symbol is provided by the Pattern Analysis feature (F-PAT) which is included in the R&D Package license. You may need to update your R&D package version.
The reference symbol settings set the pattern's reference symbol and aligns the timebase with the reference symbol.The reference symbol is set to the display's left edge. These settings are mutually exclusive.
Click Auto Detect to automatically determine the reference symbol to a consistent pattern location based on the longest run of symbols with a preference for lowest-level symbols. The timebase is aligned with the reference symbol.
Click Set To Current Timebase to realigns the timebase to use the left edge of the screen as the reference symbol for the pattern. Once you have used this setting, you cannot undo it and clicking Setup > Undo has no effect.
The Set To Current Timebase setting is only available in Scope mode.
To select the symbol, use one of the following two methods.
- Use the Find symbol sequence dialog. In FlexDCA's menu, click Tools > Find....
- Use the Pattern Navigation Display to select the symbol. To view the Pattern Navigation Display, expand the pattern bar that is shown above the display when pattern lock is enabled. The gray box highlights the symbol shown on the display. You can drag the gray box over the pattern to scroll the displayed symbols.