FlexDCA Connection Setup Dialog
Use this dialog to establish a connection from N1010A FlexDCA on a PC to FlexDCA on a DCA-X oscilloscope.
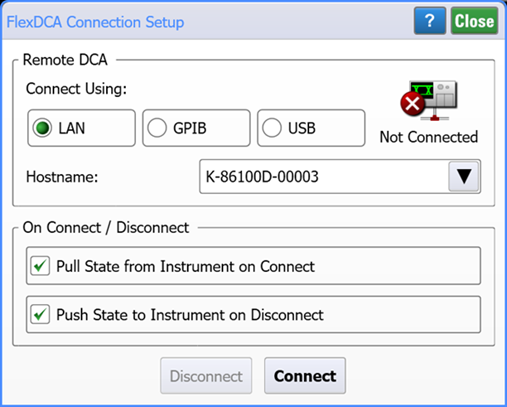
Click Setup > DCA Connection Setup to open the dialog.
Connect Using
Select a connection via the LAN, GPIB, or USB to the DCA-X. Most users prefer a LAN connection so this is the default setting. For GPIB, you can use a USB-to-GPIB adapter or install a GPIB card in the PC.
LAN
Hostname is the computer name of the DCA-X or its IP address. On the DCA-X, click Help > About and scoll down to the end of the list to locate the computer name.
GPIB
Enter the SICL Interface and GPIB Address for the DCA-X.
USB Device field (USB connection)
FlexDCA autodetects the DCA-X when the USB cable is connected. The identification string includes the DCA-X's serial number. Although the DCA-X displays Under Remote Control, control is reserved and you must click the dialog's Connect button to establish full control.
On Connect / Disconnect
Pull State from Instrument on Connect: When Connect is clicked, the instrument state of FlexDCA on the DCA-X is copied to N1010A FlexDCA on the PC.
Push State to Instrument on Disconnect: When Connect is clicked, the current state of N1010A FlexDCA on the PC is copied to the FlexDCA on the DCA-X.
Click Connect to make the connection. When the connection is made, the DCA-X's display and front-panel keys are locked and do not respond to user input. The connection status icon displayed in the menu bar shows the connection status.
| Icon | Description |
|---|---|
|
|
FlexDCA is not connected to DCA-X |
|
|
FlexDCA is connected to DCA-X |