Connecting Optical Switches
Connecting an optical switch using USB or RS232 is easy because FlexDCA automatically detects the switch as soon as the USB cable is connected to the PC port's USB connector. To ensure that the switch is detected by FlexDCA:
- Turn the switch's power on.
- Allow the switch to boot up.
- Connect the USB or RS232 cable to the PC or DCA-X.
Supports automatic detection via USB by FlexOTO.
Third-party optical switches are not provided by Keysight and must be purchased from their manufacturer. The N1002A, when purchased as part of a solution bundle includes an optical switch. If the N1002A is purchased separately, not in a solution bundle, the Keysight switch, if desired, must be separately purchased.
After connecting to a switch, if you are not going to use the FlexOTO application, refer to configure the switch paths for control from FlexDCA.
If you plan on using the FlexOTO application, it is recommended that you first connect the optical switch to FlexDCA using the information in this topic. Then, start FlexOTO from FlexDCA's menu (Apps > FlexOTO) and configure the switch with FlexOTO.
Extended Module Configuration Dialog
You can use the Extended Module Configuration dialog to make or view a connection to FlexDCA over LAN or if automatic detection is not working. To determine the LAN or USB address, use the Keysight I/O Library Suite which is installed on the PC or DCA-X. Downloaded the Keysight I/O Library Suite from keysight.com. Once installed, run Connection Expert from the Windows Start menu.
To connect over LAN
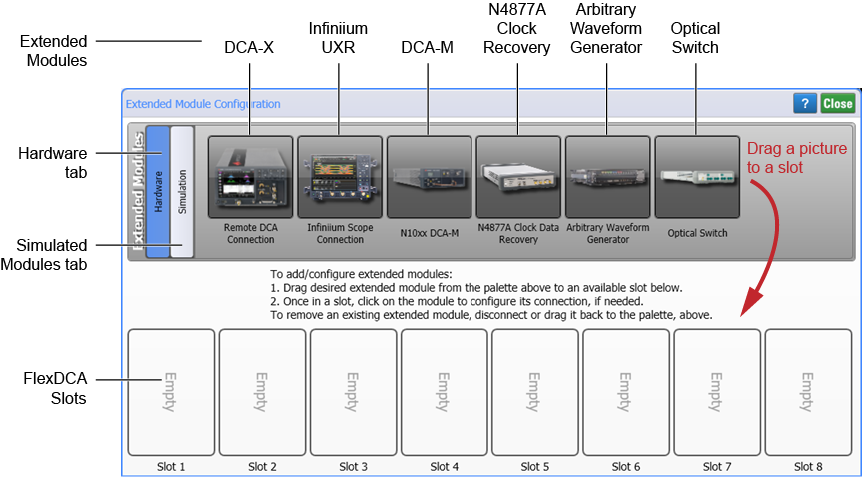
- In FlexDCA, click Setup > Configure Extended Modules. Or, click the
 icon that is displayed to the right of the channel buttons along the bottom of the display.
 - In the Extended Module Configuration dialog, click the Hardware tab.
- Drag a picture of the Optical Switch to an available Slot as shown in the following picture.
- Click on the switch's picture to open the Optical Switch Connection Setup dialog, enter the LAN address or hostname, and make the connection. If you don't know the LAN address or hostname, perform the following procedure, To discover the hostname or IP address for a LAN connection.
To discover the hostname or IP address for a LAN connection
- Use a LAN cable to connect the optical switch to the FlexDCA (on a PC) or to a DCA-X.
- On the Windows Start menu, start the Keysight Connection Expert application. In Connection Expert start a scan for the optical switch. After a few moments, the switch should be recognized.
- Click the Interactive IO button that is located at the top edge of Connection Expert's Details for Switch pane.
- In the Interactive IO, enter the SCPI command
:SYST:COMM:LAN:HOST?and click Send & Read. The Instrument Station History pane will show the hostname returned from the switch. - Close the Interactive IO window.
- Disconnect the USB cable from the switch, and connect the switch to the LAN.
- In Connection Expert, click the + Add button and select LAN Instrument.
- In the Add a LAN device dialog, click the Enter Address tab. In the Hostname or IP Address field, enter the switch's hostname (or IP address) that you previously recorded.
- Click Test This Visa Address. After a few moments, the address should be verified. Click OK to close the dialog.
- In Connection Expert's Details pane, copy either the VISA or SICL address for use in the above rocedure.
- Close Connection Expert.