Flex-on-SFP without ECM
Making a Flex-on-SFP Connection
(Without AXIe Chassis Embedded Controller Module)
This topic shows how to make a Flex-on-SFP connection to an M8194/5/6A and M8199A/B AWG when the AXIe chassis does not include an Embedded Controller (ECM) module. The M8194/5/6A and M8199A/B each have their own Software Front Panel (SFP) application. Keysight's IO Libraries Suite, which includes Command Expert must also be installed. The suite provides supporting libraries for the SFP and is used to confirm LAN addresses.

When the AXIe chassis does not include an Embedded Controller module as identified in the above picture:
- FlexDCA must communicate with the AWG via the AXIe System Module's PCIe or USB connector. If an Embedded Controller module is installed, communication with the AWG via the PCIe or USB cable will fail.
- Soft Front Panel must be installed and running on an external PC where FlexDCA is located.
- Install IO Libraries Suite on external PC. Command Expert is included in the installation.
- Click here to find the test setup that fits your needs.
- Download the SFP from Keysight.com:
- On Keysight's home page, search for M8195A or M8196A product page.
- Click Technical Support.
- Click Drivers, Firmware & Software tab.
- Click M819XA Firmware and Soft Front Panel.
- Click Download.
- Download the IO Libraries Suite:
- On Keysight's home page, search for IO Libraries Suite.
- Click the download link on the IO Libraries Suite page.
- Do the following steps on an external PC that will be used to control the AWG:
- Install the IO Libraries Suite.
- Install the SFP.
- Turn the PC off.
- Connect either a USB or PCIe cable between the external PC and the System Module on the AXIe chassis.
- Connect the SFP:
- Turn on the AWG's AXIe chassis.
- Wait until the Access light on the AXIe chassis's AWG module changes from red to green.
- Turn on the PC.
-
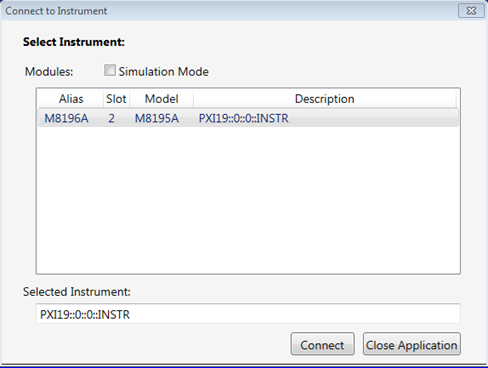
 On the PC's Windows Start menu, click Keysight M8194/5/6A and M8199A/B Soft Front Panel to start the SFP. The Connect to Instrument pane should be displayed.
 - The AWG should be automatically detected and listed in the Connect to Instrument pane as shown in this picture. Select the AWG and click Connect.
- If the SFP could not detect the AWG, turn the AXIe chassis and PC off and repeat the above steps starting with step 6.
- On the PC, click the Windows Start menu and search for "System". Locate and record the PC's Computer name (hostname). This will be needed in the next step.
- Follow these steps to determine the PC's SICL and VISA address strings:
- On the PC's Windows Start menu start Keysight Connection Expert.
- In Connection Expert's Instrument tab, click the + Add button and select LAN Instrument.
- In the Add a LAN device dialog, select the Enter Address tab.
- In the Hostname or IP Address field, enter the hostname (or IP address) that you copied above.
- Select HiSlip and click Test This VISA Address. If the address is verified, click OK. Otherwise, try to verify with Instrument (VXI-11) selected.
- Click the Instruments tab and the Details panel shows the valid VISA and SICL addresses for the PC. Copy the SICL (or VISA) address string for use later in this procedure.
- Perform the following steps to make a Flex-on-AWG connection:
- Start FlexDCA on the PC.
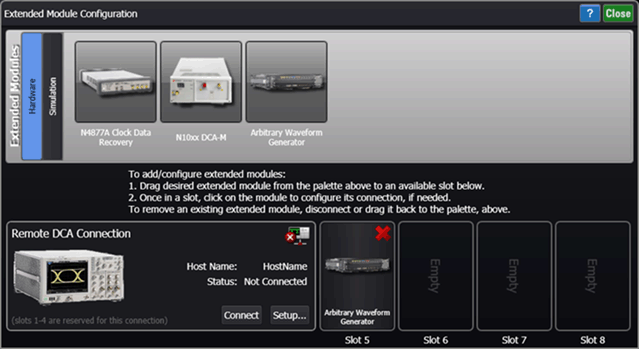
- On FlexDCA, click Setup > Configure Extended Modules.
- In the dialog, click the Hardware tab. Drag the Arbitrary Waveform Generator tile from the tab to an available slot as shown in the following picture. The Arbitrary Waveform Generator Connection Setup dialog opens.
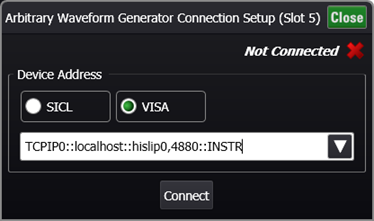
- In the dialog, select to use either a SICL or VISA address for the AWG. Paste the address that you copied in the Keysight Connection Expert into the address field as shown in the following picture. Note in this picture, that
localhosthas been substituted for the hostname. - Click Connect and then Close.
- If you are connecting to a DCA-X, make a Flex-on-Flex connection by dragging the DCA-X tile from the tab to slot 1. The DCA-X must be installed in slots 1 through 4.

If the SFP is already running, click File > Connect to open the Connect to Instrument M8194/5/6A and M8199A/B dialog. In the dialog, if Simulation Mode is selected, unselect simulation and select AWG module in the list. Click Connect.

| SICL Address | VISA Address |
|---|---|
| lan,4880;hislip[WINDOWS-6ISM873]:hislip0 | TCPIP0::WINDOWS-6ISM873::hislip0::INSTR |
| lan,4880;hislip[10.113.25.62]:hislip0 | TCPIP0::10.113.25.62::hislip0::INSTR |
| lan,4880;hislip[localhost]:hislip0 | TCPIP0::localhost::hislip0::INSTR |
| Note: Substitute your PC's hostname (or IP address or localhost) for the blue italicized text in the above strings. | |


When an AWG connection is made, all AWG channels are turned off. When an AWG connection is disconnected, the on/off state of the AWG channels is not changed.
 Notice that you can start the AWG's Soft Front Panel from within the Connection Expert by clicking the Soft Front Panel button.